Why Amazon Category Listing Reports Matter

What we’re learning, published as we learn it.

Ever felt like you're drowning in product listings on Amazon? Trust me, I get it!

Why Amazon Category Listing Reports Matter

Ever felt like you’re drowning in product listings on Amazon? Trust me, I get it! Managing multiple products across different categories can feel like juggling while riding a unicycle. But here’s the game-changer you might be missing: the Amazon Category Listing Report, aka flat file. Let me show you why this hidden gem is about to become your new best friend!

What’s This Category Listing Report Thing, Anyway?

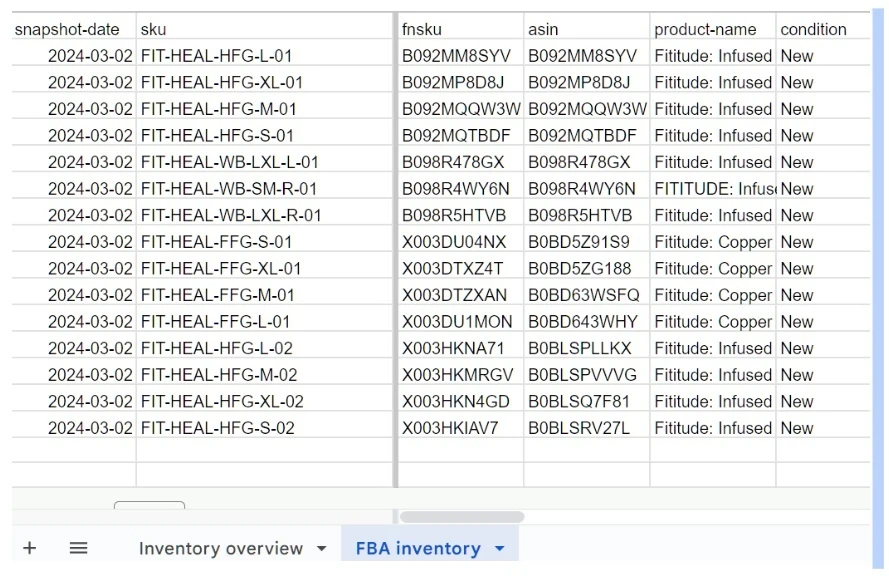
Think of it as your product catalog’s DNA test results! It’s basically a report with all the information that Amazon has in the backend – from your SKUs and ASINs to pricing and category info, title, bullet points and any attribute you can think of. If you’re juggling multiple products, this report will help you keep everything organized and running smoothly.

Why You’ll Love Getting Cozy with These Reports

Here’s what you can do with it:

  • Make bulk updates (bye-bye, endless clicking!)

  • Keep Amazon happy by staying category-compliant

  • Spot trends and opportunities like a pro

  • Save hours of precious time (hello, work-life balance!)

The Real Deal: Impact on Your Business

You know what’s not fun? Spending your Sunday night manually updating 500 product prices because your competitor just had a price drop. Been there, done that! But with Category Listing Reports, you can knock this out in minutes. Imagine what you could do with all that extra time – maybe finally take that weekend off?

A Step-by-Step Guide to Accessing and Managing Your Amazon Category Listing Report

Now that you understand why Category Listing Reports are crucial for your Amazon business, let’s walk through exactly how you can access, download, and efficiently manage these reports. Whether you’re a new seller or looking to streamline your existing processes, this guide will help you master the technical aspects of working with Category Listing Reports.

How to Access Your Category Listing Report

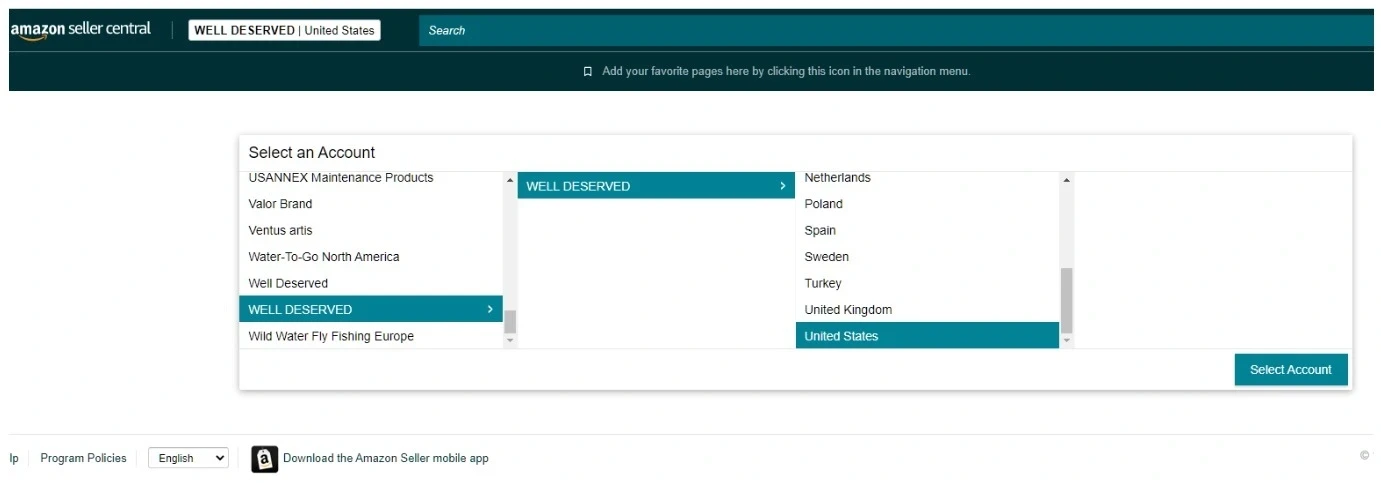
Your first step is accessing the report through Seller Central. Here’s how you can do it:

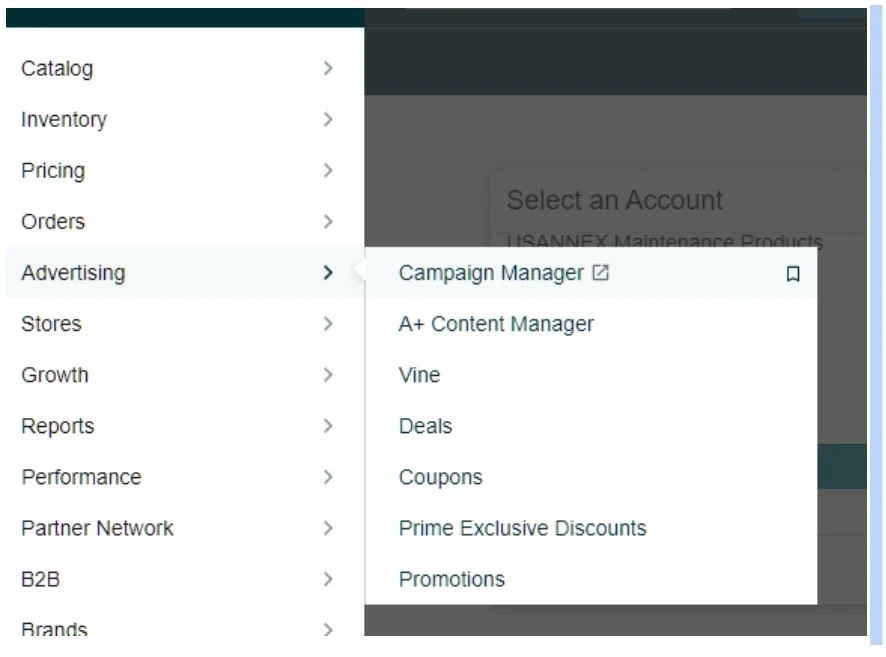
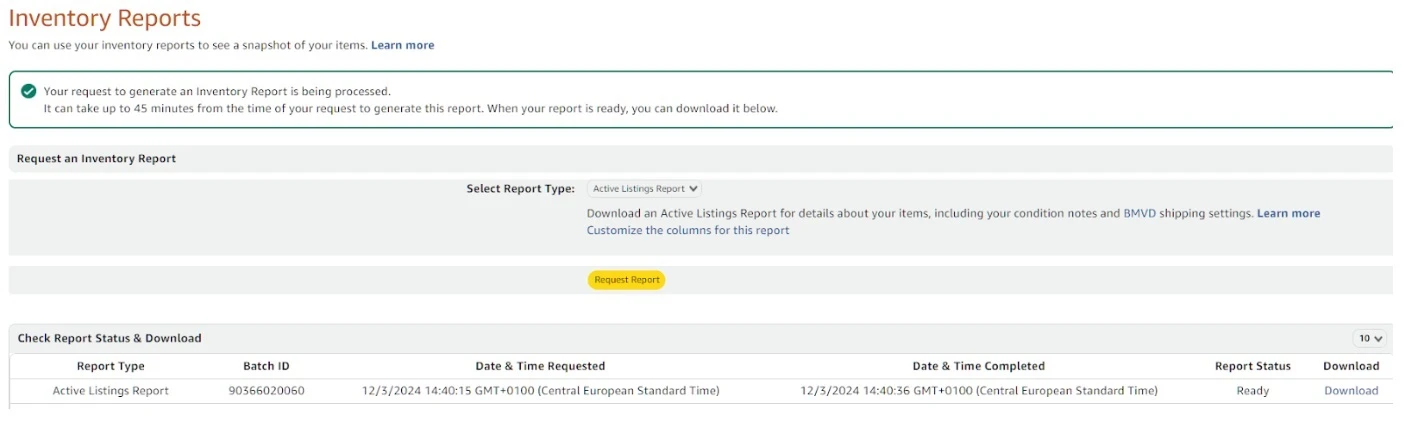
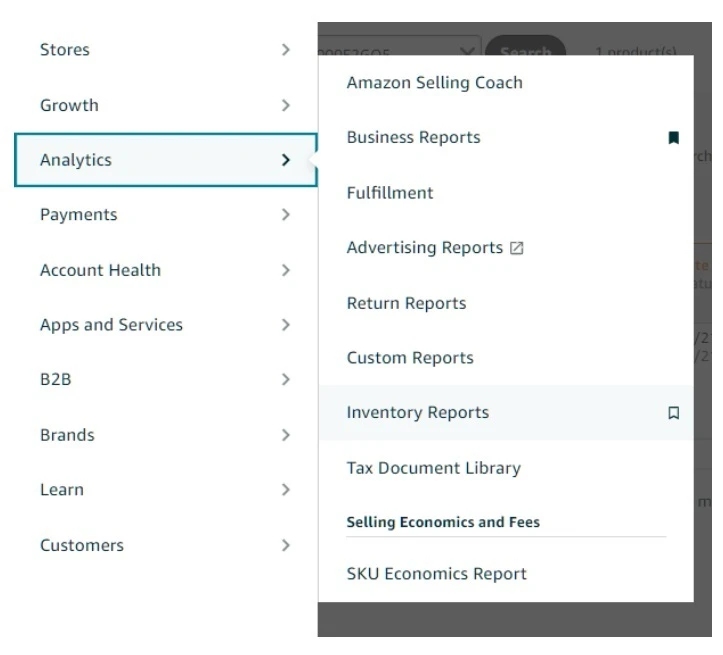
1. Navigate to Your Reports Start by logging into your Seller Central account and go to the Analytics section. From there, look for Inventory Reports in the menu. This is where you’ll find various report options for managing your catalog.

‍

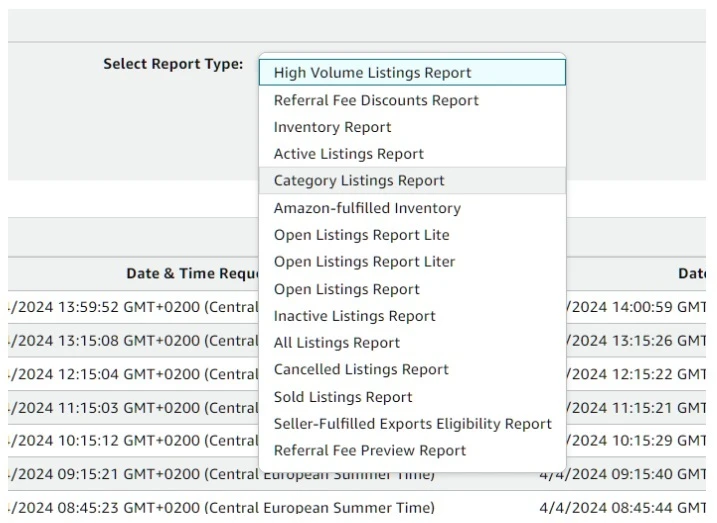
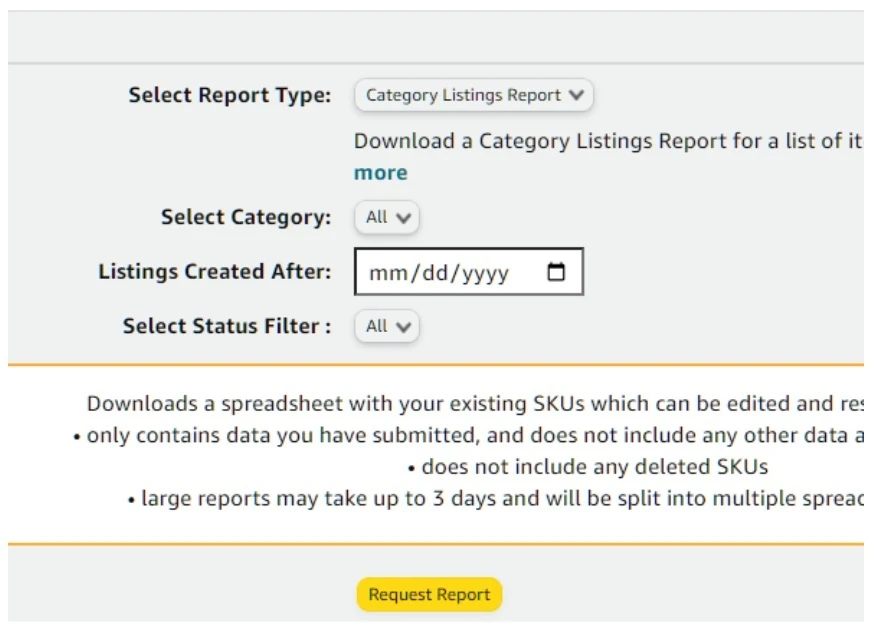
2. Request Your Report In the dropdown menu, locate and select “Category Listings Report.” Once selected, click the yellow “Request Report” button to initiate the download process. Amazon will then begin generating your report, which typically takes a few minutes to complete.

‍
What If You Don’t See the Category Listings Report Option?

Don’t worry if you can’t find the Category Listings Report in your dropdown menu – this is a common issue that’s easily resolved. Here’s what you need to do:

  1. Go to the Help section in Seller Central

  2. Select “Get help and resources”

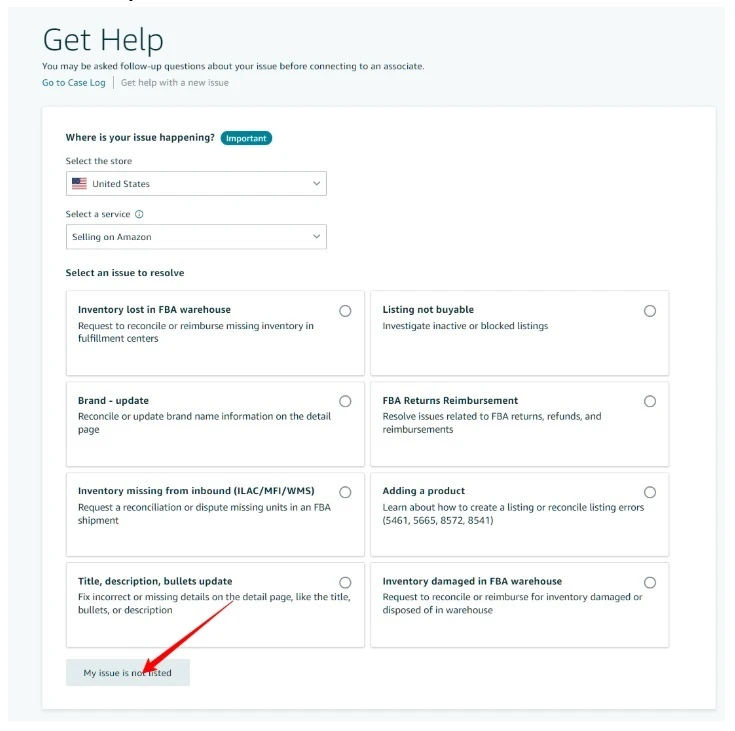
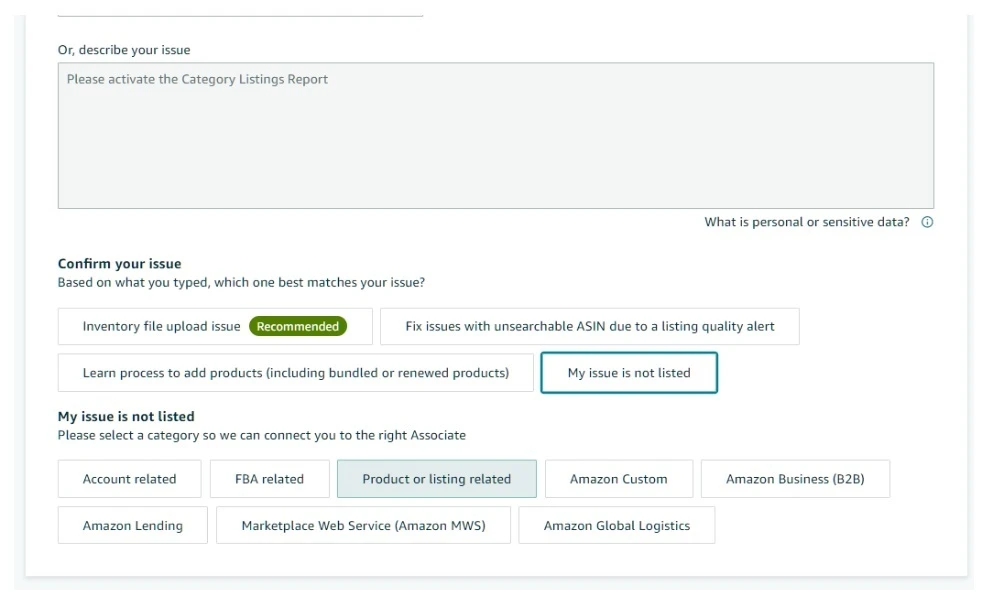
  3. Scroll to the bottom and click “My issue is not listed”

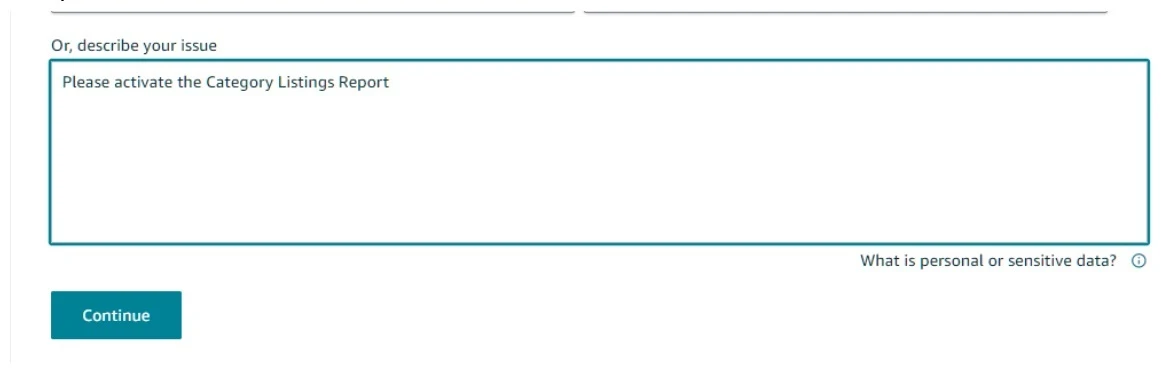
4. In the Description box, simply request the activation of the Category Listings Report

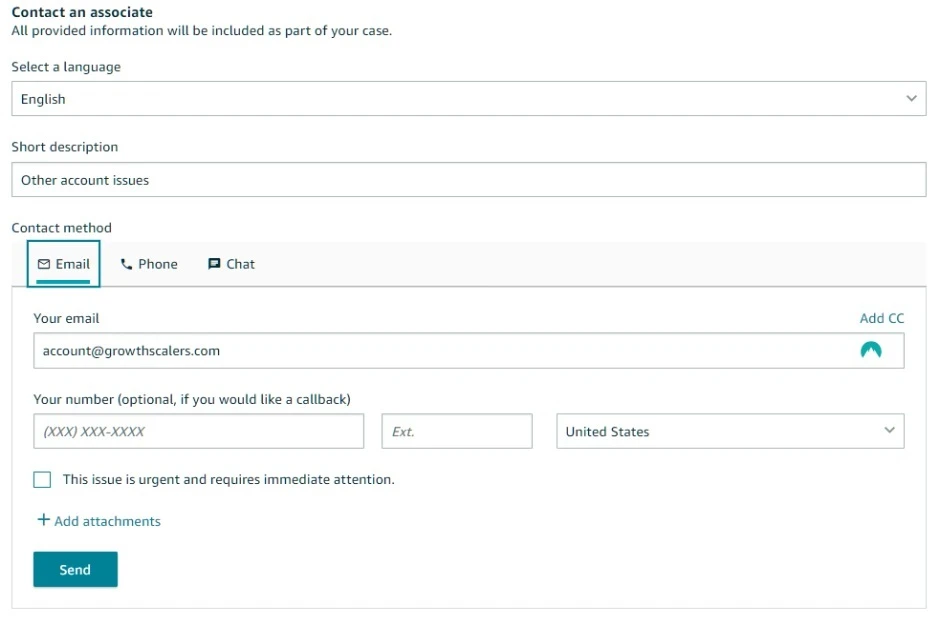
5. Follow the prompts: Click “Continue,” then “My issue is not listed” again, followed by “Product or Listing”

6. Choose email as your preferred contact method and send your request

Amazon typically processes these requests within 24 hours, after which you should see the Category Listings Report option in your reports dropdown menu.

Organizing Your Category Listing Report

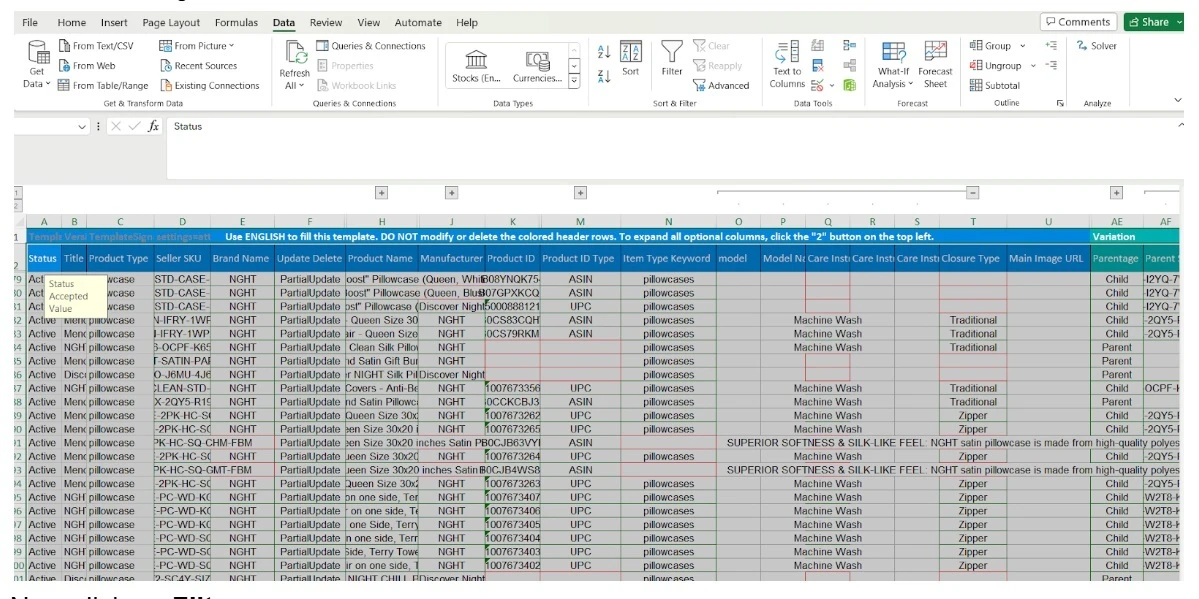
Once you’ve downloaded your report, you’ll notice it’s quite extensive and might seem overwhelming at first. Here’s how to organize it effectively:

Quick Sort Method

To make your data more manageable:

  1. Click on Cell A2 in your spreadsheet

  2. Press Ctrl + Shift + Arrow Down to select all data in that column

  3. While holding Ctrl + Shift, press Arrow Right to select the entire dataset

  4. Click on the Filter option in your spreadsheet


Now you have a filtered view of your entire catalog that you can sort by any column, making it much easier to analyze specific aspects of your listings.

Advanced Organization Tips

For more complex management needs, consider creating different views of your data:

  • Sort by Parent SKU to group all variations together

  • Filter by Seller SKU to focus on specific products

  • Use the filtered view to identify missing information or inconsistencies across listings

Final Step: Ungrouping Columns

To ensure you have full access to all your data:

  1. Select all cells using Ctrl+A

  2. Press Alt, then A (to access the Data tab)

  3. Press J to ungroup all columns

This final step ensures you can view and edit all aspects of your listings without any hidden or grouped data getting in the way.

Before You Dive In…

Here are some golden nuggets of wisdom:

  • Always, ALWAYS save a backup (future you will thank me later!)

  • Use Excel’s freeze panes feature (trust me, it’s a game-changer)

  • Create templates for stuff you do often

  • Make downloading reports a regular habit (like your morning coffee)

Need a Hand?

Hey, we at Growth Scalers know this Amazon selling business can get pretty complex. If you’re feeling overwhelmed or just want to make sure you’re making the most of these reports, we’re here to help! We’ve helped sellers turn their Amazon catalog management from chaos to clockwork.

Remember, mastering your Category Listing Reports isn’t just about learning a new tool – it’s about transforming how you run your Amazon business. Ready to take control of your catalog? Let’s do this! Contact us now!

Why Amazon Category Listing Reports Matter

Tue Feb 25 2025 20:26:20 GMT+0000 (Coordinated Universal Time)

Struggling to streamline Amazon product listings? Discover how Category Listing Reports can transform catalog chaos into effortless management. Dive in now!

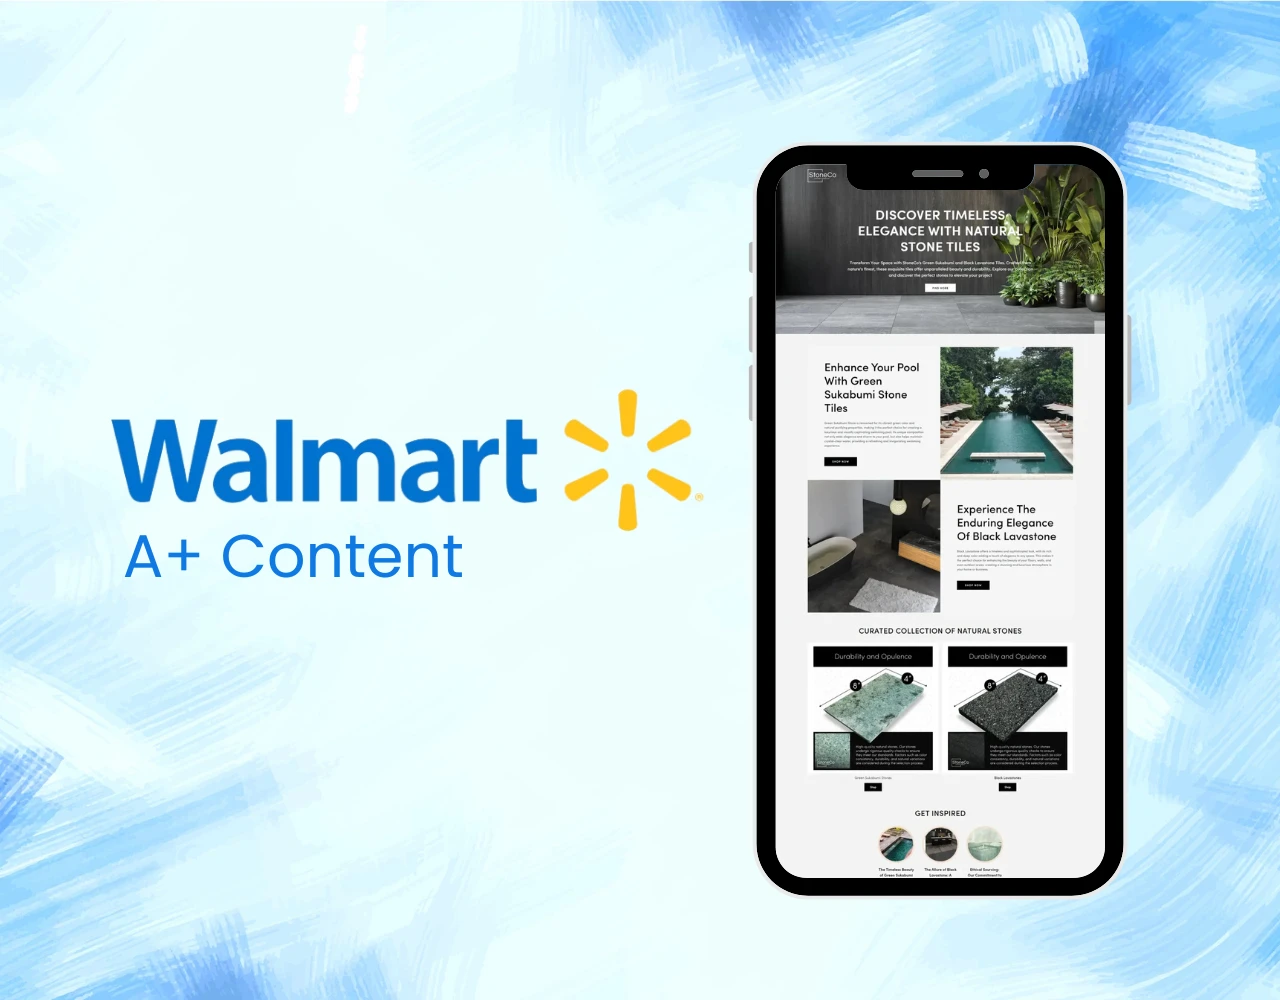
Walmart Rich Media an A+ Content for your Walmart listing

Many sellers know how to create A+ Content on Amazon, but when it comes to Walmart, things work a little differently—and they’re evolving rapidly. If you want to stay ahead of your competitors, you need to leverage Walmart Rich Media and A+ Content strategically.

What’s This Rich Media All About?

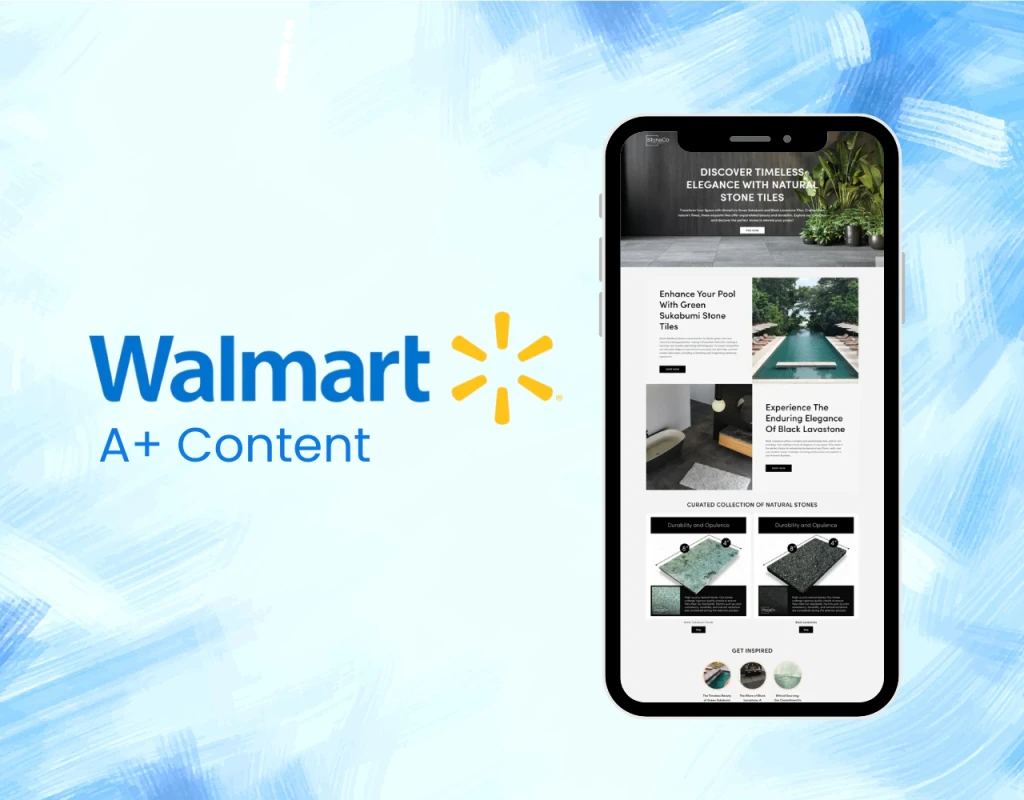
Think of Rich Media as your custom landing page for a product—it’s your chance to visually captivate shoppers and increase conversions. Instead of relying solely on standard text descriptions, you can add videos, 360-degree images, feature sets, and brand storytelling that make customers say:

“Wow, I need this in my life!”

Why Should You Care?

Better Conversion Rates

Customers buy with their eyes—if they can see, explore, and understand your product clearly, they’re much more likely to click “Buy Now.”

Stronger Brand Storytelling

Your products aren’t just objects—they solve problems. Rich Media helps you tell a compelling brand story that connects with customers on an emotional level.

Fewer Returns

When customers know exactly what they’re buying, they’re less likely to return the product. No more mismatched expectations—just happy customers.

How to Add Rich Media & A+ Content on Walmart

Walmart recently made it easier than ever to enroll in Walmart’s Brand Portal and gain access to Rich Media. Here’s your step-by-step guide to setting it up:

Step 1: Ensure You’re Eligible for Walmart’s Brand Portal

Before you can upload Rich Media & A+ Content, you must register your brand with Walmart’s Brand Portal. You’ll need:

✔️ A registered trademark (USPTO or other valid trademark authority)
✔️ An active Walmart Seller Account

Tip: If you don’t have a trademark yet, apply for one first—it’s required to access Walmart’s A+ Content features.

Step 2: Register for Walmart’s Brand Portal

1️⃣ Go to Walmart Brand Portal
2️⃣ Log in with your Walmart Seller Center credentials
3️⃣ Submit your brand application
4️⃣ Wait for Walmart’s approval (typically takes a few days)

Once approved, you’re officially registered as a brand owner at Walmart!

Step 3: Uploading Rich Media & A+ Content

Now that your Brand Portal access is active, it’s time to enhance your product listings with high-quality Rich Media.

A. Accessing Walmart’s Media Library

1️⃣ Log into Walmart Seller Center
2️⃣ Go to your Catalog
3️⃣ Open the Media Library (only available for registered brand owners)

Pro Tip: If you don’t see the Media Library, double-check your Brand Portal approval status.

B. Adding Rich Media Elements

1️⃣ Click on “Add Media”
2️⃣ Select the type of media to upload:

  • 360-Spin Images

  • Product Videos

  • Enhanced Feature Sets

  • Comparison Charts

  • Brand Story Sections

3️⃣ Ensure your media meets Walmart’s content guidelines before uploading

Pro Tip: Videos under 45 seconds tend to perform best for product listings!

C. Submitting & Publishing Rich Media

1️⃣ Click “Submit”
2️⃣ Walmart will review your content (this may take 24-48 hours)
3️⃣ Once approved, your Rich Media will be live on your product listing!

Alternative: Using Third-Party Providers for Rich Media

If you want more customization, Walmart allows sellers to use third-party platforms like:
🔹 1WorldSync
🔹 Nielsen Brandbank
🔹 Salsify

These platforms provide advanced content hosting for below-the-fold media, 360-degree views, and custom layouts.

Should you use a third-party tool? If you want highly customized layouts or extra flexibility, third-party platforms can be a great choice.

Pro Tips for Maximizing Walmart Rich Media

Want your Rich Media to stand out? Here’s what we’ve learned from real-world experience:

✅ Use High-Quality Images & Videos → Blurry visuals don’t convert! Ensure crisp, clean, and high-resolution assets.
✅ Tell a Story, Not Just Features → Customers connect with why your product exists, not just its specs.
✅ Keep Content Fresh → Update your Rich Media seasonally to reflect new trends and promotions.
✅ Test & Iterate → Monitor engagement and conversions to see what works best—and tweak accordingly.

Need Help Setting Up Walmart Rich Media?

🚀 Feeling overwhelmed by the technical steps? That’s where we come in! At Growth Scalers, we handle it all—so you can focus on growing your business.

What We Do for You:

✔️ Register your brand in Walmart’s Brand Portal
✔️ Design & upload stunning Rich Media
✔️ Optimize your content for better conversions
✔️ Track performance & make improvements

Ready to Supercharge Your Walmart Listings?

Contact us today, and let’s make your products shine!

Final Thoughts: The Walmart Rich Media Advantage

Rich Media isn’t just another extra feature—it’s the key to making your listings stand out in Walmart’s crowded marketplace. If you want to:

🔹 Increase sales & conversions
🔹 Build a stronger brand presence
🔹 Reduce customer returns

… then now is the time to invest in Rich Media & A+ Content!

Let’s take your Walmart listings from average to outstanding!

Disclaimer: Walmart’s Rich Media guidelines may change periodically. Always verify the latest requirements and best practices on the Walmart Seller Help Center.‍

Walmart Rich Media an A+ Content for your Walmart listing

Sat Feb 08 2025 14:51:33 GMT+0000 (Coordinated Universal Time)

Discover how to elevate your Walmart listing with Rich Media, crafting a compelling visual narrative that stands out and boosts conversions effortlessly.

Unlocking eCommerce Success

In the fast-paced world of eCommerce, understanding how customers find your products is more than just a marketing strategy—it’s your competitive edge. Search query performance will allow you to understand what keywords convert and what keywords don’t convert while searching for your product. You can use this insight to improve your listing or to add negative keywords to lower ad spend and improve performance. This strategy has been proven successful on both Amazon and Google.‍

Generating Amazon Sponsored Ads Search Query Performance Report

Step-by-Step Process:

1. Account Access Preparation

  • Log into your Amazon Advertising account

  • Ensure you have the necessary permissions to access reporting features

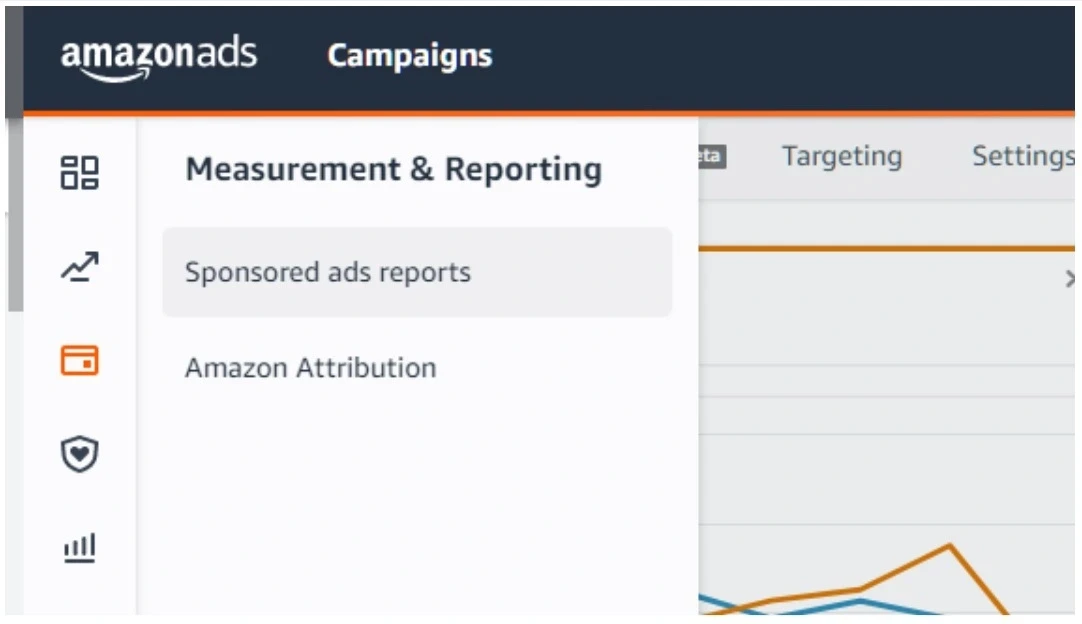
‍2. Navigating to the Reporting Section

  • Click on Advertising/Campaign Manager

  • Select “Measurement and Reporting”

  • Choose “Sponsored Ads Reports”

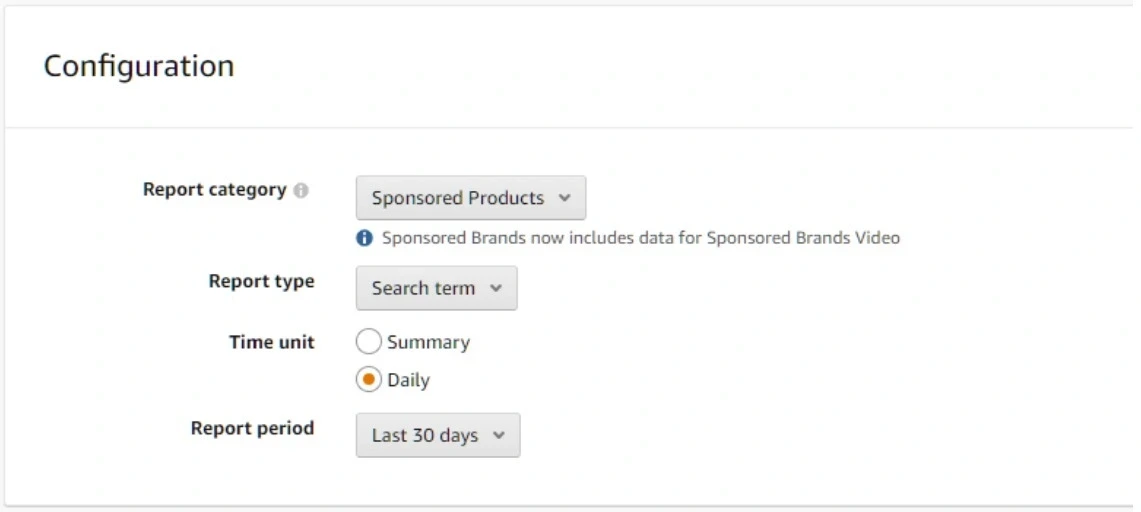
3. Report Configuration When creating a new report, pay attention to these critical settings:

  • Report Category: Select “Sponsored Products”

  • Report Type: Choose “Search Term”

  • Time Unit: Set to “Daily”

  • ‍Time Range: Select the specific period you want to analyze (e.g., last 30 days, quarter-to-date)

‍4. Report Generation

  • Click “Run Report”

  • Download the generated report for detailed analysis

Generating Google Ads Search Query Performance Report

Detailed Extraction Process:

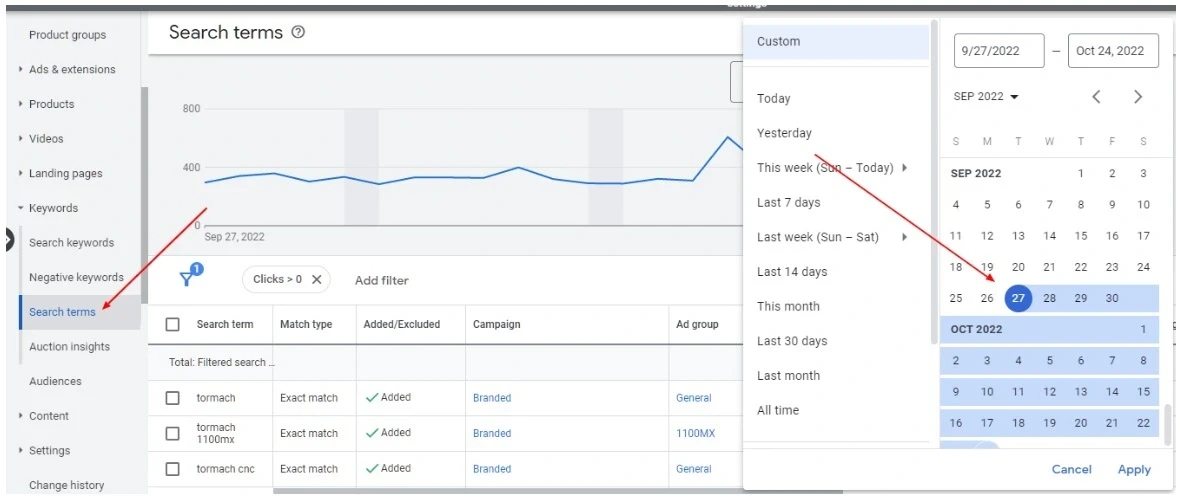
1. Accessing Search Terms

  • Log into your Google Ads account

  • Navigate to the left-side menu

  • Select “Keywords”

  • Click on the “Search Terms” tab

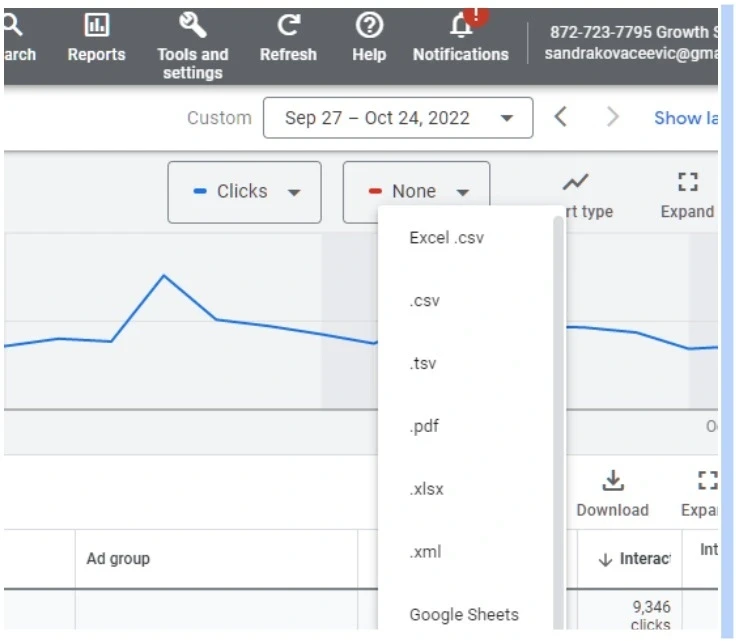
2. Report Preparation

  • Set your desired time range

  • Download the report in CSV format

‍3. Google Sheets Analysis

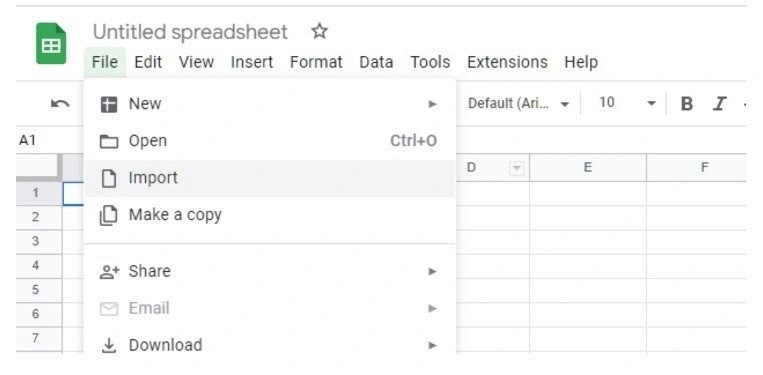
  1. Open Google Sheet

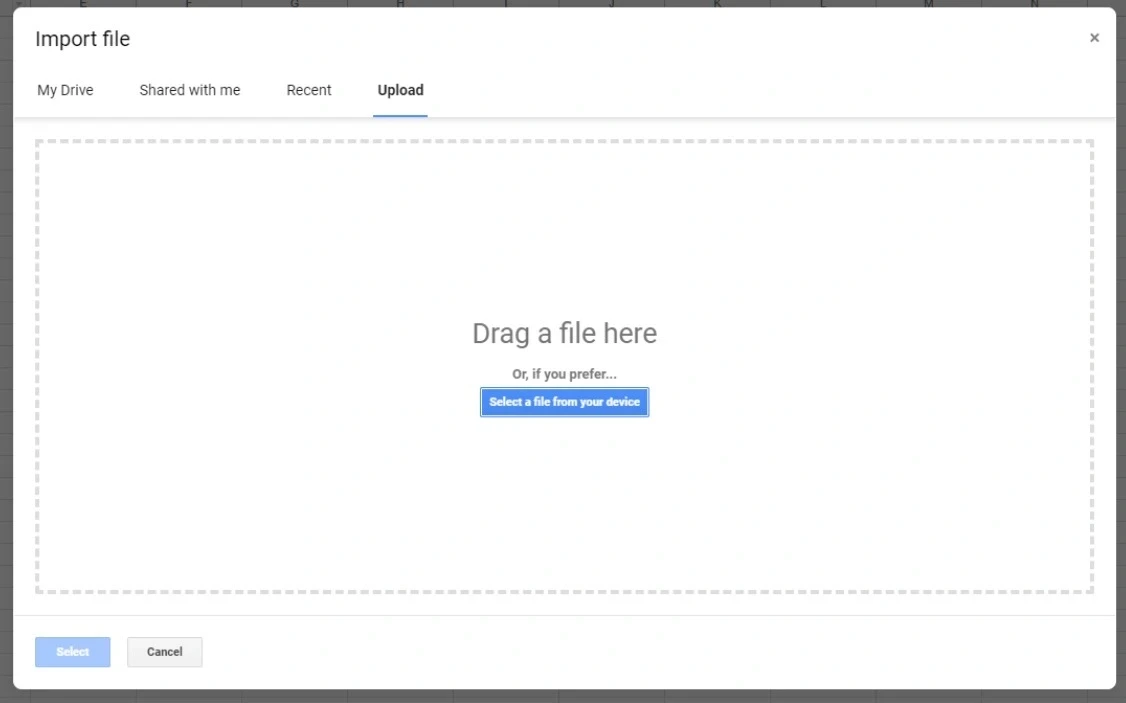
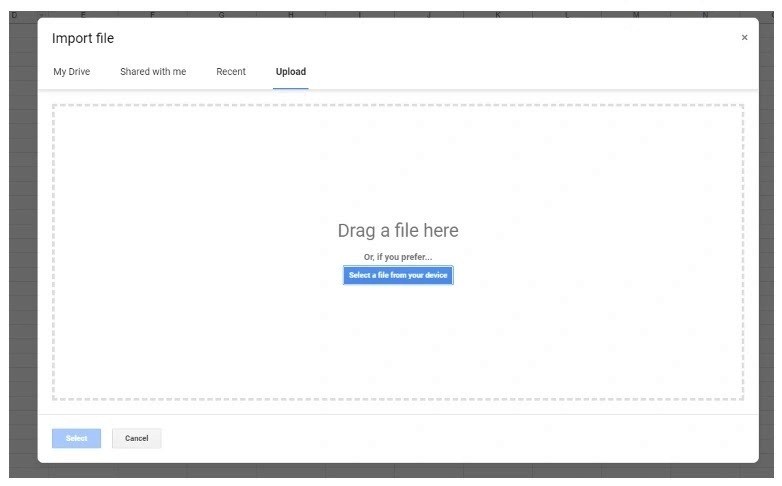
  2. Import the downloaded CSV:

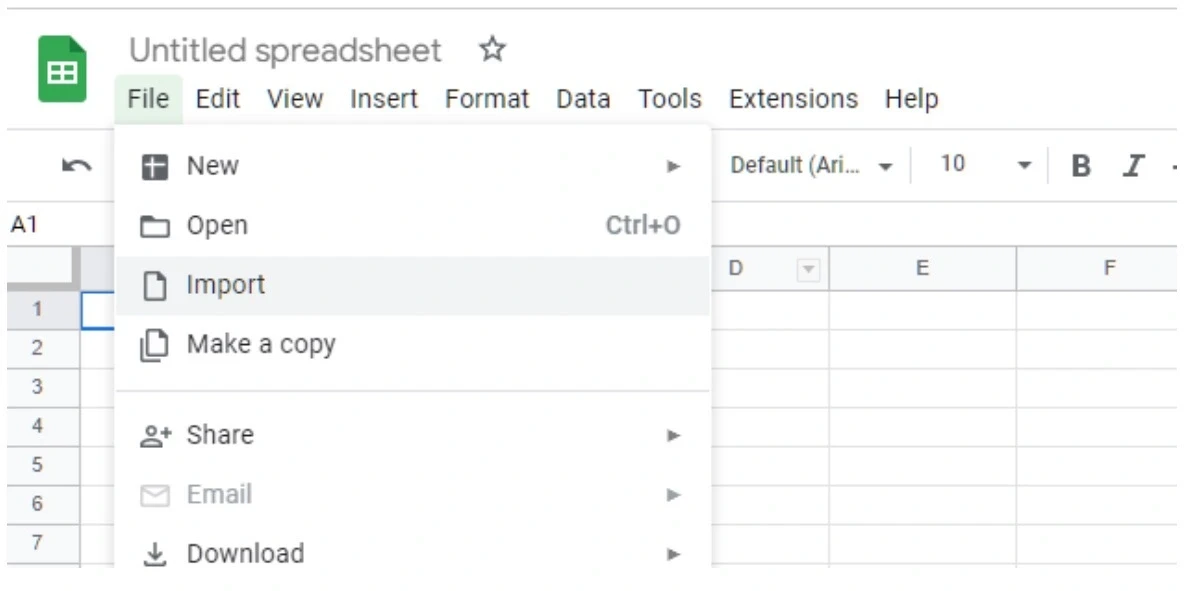
    • Go to File > Import

    • Upload/drag-and-drop your CSV file

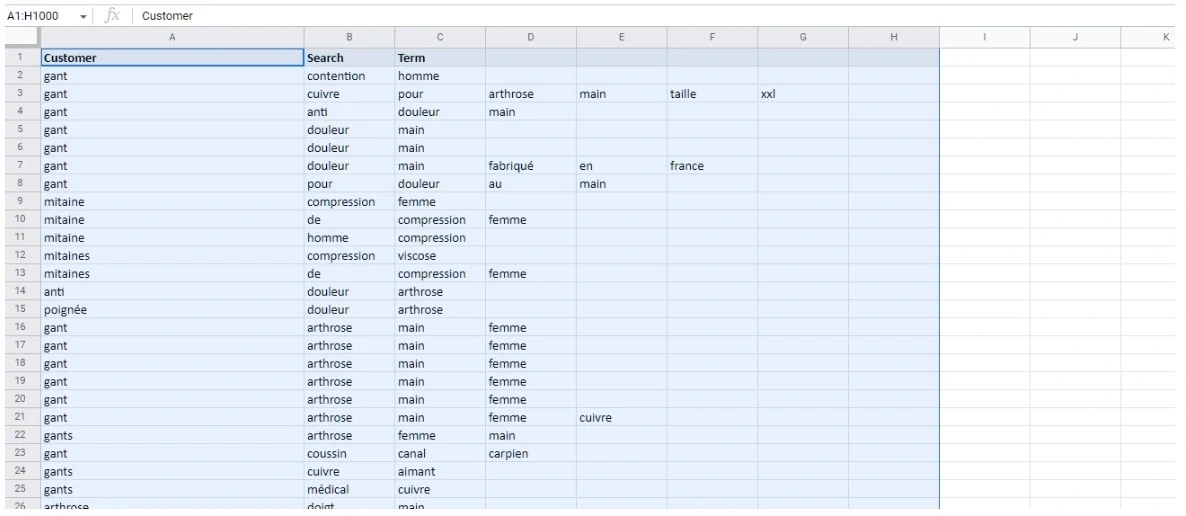
4, Keyword Extraction Technique‍

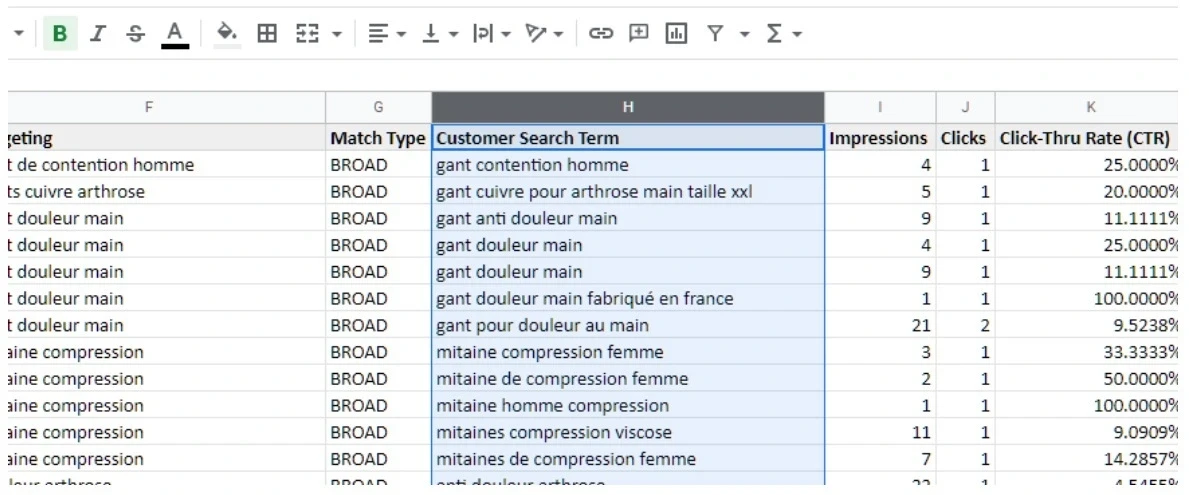
  • Select the “Search Term” column

  • Copy the entire column

  • Paste into column A of a new sheet

‍5. Advanced Keyword Breakdown

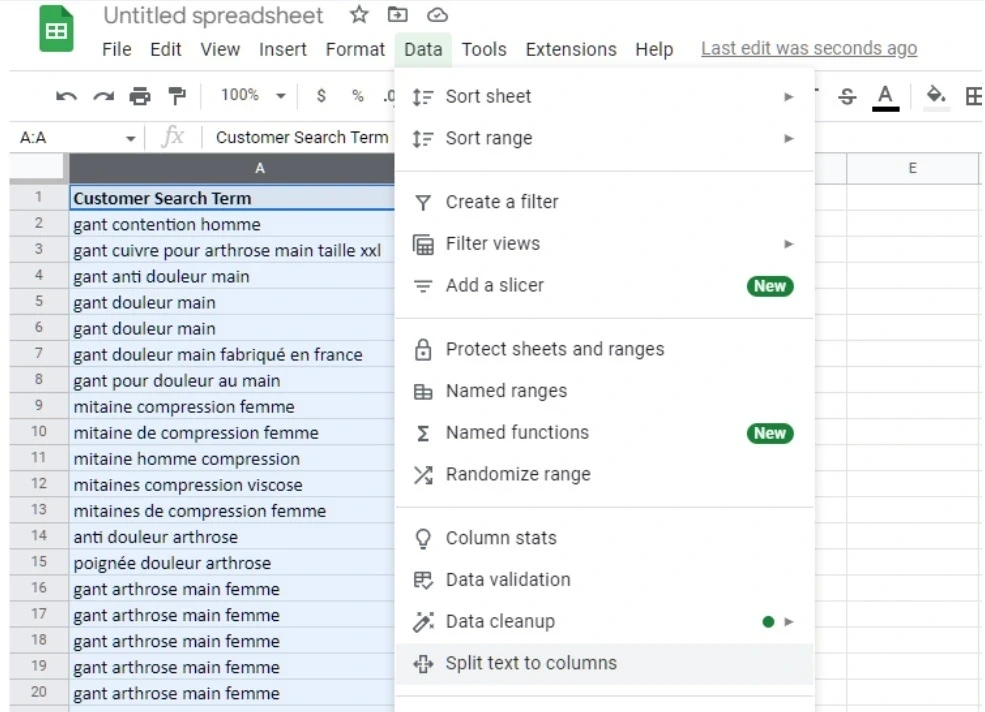
  • Select the column

  • Navigate to Data > Split text to columns

  • Choose “Space” as the separator

  • This breaks multi-word search terms into individual words

‍

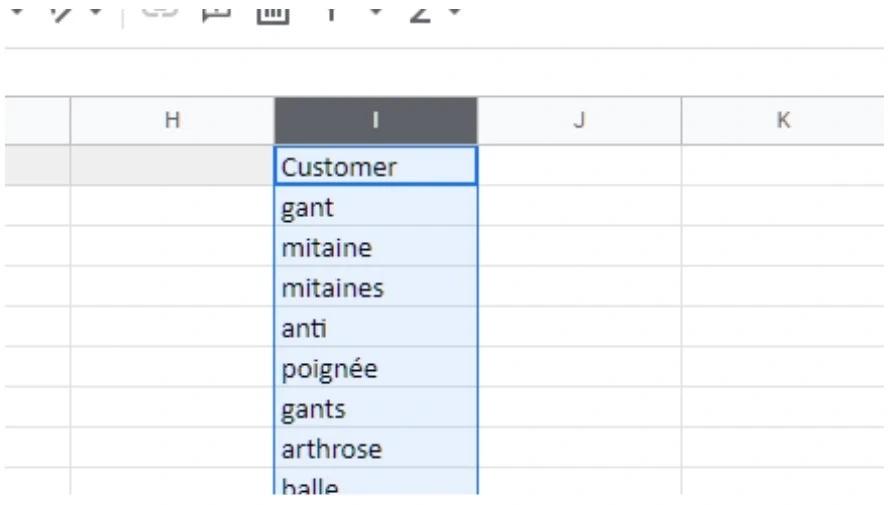
6. Unique Keyword Extraction

  • In the first non-highlighted cell, use this powerful formula:
    Copy
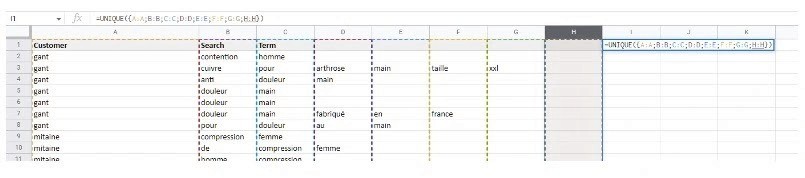
    =UNIQUE({A:A;B:B;C:C;D:D;E:E…})

  • Note: Adjust column references based on your specific report’s word count

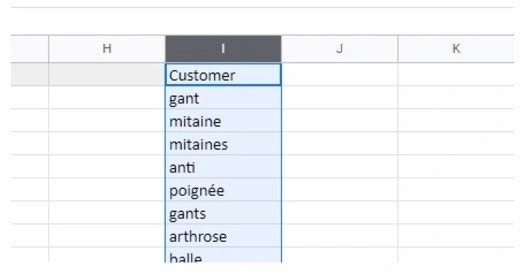
‍This formula will extract the unique words from all the columns and put it into one single column.

‍Pro Tips from Growth Scalers

🔍 Pro Tip: Always maintain a consistent approach to these reports. Set a regular schedule (monthly) to track changes and trends. Platform like Google or Amazon often generate new keyword that might not convert and waste your ad spend.

What to Look For:

When analyzing these reports, there are several key insights you should pay attention to. Look for unexpected search terms that are driving conversions—they could reveal hidden opportunities you haven’t considered. Also, identify search terms with low ROAS; these may signal a mismatch between customer intent and your ads. Lastly, make a list of top keywords and add any new suggested keywords with those word in it.

Need Expert Guidance?

At Growth Scalers, we specialize in transforming raw data into actionable growth strategies. If this process seems overwhelming, our platform experts are ready to help you navigate and maximize your search query performance.

Ready to unlock your eCommerce potential? Let’s talk strategy!

Unlocking eCommerce Success

Mon Jan 06 2025 21:10:42 GMT+0000 (Coordinated Universal Time)

Understanding search query performance is crucial for eCommerce success, offering insights to optimize listings and reduce ad spend effectively.

Walmart Rich Media an A+ Content for your Walmart listing ›

Understanding Amazon Brand Ungating

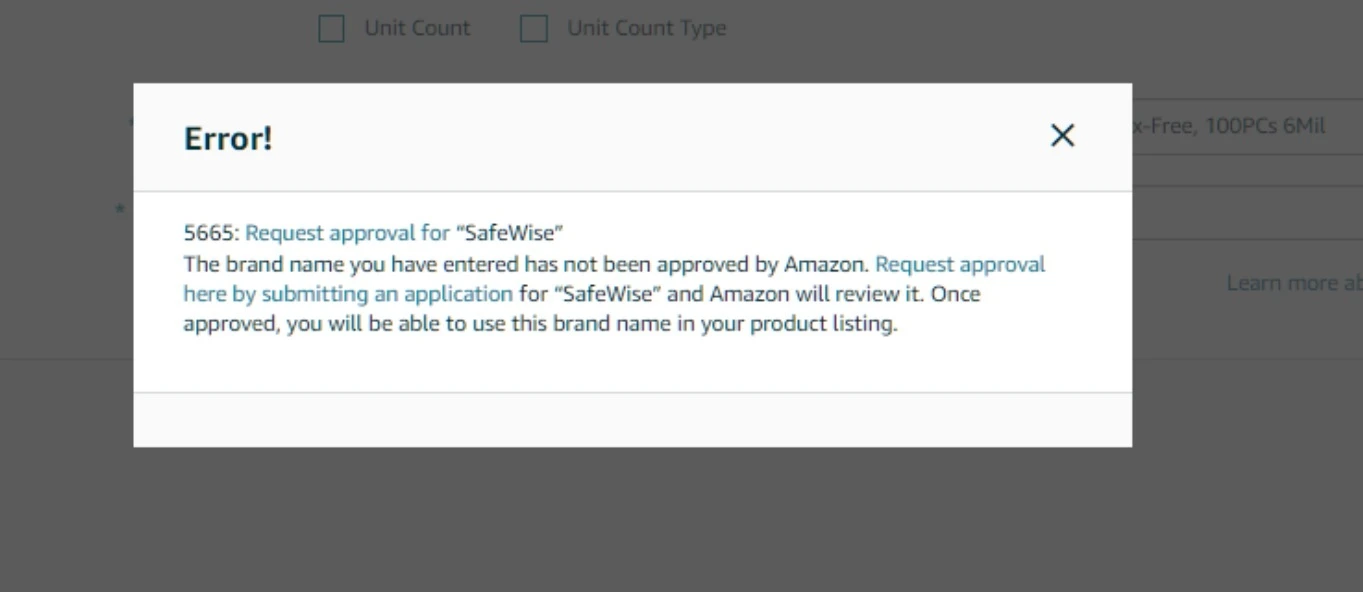
Are you struggling with Error 5665 while trying to list products on Amazon? You’re not alone. As an eCommerce seller, encountering brand restrictions on Amazon can feel like hitting a brick wall. But don’t worry – we’re here to guide you through the brand ungating process and help you understand why it’s crucial for your business success.

Why Brand Ungating Matters for Your Amazon Business

Amazon’s brand gating policy is a powerful protection mechanism designed to maintain marketplace integrity and protect both brands and customers from counterfeit products. When you encounter Error 5665, it’s Amazon’s way of saying, “Hold on – you need special permission to sell this brand.”

Think of brand gating as Amazon’s bouncer, carefully checking credentials before allowing sellers to list certain branded products. This protection is particularly important because:

  • It helps maintain the authenticity of products sold on Amazon

  • It protects legitimate sellers like you from competing with counterfeit goods

  • It builds customer trust in both the platform and your business

  • It ensures brand owners maintain control over their product distribution

The Real Impact on Your Business

Without proper brand ungating, you might find yourself unable to list products from specific brands, potentially limiting your business growth. This is especially crucial if these brands are central to your product strategy. The good news? The ungating process, while detailed, is completely manageable with the right approach and understanding.

When Do You Need Brand Ungating?

You’ll typically encounter this requirement in two common scenarios:

  1. When you’re trying to list a product from a gated brand for the first time

  2. When you’re expanding your product catalog to include new brands that are protected by Amazon’s gating policy

The key indicator that you need to go through the ungating process is receiving Error 5665 during your listing creation attempt. This error is essentially Amazon’s way of saying you need to provide additional verification before proceeding with your listing.

Your Step-by-Step Guide to Amazon Brand Ungating

Let’s break down the process into manageable steps that you can follow to successfully ungate a brand when you encounter Error 5665.

‍Step 1: Brand Name Verification

Before diving into the application process, you need to pay careful attention to the brand name spelling. This might seem trivial, but it’s actually crucial. For example, a brand like “SafeWise” might appear in different formats:

  • SafeWise

  • Safe Wise

  • SAFEWISE

The exact spelling and format matter more than you might think, so double-check this before proceeding.

Step 2: Preparing Your Documentation

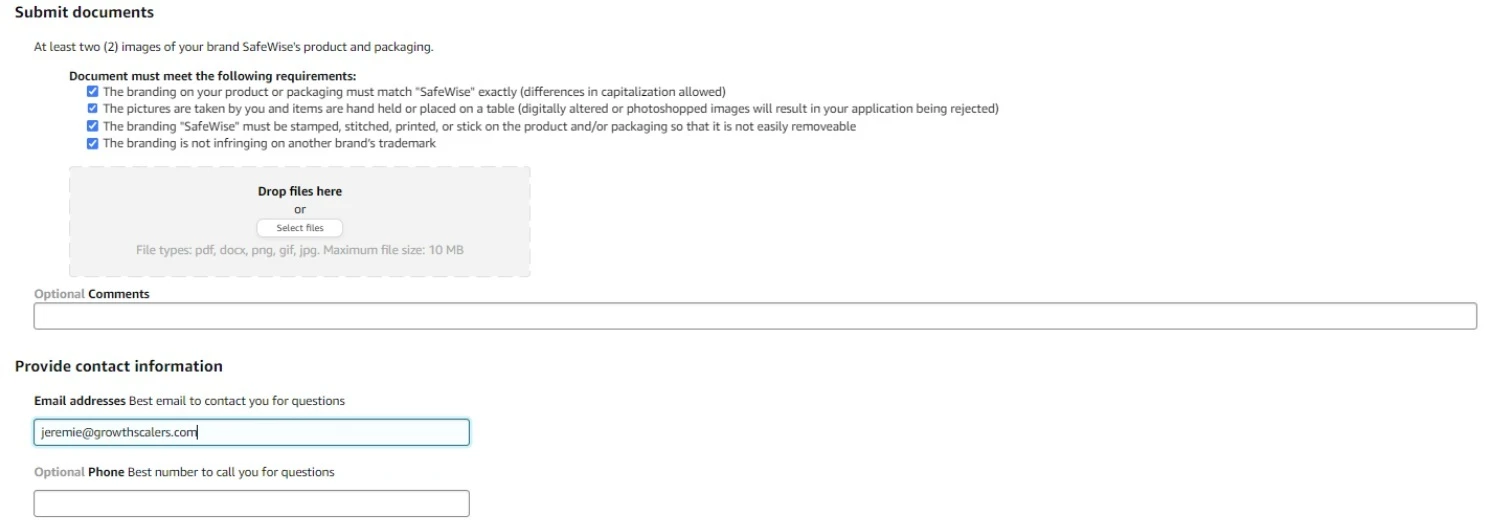
When you encounter Error 5665, you’ll need to gather specific photographic evidence of your products. Here’s what Amazon requires:

You’ll need at least two (2) clear images showing your product and its packaging. But not just any photos will do. Here’s what you need to keep in mind:

  • Your photos must show the brand name exactly as it appears in your application

  • Take authentic photos of the actual products – Amazon wants to see them either held in hand or placed on a table

  • Skip the Photoshop – digitally altered images are a fast track to rejection

  • The brand name must be permanently affixed to the product or packaging (think stamped, stitched, or printed)

  • Ensure the branding doesn’t infringe on any other trademark

Step 3: Submitting Your Ungating Request

Once you have your documentation ready, here’s how to submit your request:

1. Click the “Request Approval” button when you encounter Error 5665
2. Navigate to Catalog > View Selling Application to find your draft


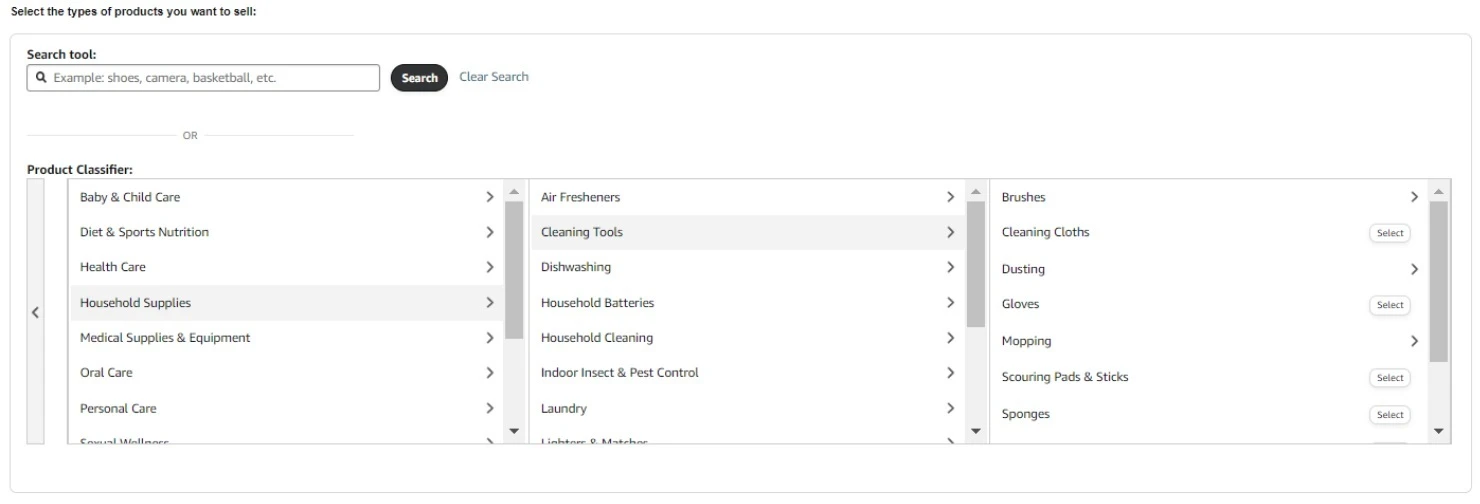
3. Select the appropriate browse node for your product category

‍4. Upload your prepared photos

‍5. Carefully review the compliance requirements checklist

6. Submit your completed application

Pro Tips for Success

  • Always take clear, well-lit photos that clearly show the branding

  • Double-check all requirements before submitting to avoid unnecessary rejections

  • Keep your original photos handy in case you need to provide additional documentation

  • Remember that patience is key – the approval process can take some time

Need Expert Help?

Navigating Amazon’s brand ungating process can be complex, and mistakes can cost you valuable time and opportunities. At Growth Scalers, our team of Amazon experts handles these procedures frequently. We understand the nuances of brand ungating across different categories and can help streamline the process for your business.

Whether you’re dealing with Error 5665 or need comprehensive Amazon account management, our dedicated platform experts are here to help you navigate the increasingly complex eCommerce landscape. Want to ensure your brand ungating process goes smoothly? Reach out to our team today.

Remember, successful brand ungating isn’t just about following steps – it’s about understanding the process and getting it right the first time. With the right approach and attention to detail, you can overcome Error 5665 and expand your Amazon product portfolio effectively.

Understanding Amazon Brand Ungating

Mon Jan 06 2025 21:44:48 GMT+0000 (Coordinated Universal Time)

Struggling with brand restrictions on Amazon? Learn the crucial steps to unraveling the brand ungating process and ensure your business success today.

Transform Your Amazon PPC Game: Let’s Talk About Scalomatic’s Magic

Managing Amazon PPC campaign is a neverending task. But guess what? I’ve got something exciting to share that might just change your PPC game forever!

Meet The Best PPC Management Softwarew we Have tried: Scalomatic

You know that feeling when you find something that makes your life SO much easier? That’s exactly what Scalomatic does for your Amazon advertising! Think of it as having a super-smart ad expert working for you 24/7 (except this one never needs coffee breaks!).

What Makes Scalomatic Your PPC Superhero?

Real-Time Magic

(No More Manual Madness!)

Remember those late nights adjusting bids? Say goodbye to that! Scalomatic keeps an eye on your campaigns round the clock, tweaking those bids just right. While you’re sleeping, it’s making sure your ad spend is working as hard as you do!

Your ACoS Guardian Angel

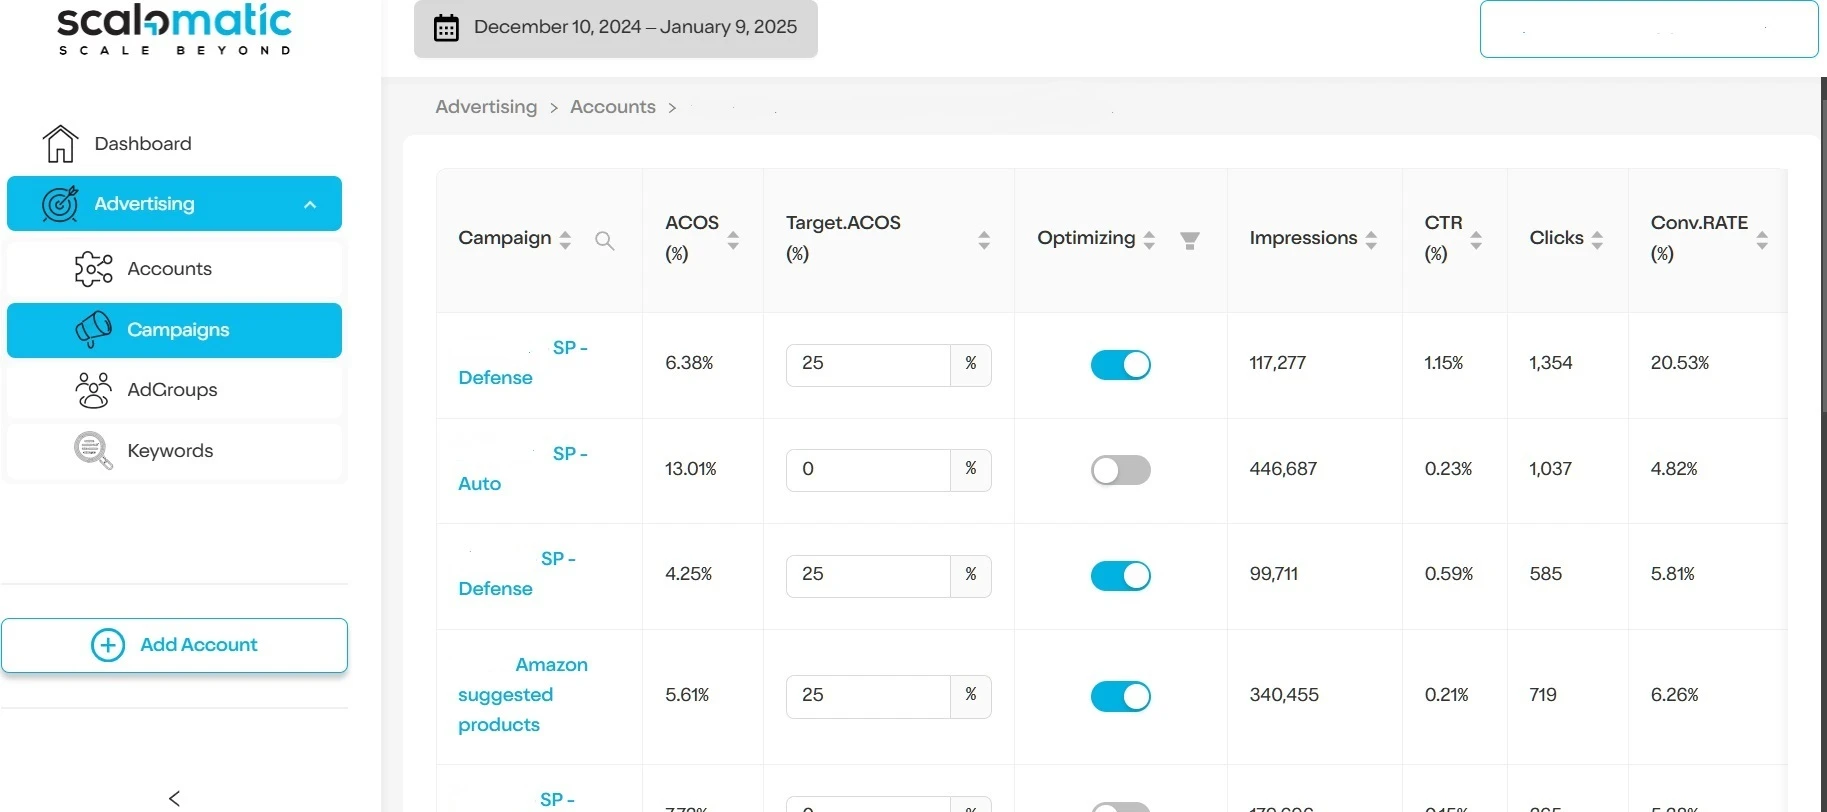
Worried about your Advertising Cost of Sale spiraling out of control? (We’ve all been there!) Here’s the cool part: you just tell Scalomatic your target ACoS, and it works its magic to keep your campaigns within those boundaries. It’s like having a financial advisor specifically for your Amazon ads!

Free Dashboard? Yes, Please!

Who doesn’t love free stuff that actually helps? Scalomatic’s dashboard gives you a crystal-clear view of how your Amazon account is performing. No more digging through multiple reports – everything you need is right there in front of you.‍

‍

But What About the Investment?

I know what you’re thinking – “This sounds great, but what’s the catch?” Here’s the deal: Scalomatic offers different plans to fit your business size and needs. And the best part? You can try it out for free! It’s like test-driving a luxury car before making the decision.

Ready to Give Your PPC Campaigns a Boost?

Look, running Amazon PPC campaigns doesn’t have to feel like solving a Rubik’s cube blindfolded. With Scalomatic, you’re getting a partner who works tirelessly to optimize your campaigns while you focus on growing other aspects of your business.

Take the first step towards automated Amazon advertising success – jump over to Scalomatic’s website and start your free trial today! Don’t let manual PPC management hold your business back any longer. Join the growing community of Amazon sellers who are already saving time and optimizing their ad spend with Scalomatic’s AI-powered automation!

The Bottom Line

Remember when we said managing Amazon ads feels like a full-time job? Well, now you’ve got a super-smart assistant ready to take that workload off your shoulders. No more PPC headaches, just better results!

Ready to make your Amazon advertising journey a whole lot easier? Give Scalomatic a try – your future self (and your ACoS) will thank you!

Got questions? Their support team is super friendly and ready to help you start your PPC transformation journey. Let’s get those campaigns optimized and those sales rolling in!

Transform Your Amazon PPC Game: Let’s Talk About Scalomatic’s Magic

Sat Feb 08 2025 22:50:11 GMT+0000 (Coordinated Universal Time)

Revolutionize your Amazon PPC campaigns with Scalomatic. It’s like having a 24/7 ad expert, saving time and maximizing your ad spend with AI precision.

The ultimate guide to advertise online

Online advertising has become more and more technical. On the one hand, the number of platforms is increasing with each of them bringing new challenges. On the other hand, thanks to a large amount of data, online advertising is now the fastest way to scale up a business online. In addition, the insights gained from one platform can be used for other platforms, creating synergy in your advertising strategy. Unlike SEO which often takes longer to implement and which is more time consuming because it relies on content writing and content promoting, online advertising allows you to scale up your business quickly and at the same time control your return on investment.

In this ultimate guide, we are going to cover the A to Z of online advertising, from tracking your results to scaling up your advertising, optimize every last penny and cover each of the platforms and marketplaces.

Disclaimer: We might receive a commission from affiliate links displayed in this article. However, our opinion is never biased because of that.

What is Online Advertising?

Online Advertising is part of Online Marketing, where you need to pay for the traffic that you get. There are 7 channels for Online Marketing:

Unpaid Channels

  • Direct channel: This is people who know your website, for instance, amazon.com, and come directly to the website by inputting your website address in their web browser. Having said that, it can be that they know your website because they learned about it through another channel or that they found out about you offline (friends, printed ads, tv…)

  • Search Organic: also known as SEO for Search Engine Optimization: people come to your website by searching in search engines like Google, Bing, Yahoo…Most of the time, people are looking for something to solve their problems or to educate themselves. They can be comparing different products or technology or looking for the best way to solve their problems.

SEO Marketing is an art on its own so we will not cover it in this ultimate guide. In a nutshell, it requires keyword research, writing some engaging content, and promoting this content to get some backlinks directing to your website. If this is something interesting for you, you can check SEMrush for instance as it is affordable, easy to handle and allows you to get your competitors’ data and automate your backlinks promotion strategy:

Take a Trial and Get More Out of Semrush

  • Email: that goes without saying but for email, you need to have a list of emails first. You can either collect email from people who visited your website and engage with you (for instance on social media, newsletter, account creation, white paper, exit popup). You could also consider getting emails from 3rd party. After collecting emails from customers and prospects, you can re-engage with them and keep them updated on any news of your website…By all means, emailing is the marketing channel with the highest return on investment because the cost is very low and it scales easily.

  • Referral: this can be any website, blog, newspaper…with a link directing to your website.

Paid Channels

  • Paid Search Ads: Typically, you get charged for each click, mainly for search/shopping campaigns. Those ads appear usually at the top of the search result when someone enters a search query in a search engine.

  • Display Ads: Typically, you get charged for each impression. Those ads are displayed when users surf a website, usually between the text or on the side of the content.

  • Social: those ads are shown on social media like Facebook & Instagram, or TikTok.

Now even though each channel should not be considered independently, in the rest of this ultimate guide, we are going to focus only on paid advertising because unpaid advertising requires different skill sets and would be part of another guide.

Also, understanding each of the channels individually is great but being able to combine them to increase the number of touchpoints with the customer and nudge him to become a returning customer is a completely different strategy and that’s what we are going to explore.

Growth scaling concept

There are 3 important concepts to understand growth scaling: reach, customer intent, and optimization. Those 3 concepts allow a continuous growth process for our customers.

What is Customer Intent and why is it important?

When someone is looking for something, no matter if it is in Google, Amazon, or any search platform, he or she has something specific in mind. We call this customer intent. The search query used can tell us a lot about the customer’s intent.‍

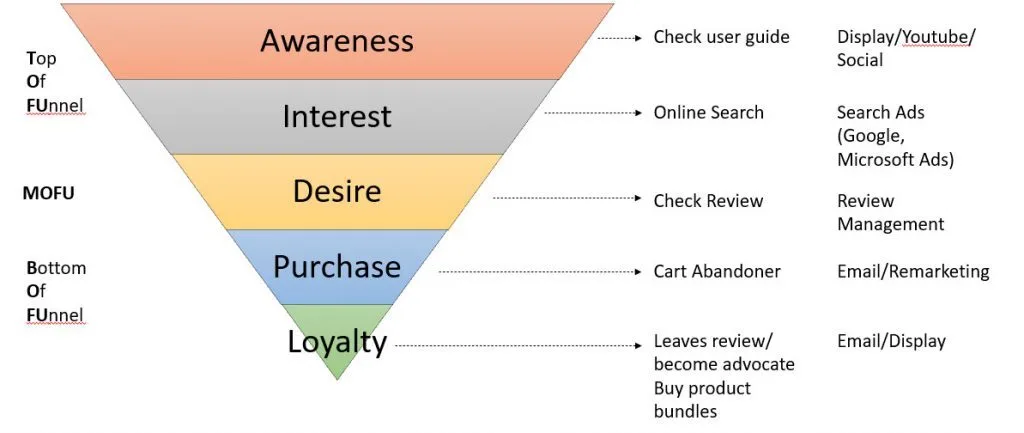
eCommerce Sales Funnel

For instance, if someone is looking for Shopify this means that this person is already familiar with the brand. In other words, he or she is more likely to buy because he already knows about the value-added, the benefits, and the mission of the company..

However, if he or she looks for Shopify cancelation, it is not likely at all that he would buy.

If he or she is looking for Shopify review, then it is a signal that he is considering buying. So even though all those search terms are similar, they have completely different intents.

Having said that, the same keyword can be a brand keyword for a customer and will be a competitor keyword for another customer. For instance Nike and Adidas.

Because the customer intent defines how likely it is that someone will buy a product, it is very important to structure campaigns based on different customer intents so that each campaign can, later on, be optimized properly.

Here is a list of different customer intent on a scale from 0 to 5, 5 being the highest:

(conversion likelihood:4) Brand: Customer searches for the brand directly. Ex. Nike

(conversion likelihood:5) Brand + Specific Attribute: Customers search for a specific product of a brand. Ex. Blue Nike

(conversion likelihood:2) Generic: Customers look for a product. Ex. Shoes

(conversion likelihood:3) Generic + Attribute: Customers look for something more specific. Ex. blue shoes.

(conversion likelihood:1) Competition: Customers are looking for another brand. Ex. Adidas.

(conversion likelihood:0) Competition: Customers are looking for a specific product from another brand. Ex. red Adidas.

Also, the likelihood decreases if the product is not sold. For instance, if we sell only blue and green T-sheets and the customer is looking for red tshirts, which we don’t sell, it is less likely that the customer will buy other colors (it doesn’t mean that it is not likely at all).

Therefore, campaigns need to be separated by customer intent. A combination of generic terms and product attributes is a good start. For instance green shoes, blue shoes, yellow shoes… This allows us also to systematically scale up keywords to reach more customers with the same performances.

How to reach more users without paying more per clicks?

The more people you reach, the more traffic you can generate and the more sales you can get for the same performance. To increase your reach, you need to show your ads to more people, either by adding more keywords to your account and/or diversifying the type of campaign you use and/or by duplicating your campaigns to another platform. You can also do so by increasing the targeting, for instance, if your ads run in the US, you can expand to Canada, UK, Australia to show your ads to more people. Of course, it always depends on the nature of the business. If you sell a service, it is easier to sell internationally. If you sell a product, then it is more difficult to sell globally.

Which match type should you use?

Each match type has pros and cons. Broad keywords have the biggest range but the problem with broad keywords is that it is hard to control the customer intent.

Macth Type Example keyword Match to:
Match to search query like:
Broadt shirt misspellings; synonyms; related searches; close variation sthsirt; polo; golf shirt; T-shirt Broad Match Modifier+tshirt +blue search terms that include all words preceded by “+”; close variant tshirt with blue stripes; T-shirt with blue stripes Phrase“blue tshirt”search terms that include every words in the quote; close variant best blue tshirt for men; best blue T-shirt for men Exact[blue tshirt]Search terms that exactly match the keyword; close variant blue tshirt; blue T-shirt

Therefore, it is important to use keywords in a wise way. For instance, having a generic campaign with broad keywords to get traffic. Then analyze the search query report and identify different worlds that are relevant (category, property…) and add systematically a combination of as broad match modifier to the right campaign. For instance:

Blue King size bedsheet:

  • +blue +king +sheet

  • +blue +king +linen

  • +navy +king +sheet

  • +navy +king +linen

Which Campaign Type should you use and how to add them in your strategy?

Each campaign is a way to get additional traffic and reach and therefore incrementally grow our customers’ revenue.

For instance, on Google, many advertisers use Search but should also explore DSA, Display, Shopping, Video.

On Amazon, many advertisers have sponsored products but should also consider Sponsor Brand & Display

Google campaigns overview

Google Display (and Video) campaigns

Display campaigns are great to reach people that are not searching for a product (yet or anymore). It can be used for creating brand awareness for instance at the top of the customer funnel. It can also be used to reengage visitors or purchasers after some time.

For prospecting, targeting is very important, that’s why we always advise using audience insights from Search campaigns before creating Display campaigns.

Audience based targeting:

In Google Analytics, we can see which are the top audiences (in-market audience, affinity audience…) and we can add those to the search campaigns. If they perform well we should use those audiences as targeting for display prospecting campaigns.

Keyword-based targeting:

In Google, it is also possible to target customers based on the keyword of the website. If the website contains top converting keywords, then it is likely that people are interested in this topic and therefore it is a good targeting option.

Search intent targeting:

It is also possible to target people who research some specific keywords. This means that we can target people who look for top keywords but didn’t click on our Search Ads. This makes especially sense when competitors’ bids are very high and we can not compete anymore but we still want to reach those customers.

In every case for prospecting, it makes sense to exclude past buyers from the targeting to avoid wasting money.

For retargeting, remarketing, we can either target people who visited the website and left without purchasing (for instance cart abandoners) or people who bought in the past. If so then we should take into consideration the buying frequency. For instance, if people buy every month, we can show an ad one month after their previous purchase.

Google Shopping Campaign

Shopping is a great way to get more traffic for eCommerce websites. It is slightly different from other campaign types because Google allows only bidding on product groups and not keywords. Products are grouped into product groups and we can set one bid per product group. For each product, Google will automatically associate search terms.

Therefore it is important to segment the shopping campaign by category. If you have a large number of SKUs (>500), it doesn’t make sense to create either one ad group or one campaign for each category

Because we can not bid on keywords and because the performance for different customer intent are different, it makes sense to duplicate the campaigns as follow:.

You should have 2 campaigns:

  • Brand (low priority – high bid)

  • None Brand (high priority – low bids) with negative keywords for brand terms

In this way, if someone search for something generic, is less likely to convert and therefore the click price will be lower. If he is looking for a specific brand, he is more likely to convert, and then it makes sense to spend more because the return will be higher.

Amazon campaigns

Sponsored Products

Sponsored Product is the main type of campaign on Amazon Advertising. With Sponsored Product campaigns, you can either target some keywords for instance shoes, and appear at the top of the search result on Amazon or you can target competitors’ products and appear on their product page.

One thing to keep in mind is that on Amazon, Advertising sales and Organic sales are not independent. Indeed the more you sell through Advertising, the better will be your ranking and the more you will sell.

Sponsored Brand

Sponsored Brand increases your brand awareness by showing a banner at the top of the search result. Usually, sponsored brand return on ad spent is lower than sponsored products but it can still bring you incremental sales.

Sponsored Display

Finally, Sponsored Display helps you to leverage audience information of Amazon. You can target users on and off Amazon based on their audience, for instance, if they visited your product page or if they are amazon prime users. The level of targeting is not as precise as with Amazon DSP but this is still a good alternative if you want to start small.

Platform

Each additional platform is an opportunity to reach new customers and also a way to mitigate the risk of relying only on one source of income.

Here is the platform we came across and can offer to our customer:

Search

  • Google Ads

  • Microsoft Ads (campaigns can be imported automatically from Google, also windows users use quite a lot Microsoft ads search engine, especially in the US)

Social

  • Facebook & Instagram

  • LinkedIn

Social

  • Amazon

  • Ebay

  • Walmart

  • Wayfair

  • Shopify

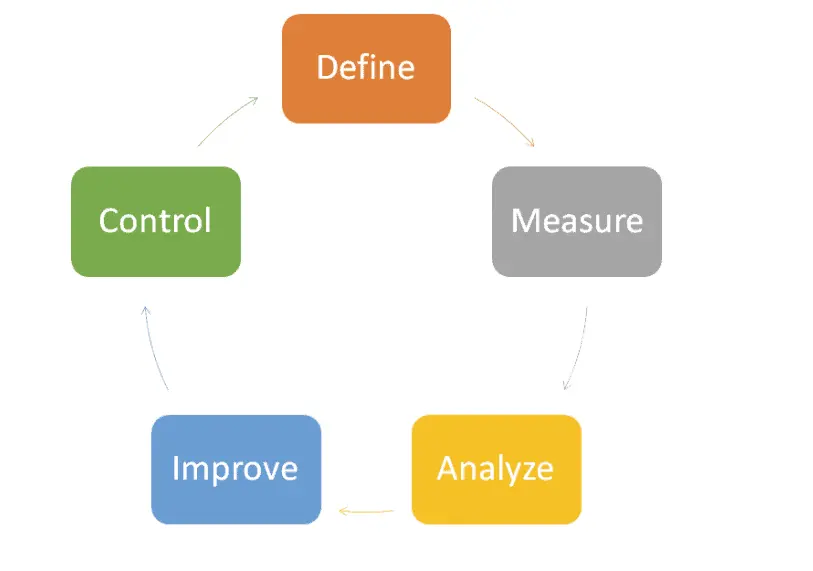
Optimization cycle: Define, Measure, Analyze, Improve, Control

Thanks to the large amount of data that is now available, Online Advertising has become a data-driven practice. The main advantage of this data-driven process is that you don’t need to create a persona or a profile of your ideal customer before getting started. You can gradually scale up your advertisement as you get more insights into your customer, for instance by knowing what they are looking for, how old they are, or where they are based.

We are going to see how to implement the full optimization cycle:‍

Optimization Cycle

‍Define your KPIs for advertisment

First of all, you need to define the KPIs which are relevant for your business. Here you should focus on what is important for your business model and not get into the trap of using out-of-the-box advertisement metrics like ACOS/Return on Ad spent or Cost per Conversion.

If you are an eCommerce business, you probably have different profit margins for the products you sell. Therefore 10 % ACoS might be good if you have a 20% profit margin but it is bad if you have 5% profit margin.

If your business model is affiliate or you get a commission for instance if you are a price comparison platform or a platform connecting users like Airbnb, Blablacar…Then your commission is probably a rate of the product or service you sell on your platform.

Finally, if you sell a service or a subscription and you have no way to know what would be your customer lifetime value upfront, then cost per conversion would make more sense for you.

Something to keep also in mind :

  • customers don’t only buy once. If customers are frequently buying from you, you should know exactly what your customer lifetime value is. You would prefer a customer buying 5 times from you each time for $50 than a customer only buying once for $100. This being said, different audiences have different LTV.

  • That cross-selling might increase your profitability. Because many of your costs are fixed costs, you might be more profitable if you use cross-selling, meaning that you could spend more to get incremental profitable conversions.

Measure improvemet of your ads and sales

At Growth Scalers, we have seen many customers who try to scale up their accounts before making sure that the tracking works properly. Here are the most common signs that your tracking is not working:

  • You don’t get any conversion even though you have a lot of clicks (>>100)

  • Every day the number of conversions is an even number

  • Your bounce rate is 0

  • You have more sales in analytics than in your CRM

In what follows, we outline how to accurately track conversions on your website.

How to track conversion with Google Analytics?

First, sign up in Google Analytics, and follow the wizard to create your account and a property. Generally speaking you need one property per website.

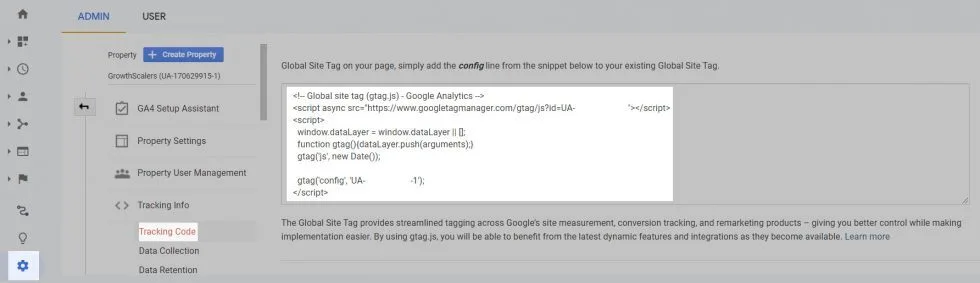
Then, to get the tracking code of Google Analytics, go to Admin > Property > Tracking Info > Tracking Code.‍

TrackingCodeAnalytics

Copy this code and you can now paste it on your WordPress or Shopify website. For WordPress you can use plugins like MonsterInsights. If you are using Divi themes you can go to Divi > Integration and paste it to the code of the of your website. Finally, save changes.

To check if the tracking is working, go back to Google Analytics > Admin > Property > Tracking Code and click on “send test traffic”. It will open your website homepage and if you see at least one active user, it means that the tracking is working.

How to activate Ecommerce transactions?

Tracking conversion is great but you also want to know which product performed best and how much revenue your advertising is generating.

Therefore, you should activate eCommerce transactions.

Go to Admin > View > Ecommerce Settings and then enable eCommerce.

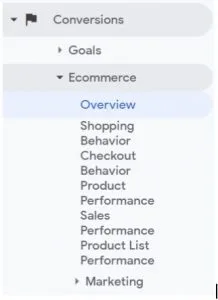
You will see on the left a new eCommerce menu:‍

eCommerce Transaction Analytics

You can now analyze check-out behavior, avg. order value and product performances.

How to get your Google Ads data in Google Analytics?

You might want to see advertising data in Google Analytics to know your cost of advertising. Go to Admin > Property > Google Ads Linking and click on “new link group” and select your google ads account.

How to import conversion from Google Analytics to Google Ads?

Having your KPIs in Google Analytics is nice but having them in Google Ads and use them for optimization is even better. Now that everything is setup in Google Analytics, let’s import the data in Google Ads. In Google Ads, go to Tools & Settings > Measurement > Conversions then click on the blue + to create new conversion action. Finally, click on Import and select Google analytics

Analyze your ads performance

After making sure that the tracking is working correctly, we can start analyzing data.

Understand your customer intent

The search query reports give us a lot of information about customer intent. We know what people are actually looking for and which keywords triggered which search query.

It is important to make sure that each campaign or adgroup is targeting the right queries as intended. It can be for instance that broad keywords in generic campaigns trigger brand search terms. If so we need to add brand search terms as negative phrase to make sure that each campaign is targeting the intended search queries.

We can also aggregate the performance of each word and analyze the performances to see if some search terms are not related to our business. For instance, if we sell yellow T-shirts and we don’t sell black T-shirts, we can aggregate the performance for the word black, and most probably it will have a low return on investment.

Check if your ads Ad Running?

Quite often, ads stop running, meaning that they have no impression. This is a missed opportunity as those ads could easily bring you additional sales. You can check this easily by filtering every ad or adgroup with 0 impression in the last weeks.

If you find some ads that are not running, check if:

  • your bid is too low

  • ads are not approved (maybe because they are not complying with some policies)

  • targeting is too small (keywords too specific or audience targeted too small)

Title and ads performance

There is only a limited number of people looking for what you have to offer. Therefore, the better is your clickthrough rate (CTR), the more click you will get and the more sales you will generate.

The CTR =clicks/impressions

If you want to improve your CTR, check out how to write good ads?

Pay per click performance

If we consider PPC optimization (keywords but also any kind of segment like age range, parental status, audience, devices…)

Then the important output depends on the business model:

If the business model is about generating leads then the output KPI which needs to be considered is Cost Per Conversions (CPA). The input metric that needs to be considered is the conversion rate (number of conversions/number of clicks).

Let’s assume we have only mobile and desktop, if the conversion rate for mobile is 2% and the conversion rate for desktop is 4%, then without optimization, the cost per conversion for mobile will be double of it for desktop. For instance $100 per conversion for mobile and $50 for desktop. Now if we can reduce the click price for mobile and/or increase the click price for desktop so that we have the same cost per conversion, then mobile and desktop will be optimized. For instance, we can apply -30% on mobile and +30% on desktop.

If the business model is about generating sales then the output KPI will be ROAS (also called ROI return on ad spend, or ACOS=1/ROAS). The ROAS is the conversion value * conversion rate / Cost. So the input will be both conversion value=product price and conversion rate (assuming that every product has the same profit margin). In the same way, to be optimized, each segment needs to have the same ROAS even though the conversion rate and the conversion value are different.

Improve your ads to maximize sales

How to write good ads?

A good ad should engage the reader and create the desire to learn more about what you have to offer. To write good ads, here is our secret sauce:

  • Relevance: Your ads need to match with what customers are looking for. Let’s say, for instance, that your customers are looking for a blue T-shirt and your ad is showing a red T-shirt. That would be a no-go: probably people would not click on your ad, resulting in a low Clickthrough rate. You would leave more money on the table because you would get fewer visits than what you could and your sales would be also lower. In addition, low CTR will have a negative impact on your quality score and therefore you will pay more per click.

  • Talk to your customer: Imagine that you want to sell directly to a customer who is contacting you or entering your store. How would you address his needs? Probably you would listen to his needs (analyze search query report), show him the most suitable product, and tell him why this product is what he is looking for. If you need to write ads, direct communication is extremely more powerful than generic ads.

  • Outline benefits over features: You know the saying features tell but benefits sell. To illustrate this point, remember the slogan of Apple when they launched the iPod. Steve Jobs could have mentioned all the features in the world, the 5 GB hard drive, the Firewire connectivity, and the synchronization to iTunes but features are not solving any of the customer’s problems. Instead, he just stated one benefit, that you could carry 1000 songs in your pocket.

When possible, always showcase the benefits of your product or service instead of features.

How to improve conversion rate?

This is a one-million-dollar question. Because in the end, if you could improve by 10% the conversion rate, you could save 10% on advertisement every month. Compounded for a couple of years, it becomes very interesting to optimize conversion rate. Here are some tips that have proved to work.

  • Make sure your site loads quickly: if your website is not loading quickly enough and your visitor are just bouncing, it doesn’t make sense to move forward and try to increase advertising spends. We have seen so many websites that didn’t convert, just because people were leaving before the site was even loaded.

  • Target the right audience: First thing first, not all audiences are equal, if your ideal customer is between 25 and 45 years old and most of your visitors are over 65, chances are that your conversion rate is low. You can either limit the targeting to the right target audience or decrease on Google/ Microsoft ads the bid adjustment by demography, location, audience…

  • Use social proof: for instance testimonial, review, case study, number of clients or well-known brands. In some way, you need to prove that your solution worked for others and that it will work again with your prospect. Influencers is also an alternative way to create social proof.

  • Make purchasing as quickly and as easy as possible: with each additional step in your purchasing process, some users will drop the funnel. Don’t ask for users to register before cashing out, make sure they can pay without having to search for their credit card, for instance with PayPal, Amazon Pay, or Google Pay. If you want them to register, you can let them create an account after they buy.

  • Leverage data analytics to see where people are getting stuck in your funnel and where they are dropping. You can use for instance a solution like Mouseflow to understand how visitors are interacting with your website, where they are clicking, and where you make the most money. If you make most of your money at the bottom of the page, just rearrange your website to have the most profitable items at the top and you can thank us later.

Control your result with this simple check list

Follow the following checklist to make sure that you are not missing out anything:

  • Check weekly the performance of the last week and the last 30 days. Is there some permanent change in performance, is it due to customer behavior (conversion rate, conversion value) or to competitors (increase in click price, loss of impression share)

  • Check weekly the search query report to see what people are looking for. Did you identify new customer intent? If so, you need to create new ad. Is there some unrelated intent to your business, then use negative keywords.

  • Check bi-weekly/monthly the performances of each demographic (gender, age, parental status, income range), audience, location. If needed, adjust bid adjustments.

  • Check out keyword recommendations from the platform but also from other channels, including SEO, and see if you can add new keywords.

  • Run A/B test to optimize ads for at least 1 month.

Thank you for reading this ultimate guide until the end. We spent time keeping it as concise as possible and bring you as many insights as we could. Don’t hesitate to share it with anybody who could benefit from it. Please reach out if you have any further questions. We look forward to talking with you.
The ultimate guide to advertise online

Tue Mar 12 2024 12:34:42 GMT+0000 (Coordinated Universal Time)

Master online advertising with this comprehensive guide covering paid search, display ads, and social media marketing. Learn essential strategies for tracking conversions, analyzing customer intent, optimizing campaigns, and scaling growth across multiple platforms. Perfect for marketers looking to improve ROI and build effective multi-channel advertising campaigns.

The Ultimate Website Sitemap Guide

What is a Sitemap?

A sitemap is a blueprint of your website that helps search engines understand your site’s structure and content. It’s essentially a file that lists all the important pages on your website, providing search engines with a roadmap to crawl and index your content more effectively.

Why Sitemaps Matter for SEO

1. Improved Search Engine Indexing

Search engines like Google use sitemaps as a comprehensive guide to understand the entire structure of your website. By providing a clear, organized map of your content, you ensure that every important page has the opportunity to be discovered and indexed, preventing valuable pages from being overlooked in the vast digital landscape.

2. Enhanced Crawl Efficiency

Sitemaps act like GPS for search engine bots, directing them precisely to the most important pages on your website. This targeted approach helps search engines navigate your site more intelligently, reducing unnecessary crawling of irrelevant pages and focusing on the content that matters most to your audience.

3. Better Website Visibility

A well-structured sitemap increases your website’s chances of ranking higher in search results by making it easier for search engines to comprehend and evaluate your content. It supports your overall SEO strategy by ensuring that new content is quickly discovered, indexed, and potentially ranked, giving your website a competitive edge in the digital marketplace.

Sitemap Creation Across Popular Platforms

1. Shopify Sitemap

Automatic Generation

– Shopify automatically generates XML sitemap
– Located at: yourdomain.com/sitemap.xml
– No manual creation required

Steps to Verify:

– Go to your Shopify admin
– Navigate to Online Store > Preferences
– Confirm sitemap is enabled

2. Webflow Sitemap

Automatic Sitemap Generation

– Publish your website
– Sitemap automatically created
– Access at: yourdomain.com/sitemap.xml

Manual Submission Options:

– Use Webflow’s SEO settings
– Verify in Google Search Console

3. Magento Sitemap

Manual Configuration

– Go to Marketing > SEO & Search > Site Map
– Click “Add New Sitemap”
– Name your sitemap
– Choose generation path
– Select stores to include
– Save and generate

4. WordPress Sitemap

Using Yoast SEO Plugin

– Install Yoast SEO
– Go to SEO > General
– Click “Features” tab
– Enable XML sitemap
– Sitemap generates automatically

Submitting Sitemap to Search Engines

Google Search Console

– Log into Google Search Console
– Select your property
– Click “Sitemaps” in the left menu
– Enter sitemap URL (usually sitemap.xml)
– Click “Submit”

Bing Webmaster Tools

– Sign in to Bing Webmaster Tools
– Add and verify your website
– Go to “Sitemaps” section
– Click “Submit sitemap”
– Enter your sitemap URL
– Confirm submission

Best Practices for Sitemap Optimization

Keeping your sitemap updated is crucial for effective website management. Site owners should regularly refresh their sitemap, promptly add new pages, and remove discontinued or obsolete pages to ensure search engines have the most current information about their site structure.

Configure your robots.txt so that Google crawler doesn’t crawl unnecessary pages (for instance filter pages or pages without text)

Conclusion

A well-structured sitemap is your website’s secret weapon for SEO success. By understanding and implementing sitemap best practices across different platforms, you can significantly improve your website’s search engine visibility and performance.

Next Steps

Need expert help to optimize your website’s SEO strategy? Growth Scalers specializes in comprehensive digital marketing solutions that drive real results. Contact us to transform your online presence.

The Ultimate Website Sitemap Guide

Thu Nov 28 2024 20:21:12 GMT+0000 (Coordinated Universal Time)

Boost your website’s search engine visibility with XML sitemaps! This guide explains sitemap basics, platform-specific setups (Shopify, WordPress, Webflow, Magento), and tips for optimizing crawl efficiency and indexing. Learn to create and submit sitemaps to Google and Bing while enhancing your SEO strategy.

‍ Stuck with Domestic Shipping

Stuck with Domestic Shipping? Here’s Why You Need Walmart Cross Border

If you’re only seeing U.S. domestic options when shipping to Walmart Fulfillment Services from China, this missing program enrollment is costing you money.

The Problem Every China-Based Seller Faces

You’re trying to create a shipment from China to Walmart Fulfillment Services (WFS), but you keep hitting the same wall – only domestic U.S. shipping options appear. Sound familiar?

Here’s what’s happening: Your account isn’t enrolled in Walmart’s Cross Border (WCB) program. Without this enrollment, Walmart’s system automatically defaults to domestic shipments only, blocking your access to direct international shipping options.

The solution? You need to register for the Walmart Cross Border program through your Seller Center. Once you’re enrolled, you can book ocean freight shipments directly from China to WFS facilities.

What Exactly Is Walmart Cross Border?

Think of Walmart Cross Border as your express lane from China to U.S. customers. It’s a port-to-door ocean freight service that ships your inventory from select Chinese ports directly to Walmart’s U.S. fulfillment centers.

Here’s what you get:

  • Direct shipping from major Chinese ports (Yantian, Shanghai, Ningbo, Qingdao, Xiamen)

  • Support for 20′, 40′, and 45′ shipping containers, plus less-than-container-load shipments

  • Access to Walmart’s negotiated shipping rates (much better than spot market prices)

  • End-to-end tracking through your Seller Center

  • Dedicated support in English and Mandarin

Are You Eligible? Check These Requirements

Before you get excited, make sure you qualify:

✅ You’re already using WFS to fulfill U.S. orders on Walmart.com
✅ Your Walmart Marketplace account is in good standing (if you’ve been selling less than 90 days, approval might take longer)
✅ You have validated tax and billing settings in Seller Center with an ACH account or credit card on file
✅ You source or manufacture goods in China

If you checked all boxes, you’re ready to enroll.

The Enrollment Process (It’s Easier Than You Think)

What You’ll Need Before Starting:

  1. Your Importer of Record (IOR) details – Your IOR must have a continuous U.S. customs bond with sufficient value to cover duties, taxes, and fees

  2. Customs broker information (you can use Walmart’s designated broker or your own)

  3. ACH account setup for paying customs fees

The Steps:

  1. Go to your Seller Center → Settings → Shipping Profile → Walmart Imports

  2. Complete the enrollment application with all required documentation

  3. Wait for document signing (Walmart will send docs to your signatory parties)

  4. Get verified (Walmart reviews all documentation)

  5. Receive approval notification via email

Timeline: It typically takes several days for Walmart’s team to verify and approve your enrollment request.

What to Expect After Enrollment

Shipping Times

Under normal conditions, expect 38-60 calendar days from cargo ready date to delivery:

  • West Coast: ~40 days

  • Midwest: ~50 days

  • East Coast: ~58 days

How Your Inventory Gets Distributed

Once your containers clear U.S. customs:

  • Standard items: Distributed across multiple fulfillment centers for faster delivery to customers

  • Oversized items: Stay at the destination fulfillment center

The Real Benefits (Beyond Just Shipping)

Cost Savings

You get access to Walmart’s negotiated ocean freight rates instead of volatile spot market pricing. For smaller sellers who typically can’t secure contract rates, this is a game-changer.

Operational Simplicity

Everything happens in your Seller Center – quoting, booking, tracking, and payments. No juggling multiple logistics providers or systems.

Strategic Advantage

With global supply chain congestion hitting hard in 2024, Walmart is filling a crucial need for smaller businesses that struggle to get cargo space from major ocean carriers.

Important Things to Know

Product Restrictions

Only general goods and excepted dangerous goods are eligible for full container loads. If you’re shipping items that might be considered hazardous, additional screening applies.

Container Options

  • Full Container Load (FCL): Best for larger shipments

  • Less Than Container Load (LCL): Perfect for smaller quantities

Support When You Need It

You get dedicated support with exception handling and inbound prioritization throughout the entire shipment cycle.

Ready to Stop Seeing “Domestic Only”?

If you’re tired of being locked out of direct China-to-U.S. shipping options, Walmart Cross Border enrollment is your solution. The program transforms a frustrating limitation into a competitive advantage.

Your next step is simple: Head to your Seller Center, navigate to Settings → Shipping Profile → Walmart Imports, and start your enrollment process today.

Once you’re approved, you’ll unlock the same enterprise-level logistics network that Walmart uses – giving your China-sourced products a direct path to U.S. customers at negotiated rates.

Don’t let a missing enrollment keep you stuck with domestic-only options. Your inventory (and your profit margins) deserve better.

Ready to scale your Walmart business with better logistics? Learn more about optimizing your marketplace strategy at Growth Scalers.‍

Stuck with Domestic Shipping

Mon Jun 02 2025 08:16:58 GMT+0000 (Coordinated Universal Time)

Unlock direct China-to-U.S. shipping with Walmart Cross Border. Avoid domestic-only limits and transform logistics into your competitive edge today.

Shopify Test Orders

Your website is only as good as its conversion rate and if your check out doesn’t work, your website is useless. Before being able to scale your online business, you need to make sure that your website converts by testing the full buying experience, using different devices/web browsers.

Why Test Orders Are Critical for Your Shopify Store

Test orders are more than just a technical formality—they’re a comprehensive diagnostic tool that provides:

1. Comprehensive Checkout Verification Simulate real customer experiences to uncover hidden obstacles in your purchasing process. Every click, every form, every transaction matters.

2. Discount and Pricing Precision Validate that promotional strategies work exactly as intended, protecting both your revenue and customer trust.

3. Payment Gateway Performance Ensure smooth, error-free transactions that keep potential customers from abandoning their carts.

Detailed Step-by-Step Guide to Creating a Shopify Test Order

Accessing the Order Creation Interface

1. Log into Your Shopify Admin

– Open your web browser
– Navigate to admin.shopify.com
– Enter your login credentials
– Ensure you’re using an account with order management permissions

2. Locate the Orders Section

– From the main dashboard, find and click on “Orders” in the left-side navigation menu
– Click the “Create order” button located at the top-right of the screen

Product Selection and Order Configuration

3. Select Test Product

– Use the search bar to find a product
– Pro Tip: Choose a top-selling product to start with
– Consider testing:
Simple products
Variant-based products
Products with multiple options

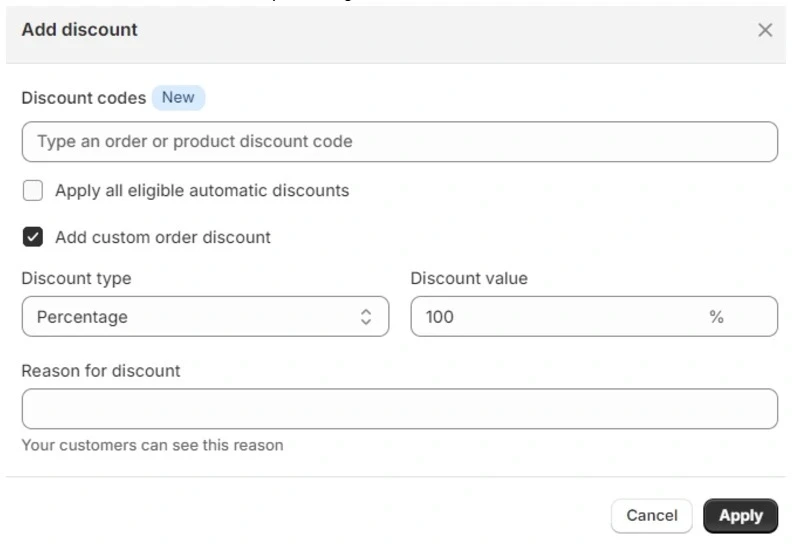
4. Apply 100% Discount

– Click on “Add discount”
– Select “Percentage” discount type
– Enter “100” in the discount field
– This simulates a free transaction for testing purposes

‍Customer and Order Details

5. Add Customer Information

– Create a test customer profile
– Use your company email or a designated test email
– Tip: Create a consistent naming convention like “TEST – [Your Name]”
– Ensure all contact details are accurate

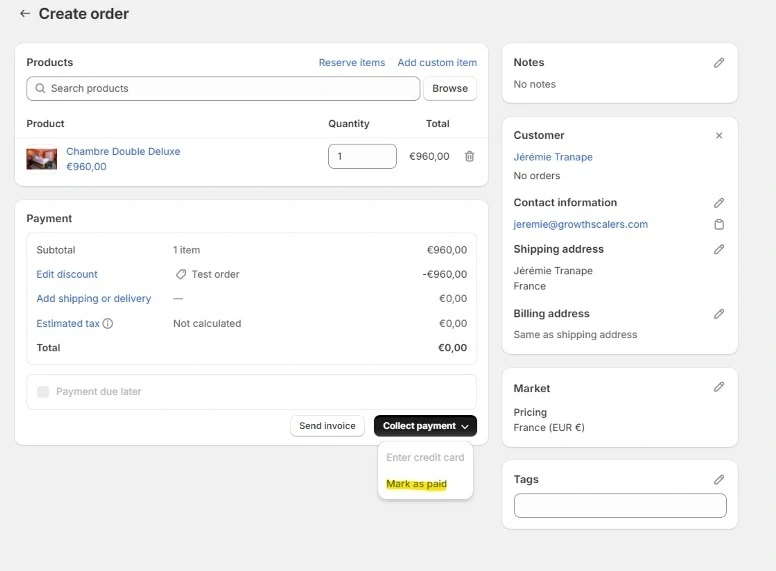
6. Payment and Finalization

– Manually mark the order as “Paid”
– Review all order details carefully
– Confirm the order

‍Advanced Test Order Best Practices
Comprehensive Testing Checklist

– Check add to cart (product can be added/removed to cart)
– Checkout works seamlessly
– Shipping fees are calculated based on location if not free shipping
– Email notifications confirm order and status
– Pricing matches from product detail page to checkout and order.‍

Common Pitfalls to Avoid

Always delete or carefully mark test orders to avoid inventory discrepancies.‍

Conclusion: Test, Optimize, Succeed

Testing your checkout allows you to make sure that your customers will get the best experience. Also, you want to make sure that you don’t have any technical issues before running ads and driving people to your website.

Ready to transform your Shopify store’s performance? Our expert team can help you implement comprehensive testing protocols that drive growth and customer satisfaction.

Key Takeaways

– Test orders are essential for eCommerce quality assurance
– Follow a systematic approach to testing
– Continuously monitor and improve your checkout process

Disclaimer: Always consult with your Shopify expert or development team when implementing complex testing strategies.

Shopify Test Orders

Thu Nov 28 2024 20:17:09 GMT+0000 (Coordinated Universal Time)

Test orders are essential in eCommerce. By simulating customer experiences, you can identify and fix checkout issues, ensuring a seamless buying process that builds trust and boosts conversions. Test, optimize, and let your business thrive.

l

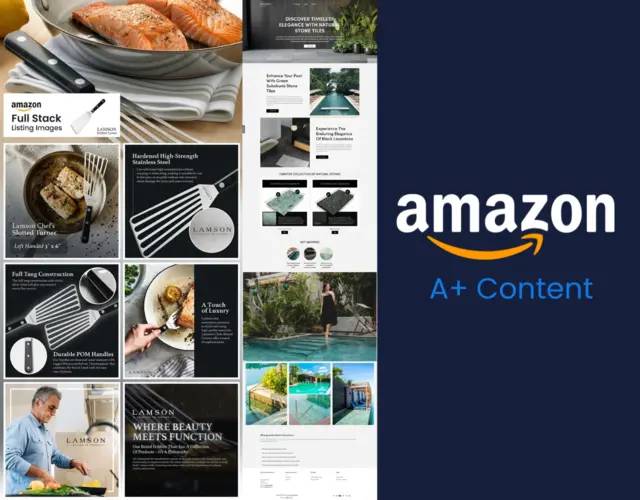
Reasons A+ Content Gets Rejected

Navigating Amazon A+ Content: 9 Critical Rejection Reasons Every Seller Must Know

In the competitive world of Amazon selling, your A+ Content can make or break your product’s success. One wrong move, and Amazon’s strict moderation team could reject your carefully crafted marketing material. This comprehensive guide will help you understand the most common pitfalls that lead to A+ Content rejection.

The A+ Content Minefield: What to Avoid

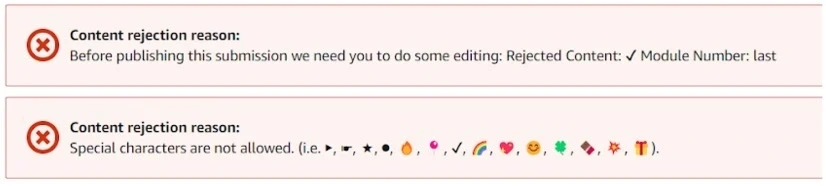
1. Emoji Overload: Keep It Professional

Emojis might seem like a fun way to catch a customer’s eye, but they’re a quick path to content rejection. Amazon wants clean, professional product presentations that focus on your product’s value proposition.

2. Call-to-Action (CTA) Language: Less is More

Forget traditional marketing phrases like:

– “Buy now”
– “Add to cart”
– “Get yours now”
– “Shop with us”

Amazon wants your content to inform, not overtly sell. Focus on product features, benefits, and unique selling points instead of pushy sales language.

3. Logo and Text Readability

Ensure all embedded texts and logos are:

– Crisp and clear
– Easily readable
– High-resolution
– Professionally designed

Blurry or illegible graphics are an instant rejection.

4. Environmental Claims: Choose Your Words Carefully

Language matters when discussing sustainability:

✖️ Avoid:

– “Earth-friendly”
– “Nature-friendly”
✅ Use Instead:
– “Earth-conscious”
– “Sustainable”

Be precise and avoid vague environmental claims without substantiation.

5. FDA Disclaimer: Don’t Forget the Fine Print

For products in health, beauty, or consumable categories, include required FDA disclaimers. Omitting these can lead to immediate content rejection.

6. Seller References: Stay Anonymous

Remove any language that directly references:

– Your company
– Seller status
– Corporate structure (LLC, Ltd, GmbH)

Let the product speak for itself.

7. Timebound Messaging: Stay Evergreen

Avoid time-sensitive language like:

– “On sale now”
– “The newest product”
– “Year-event” references
– “Latest”

Your content should remain relevant regardless of when a customer views it.

8. Claims and Awards: Prove It

Any claim requires substantiation:

– Certifications
– Test results
– Awards (must be from the last two years)

Example: “Tested by XYZ Authority in 2022”

9. Warranty Warnings

Steer clear of:

– Satisfaction guarantees
– Refund promises
– Replacement commitments

Pro Tips for A+ Content Success

– Focus on product features
– Use high-quality images
– Provide clear, factual information
– Keep language neutral and professional
– Prioritize customer education over selling

Conclusion

Mastering Amazon A+ Content is an art. By understanding and avoiding these common rejection reasons, you’ll create compelling, compliant product listings that convert.

*Disclaimer: Amazon’s guidelines can change. Always verify the most current requirements.*

Reasons A+ Content Gets Rejected

Thu Nov 21 2024 08:29:47 GMT+0000 (Coordinated Universal Time)

Unlock the secrets to Amazon A+ Content success. Learn the nine critical reasons sellers get rejected and transform your product listings from mediocre to remarkable.

Quick Hack to Convert Your Amazon Listings to Walmart

Want to sell on Walmart but don’t have enough hours in the day? Well, you’re in for a treat because I’m about to show you how to take those winning Amazon listings and transform them into Walmart success stories. Trust me, this is easier than you think!

Why Should You Care About Walmart?

Let me drop a mind-blowing fact: Walmart’s marketplace sees over 120 million unique visitors every month! That’s like having a Super Bowl-sized audience browsing your products every single month. Pretty amazing, right? And here’s the best part – you’ve already done the hard work on Amazon, so why not make those product listings work twice as hard for you?‍

Let’s Break Down This Amazon-to-Walmart Magic

First Up: Gathering Your Tools
Think of this as packing for a successful journey. Here’s what you’ll need in your toolkit:

  • Jasper.ai (your new best friend for content creation)

  • Your existing Amazon listings (you’ve already got these!)

  • A Walmart marketplace account (your ticket to new opportunities)

Detailed Conversion Process:

  1. Preparation Stage

    • Log into Jasper.ai

    • Navigate to Templates section

    • Select Ecommerce category

  2. Content Extraction

    • Copy your Amazon product’s:

      • Product title

      • Existing bullet points

      • Key product features

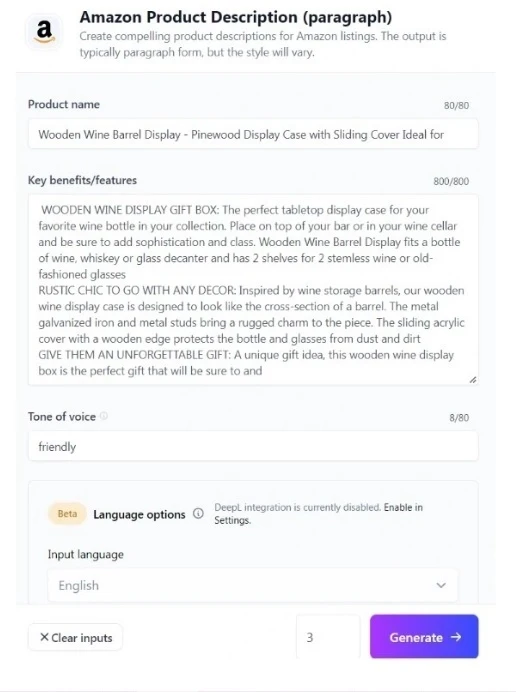
  3. AI-Powered Description Generation

    • Go to Template > Ecommerce > Amazon Product Description

    • Paste extracted product information

    • Generate multiple description variations

4. Optimization Selection

  • Review AI-generated descriptions

  • Choose the most compelling version

  • Adjust for Walmart’s specific requirements

5. Platform-Specific Adaptation

  • Verify character limits

  • Align with Walmart’s SEO guidelines

  • Ensure technical accuracy

Pro Tips from the Trenches

Want to know what really makes listings pop on Walmart? Here’s the inside scoop:

  • Add any keywords in the description of your product. Unlike Amazon, Walmart use product description to index your product in the search results.

  • Check spelling and grammar. Walmart has really strict requirements on that.

  • Keep your language friendly and natural (just like we’re chatting now!)

  • Focus on solving customer problems (because that’s what it’s all about!)

  • Pay attention to those character limits (each platform has its own rules!)

The Secret Sauce: Automated Tools

Let’s be real – nobody has time to rewrite every single listing manually. That’s where our AI friends come in! They help you:

  • Keep your brand voice consistent (no matter where you’re selling)

  • Create content super fast (because time is money!)

  • Focus on strategy (while the tools handle the heavy lifting)

But here’s a friendly word of caution: don’t just copy-paste and hope for the best! Think of AI as your helpful assistant, not your replacement. Add that human touch that makes your listings special.

Ready to Take Your Business to the Next Level?

Look, expanding to Walmart isn’t just about having another place to sell – it’s about building a stronger, more resilient business. You’re basically creating a safety net for your eCommerce empire!

Need a Hand Getting Started?

That’s exactly why we’re here at Growth Scalers! We’re like your personal eCommerce expansion team, ready to help you:

  • Create killer listings that convert

  • Navigate the Walmart marketplace like a pro

  • Make your products shine on both platforms

Ready to watch your business grow? Let’s chat about turning your Amazon success into a multi-platform empire!

Drop us a line at Growth Scalers – we’re super excited to help you double your digital footprint and grow your sales like never before!

Remember, every eCommerce empire started with a single step. Ready to take yours? Let’s make it happen together!

Quick Hack to Convert Your Amazon Listings to Walmart

Sat Feb 08 2025 11:13:18 GMT+0000 (Coordinated Universal Time)

Transform your Amazon listings into Walmart success stories effortlessly. Discover how to leverage your existing Amazon efforts for a broader reach.

Mastering TACOS

As an Amazon seller, you’re likely familiar with a plethora of metrics and acronyms. But there’s one metric that stands out as particularly crucial for measuring the efficiency of your advertising efforts: TACOS. In this comprehensive guide, we’ll dive deep into what TACOS is, why it matters, and how you can improve it to boost your Amazon business.

What is TACOS?

TACOS stands for Total Advertising Cost of Sale. It’s a metric that measures the relationship between your advertising spend and your total sales on Amazon. Specifically, TACOS is calculated by dividing your total advertising spend by your total sales (including both organic and paid sales) and is expressed as a percentage.

The formula for TACOS is:

TACOS = (Total Ad Spend / Total Sales) x 100

For example, if you spent $1,000 on advertising and generated $10,000 in total sales (both from ads and organic traffic), your TACOS would be:

($1,000 / $10,000) x 100 = 10%

This means you’re spending 10% of your total revenue on advertising.

Why is TACOS Important?

TACOS is a critical metric for several reasons, but its primary importance lies in its direct relationship to profitability:

Profitability Indicator: TACOS allows you to understand if you are profitable when considering your advertising costs. Here’s how it works:

·        If your profit margin is higher than your TACOS, you’re profitable.
·        If your profit margin equals your TACOS, you’re breaking even.
·        If your TACOS is higher than your profit margin, you’re losing money.

For example:

·        If your profit margin is 20% and your TACOS is 10%, you’re profitable.
·        If your profit margin is 20% and your TACOS is 20%, you’re breaking even.
·        If your profit margin is 20% and your TACOS is 30%, you’re losing money.

Holistic View of Advertising Efficiency: Unlike ACoS (Advertising Cost of Sale), which only considers sales directly attributed to ads, TACOS takes into account your total sales. This provides a more comprehensive picture of how your advertising efforts are impacting your overall business.

Accounts for Organic Sales Lift: Advertising on Amazon can boost your organic rankings and visibility, leading to increased organic sales. TACOS captures this effect, giving you a better understanding of the true impact of your advertising spend.

Helps Optimize Ad Spend: By tracking TACOS, you can determine whether you’re overspending or underspending on advertising relative to your total sales. This insight can help you adjust your ad budget more effectively to maintain profitability.

Takes into Account Organic Efforts and Cross-Selling: TACOS considers all sales, including those from organic traffic and cross-selling. This gives you a more accurate picture of your overall performance, recognizing that advertising can boost organic visibility and encourage customers to explore more of your product range.

By focusing on TACOS, you can ensure that your advertising efforts are contributing to your bottom line rather than eroding your profits. It provides a clear benchmark for adjusting your advertising strategy to maintain or improve profitability.

How to Improve Your TACOS

Improving your TACOS essentially means getting more bang for your advertising buck. Here are several strategies to consider:

Improve Conversion Rate

Your conversion rate is the percentage of people who buy your product after clicking on your ad. Improving this rate means you’re getting more sales for the same ad spend, which will lower your TACOS. Here’s how:

Optimize Your Product Listings: Ensure your titles, bullet points, and descriptions are clear, compelling, and keyword-rich.
Use High-Quality Images: Clear, professional photos can significantly boost conversions.
Leverage A+ Content: If you’re brand registered, use A+ Content to showcase your product’s features and benefits.
Gather and Respond to Reviews: Positive reviews build trust, while addressing negative ones shows you care about customer satisfaction.

Increase Average Order Value (AOV)

Increasing your AOV means you’re generating more revenue per transaction, which can help lower your TACOS. Try these strategies:
Bundle Products: Offer complementary products together at a slight discount.
Upsell and Cross-sell: Use Amazon’s “Frequently Bought Together” feature to your advantage.
Offer Quantity Discounts: Encourage customers to buy more by offering discounts on larger quantities.
Create a store so that customers can find other products you have to offer
Add a product comparison chart to your A+ content with other products that buyers might be interested in.

Optimize Your Advertising Campaigns

Fine-tuning your ad campaigns can help you spend your ad budget more efficiently:
Use Negative Keywords: Eliminate irrelevant clicks by adding negative keywords to your campaigns.
Adjust Bids Based on Performance: Increase bids on high-performing keywords and reduce them on underperforming ones.
Leverage Different Ad Types: Experiment with Sponsored Products, Sponsored Brands, and Sponsored Display ads to find the most effective mix for your products.

Improve Organic Rankings

Better organic rankings can lead to more organic sales, which will lower your TACOS:
Focus on Relevant Keywords: Use tools like Amazon’s Search Terms Report to identify high-performing keywords.
Encourage Customer Reviews: More positive reviews can boost your organic rankings.
Maintain Healthy Inventory Levels: Stock-outs can negatively impact your rankings.

Refine Your Product Selection

Not all products will perform equally well on Amazon. Consider:
Focusing on High-Margin Products: These allow more room for advertising spend while maintaining profitability.
Discontinuing Poor Performers: Products with consistently high TACOS might be better removed from your catalog.

Consider Your Product’s Lifecycle

Your TACOS strategy might change depending on where your product is in its lifecycle:
New Product Launch: You might accept a higher TACOS initially to gain visibility and reviews.
Mature Products: As your product becomes established, you can focus on lowering TACOS to maximize profitability.

Monitor and Adjust Regularly

TACOS isn’t a “set it and forget it” metric. Regular monitoring and adjustment are key:
Set TACOS Targets: Establish target TACOS percentages for different product categories or lifecycle stages.
Regular Reviews: Set a schedule to review and adjust your advertising strategy based on TACOS performance.
Also, TACOS only makes sense if you don’t optimize pricing (because your profit margin decreases as you lower the price).

If you have different margins per product, you might want to look at TACOS per SKU.

Conclusion

TACOS is more than just another acronym in the Amazon seller’s vocabulary. It’s a powerful metric that provides crucial insights into the relationship between your advertising efforts and overall sales performance. By understanding and optimizing your TACOS, you can create a more efficient, profitable, and sustainable Amazon business.

Remember, there’s no one-size-fits-all TACOS percentage. The right TACOS for your business will depend on factors like your profit margins, competition, and business goals. Some businesses might aim for a TACOS of 5-10%, while others might find 15-20% more appropriate for their strategy and based on their margin.

By focusing on improving conversion rates, increasing average order value, optimizing ad campaigns, and leveraging Amazon’s tools and features, you can work towards a TACOS that supports both profitability and growth for your Amazon business.

In the dynamic world of e-commerce, staying on top of key metrics like TACOS can give you the edge you need to succeed. So, start digging into your TACOS today, and take your Amazon business to the next level!

Mastering TACOS

Fri Aug 02 2024 09:21:43 GMT+0000 (Coordinated Universal Time)

Master Amazon’s key ad metric, TACOS (Total Advertising Cost of Sale), with this guide. Learn to calculate, analyze, and optimize TACOS to boost profitability through better conversions, higher order values, and refined ad strategies. Perfect for Amazon sellers aiming to enhance efficiency and performance.

Mastering Exit-Intent Popups

In the fast-paced world of eCommerce, every visitor counts. But what happens when potential customers are about to leave your site without making a purchase? Enter the power of exit-intent popups – your last-chance opportunity to convert abandoning visitors into valuable email subscribers.

Why Email Marketing Still Reigns Supreme in 2024

Before diving into the technical setup, let’s understand why email marketing remains a cornerstone of successful eCommerce businesses:

Unmatched ROI

Email marketing continues to be an extraordinarily powerful marketing channel, delivering an impressive average return of $42 for every $1 invested. By providing direct access to your customer base without relying on third-party platforms, email marketing offers businesses unprecedented control and reach. Unlike social media marketing, email campaigns consistently demonstrate higher conversion rates, making them a more efficient and cost-effective strategy for driving revenue and engagement.

Also as cookies are going away, email remarketing is a great way to nudge website visitors who haven’t purchased from you yet.

The Strategic Importance of Exit-Intent Popups

Exit-intent technology acts as your digital safety net, capturing potentially lost opportunities by:

– Reducing bounce rates
– Growing your email list
– Recovering abandoned carts
– Offering last-minute incentives

Step-by-Step Guide: Creating High-Converting Exit Popups with Klaviyo

1) Initial Setup

1. Log into your Klaviyo account
2. Navigate to “Sign-up Forms”
3. Click “Create Form”

‍
‍2) Design Best Practices

– Keep your message clear and concise
– Use compelling visuals
– Include a strong value proposition
– Implement brand-consistent design
– Ensure mobile responsiveness

3)  Configure Targeting and Behavior

1. Access the “Targeting and Behavior” settings

‍
2. Select “Timing: Based on Rules”

3. Choose “When the visitor is exiting the page”

4) Advanced Optimization Tips


– A/B test different offers
– Segment your audience
– Customize timing for different pages
– Monitor and adjust based on performance metrics

Exit Popup Success Strategies

Compelling Offers

Successful exit popups hinge on creating irresistible value propositions for visitors. These might include enticing first-time purchase discounts that encourage immediate action, free shipping thresholds that motivate customers to complete their purchase, exclusive content access that feels special, and limited-time offers that create a sense of urgency and scarcity.

Psychology Triggers

Exit popups can leverage powerful psychological principles to capture visitor attention. Scarcity messaging makes offers feel rare and valuable, social proof demonstrates others’ positive experiences, FOMO (Fear of Missing Out) creates anxiety about missing a great deal, and feelings of exclusivity make customers feel uniquely privileged.

Design Elements That Convert

The visual and functional design of exit popups critically impacts their effectiveness. Clear call-to-action buttons guide users precisely, minimalist design prevents overwhelming visitors, easy-to-close options respect user experience, and a mobile-first approach ensures seamless interaction across all device types.

Measuring Success

Tracking specific metrics allows marketers to understand and improve exit popup performance. Popup conversion rates reveal direct effectiveness, email list growth demonstrates long-term value, revenue attributed to email campaigns shows financial impact, and understanding the customer lifetime value of email subscribers helps refine marketing strategies.

Integration with Overall Marketing Strategy

Successful exit popups aren’t standalone tactics but integrated components of a holistic marketing approach. Multi-channel coordination ensures consistent messaging across email, social media, and paid advertising platforms. Customer journey mapping involves sophisticated automation like welcome series, abandoned cart recovery, post-purchase follow-up, and re-engagement campaigns that nurture ongoing customer relationships.

Common Pitfalls to Avoid

You need to be cautious of several potential exit popup mistakes. Aggressive timing can feel invasive, overwhelming design can confuse visitors, unclear value propositions reduce conversion potential, and poor mobile optimization can lead to negative user experience and impact SEO.

Conclusion

Exit-intent popups, when implemented strategically, can transform your eCommerce business’s email marketing performance. By following these guidelines and continuously optimizing based on data, you’ll build a robust email list that drives sustainable revenue growth.

Ready to Scale Your Email Marketing?

Growth Scalers specializes in implementing high-converting email marketing strategies for eCommerce businesses. Our team of experts can help you maximize the potential of your Klaviyo setup and create comprehensive email marketing campaigns that drive real results.

*Remember: The key to successful email marketing isn’t just collecting addresses – it’s about building meaningful relationships that translate into long-term customer value.*

Mastering Exit-Intent Popups

Thu Nov 28 2024 20:00:07 GMT+0000 (Coordinated Universal Time)

Don’t Let Website Visitors Slip Away! Exit-intent popups are your secret weapon to turn fleeting website traffic into loyal email subscribers, transforming missed opportunities into revenue-generating connections.

Mastering Amazon Inventory Management

The first rule of selling on Amazon is to always have your product in stock. Out of stock is from Amazon’s point of view a negative experience. If people come to buy your product on Amazon, they need to find it, if not, they are going to buy it somewhere else and Amazon doesn’t want that.

As a result, Amazon created a system to penalize products that are out of stock. When your product is out of stock, your seller ranking drop. You can see this when you click on the SKU in inventory. Below is a chart with an example. The blue line is sales and the green line is seller ranking. When the product is out of stock, seller ranking drops and when the product is back in stock, it usually takes 6 to 10 weeks to get some traction again.

Consistent inventory management directly influences these critical metrics.

The Growth Scalers Inventory Forecasting Approach

Our inventory management approach will give you visibility into your stock levels and help you make decisions faster that drive growth.

Preparing Your Inventory Management Template

Step 1: Access the Inventory Forecast Template

Open the “Product Listing Amazon (inventory forecast)” template

Locate the two key sheets:

1. Inventory Overview
2. FBA Inventory

Step 2: Add all active listings SKU’s

To retrieve all our active listing SKUs, follow these steps:

Download the Active Listings Report:

  • Log into your Amazon Seller Central account

  • Navigate to Inventory Reports > Active Listings Report

  • Click on Request Report

  • Once the report is ready, download it.

Upload the Report to the Template:

  • In your template, go to File > Import > Upload

  • Select the downloaded report

  • For Import location, choose “Insert new sheet”

  • Click Import data

Copy and Paste Data:

Copy all SKUs from the report and paste them into the SKU column of the Inventory Overview sheet.

Optionally, copy the product titles as well.

Note: Since the Active Listings Report is customizable, column names and their order may vary. This could cause formulas to pull incorrect data. To avoid issues, paste the titles in the same order as the SKUs are pasted.

Retrieving FBA (Fulfilled by Amazon) Inventory Report

Step 3: Navigate to Seller Central

  • Log into your Amazon Seller Central account

  • Navigate to Reports > Fulfillment

  • Select “FBA Inventory” from the Inventory section

  • Request the CSV download

  • Wait for the report to generate

  • Download the report once it’s ready

Importing the FBA Inventory Report

Step 4: Upload to Template

  • In your template, go to File > Import > Upload

  • Select the downloaded report

  • For Import location, choose “Replace current sheet”

  • Ensure you’re on the FBA Inventory sheet

Final Formatting and Verification

Step 5: SKU Column Formatting

  • Check SKU column formatting

  • For numeric SKUs:some text

    • Convert to plain text

    • Ensure formulas can be processed correctly

Step 6: Verify Automatic Calculations

  • Allow template formulas to pull and calculate data

  • Double-check that all information is populating correctly

Pro Tips for Inventory Management

🔹 Always plan 3 months of inventory: You should monitor your inventory level every month. If you have more than 6 months of inventory, you will have to pay long term storage fees so a good trade off is 3 months.

🔹 Keep some min inventory: If you have only a handful of products, they might be really far away from your end customer. If you need to ship from California to New York for instance. So you should have a minimum number of units in stock (10 -20 depending on your sell-through). This will allow you to have faster delivery time and therefore higher conversion rate.

🔹 Create a FBM back up SKU: You can forecast as good as possible inventory but you don’t control on Amazon’s logistic. It might take longer to get products checked in, shipment can be lost or damaged so to stay on the safe side, if you have a warehouse or a 3PL, you should create an FBM back up SKU for the same FBA listing. This will allow you to make sure that your products are always in stock.

Why Choose Growth Scalers for Inventory Management?

We don’t just provide a service—we become your strategic partner. Our approach combines:

  • Advanced technological tools

  • Expert analysis

  • Predictive forecasting

  • Continuous optimization

Ready to transform your Amazon inventory strategy? Contact us now!

Mastering Amazon Inventory Management

Mon Dec 16 2024 12:40:04 GMT+0000 (Coordinated Universal Time)

Consistent inventory management ensures your products stay visible and maintain a strong seller ranking on Amazon. Learn how to streamline your process today.

Mastering Amazon FBA Product Labeling and Shipment

Feeling overwhelmed about FBA shipping? Those shipping labels and procedures can seem like a maze at first! But don’t worry, let’s break it all down in a way that’ll make total sense. Let’s turn you into an FBA shipping pro!

First Up: What’s the Big Deal About FBA?

Think of Amazon FBA as your personal fulfillment squad. Pretty cool, right? They handle all the hard work – storing your stuff, picking orders, packing boxes, shipping to customers, and even dealing with customer service headaches. It’s like having a whole warehouse team without actually hiring one!

Why Getting Your Shipping Game Right Matters

Messing up your FBA shipments can be a real pain in the neck. Nobody wants their inventory sitting in limbo because of a tiny labeling mistake, right? And those relabeling fees? Ouch! Plus, if your products get stuck in the warehouse pipeline, you might run out of stock (and we both know that’s not good for business!).

The Good News? Nailing FBA Shipping Can Be Your Secret Weapon!

Here’s what happens when you get this right:

  • Your operational costs drop

  • Your inventory turns over faster

  • Your IPI score goes up (Amazon loves that!)

  • You get better storage limits (more room to grow!)

Essential Pre-Shipment Preparations

Critical Information You Need

Before creating your shipment, you must determine three crucial elements:

  1. Box dimensions – Accurate measurements ensure proper handling

  2. Box weight – Precise weights prevent shipping discrepancies

  3. ASIN allocation per box – Clear organization of which products go where

You can send the client a format this way:

‍Creating Your FBA Shipment: Step-by-Step Guide

Step 1: Accessing Your Seller Central Account

1. Log in to your Amazon Seller Central dashboard
2. Navigate to the ‘Inventory’ > Shipments‍

‍

3. Select ‘Send to Amazon’ to begin the process

‍
4. Enter your shipment details carefully

Pro Tips from Someone Who’s Been There

Want to know what really makes the difference? Keep a detailed inventory spreadsheet – trust me, future you will be so grateful! And don’t cheap out on those labels and printing equipment. I know it’s tempting to save a few bucks, but quality materials prevent expensive headaches down the road.

Need a Helping Hand?

Here at Growth Scalers, we’ve seen it all when it comes to FBA shipping. We’ve got the process down to a science, and we love helping sellers like you nail their FBA game! Our team knows all the tricks to:

  • Keep your shipments moving smoothly

  • Avoid those pesky common mistakes

  • Track everything like a pro

  • Keep your costs down

  • Keep your inventory levels just right

Ready to Level Up Your FBA Game?

Don’t let FBA shipping stress you out anymore! Contact us now at Growth Scalers – we’d love to show you how to make this whole process smooth sailing. Whether you’re just starting with FBA or looking to optimize your current process, we’ve got your back!

Let’s make your Amazon business soar! Ready to chat about making your FBA shipments easier? We can do this for you!

Mastering Amazon FBA Product Labeling and Shipment

Sat Feb 08 2025 15:11:08 GMT+0000 (Coordinated Universal Time)

Feeling overwhelmed with FBA shipping? Let’s break down those confusing procedures and transform you into an FBA shipping pro! Master it today.

Manual Bid Optimization

Manual Bid Optimization: A Data-Driven Guide to Mastering PPC Campaign Performance

Introduction

In the competitive world of digital advertising, mastering manual bid optimization can be the difference between profitable campaigns and wasted ad spending. While automated bidding strategies have their limitations, manual bid optimization empowers advertisers to make data-driven decisions that directly impact their bottom line.

Understanding Bid Optimization Fundamentals

The Power of Manual Control

Manual bidding offers unique advantages over automated strategies. Unlike automated bidding, which primarily reacts to external factors such as changes in conversion rates, manual bidding allows for a more proactive approach. Advertisers can strategically combine tactics like discounts with advertising to drive more sales.

Key advantages include:

– Direct influence over advertising costs
– Granular optimization capabilities
– Quick response to market changes
– Better control over profitability metrics

The 4-Step Manual Bid Optimization Process

Step 1: Define Your Target Metrics

Before adjusting any bids, establish clear performance targets:

Key Performance Indicators (KPIs):

– ACOS (Advertising Cost of Sale)
– ROAS (Return on Ad Spend)
– CPA (Cost Per Acquisition)
– Conversion Rate
– Profit Margins

Pro Tip: Align your targets with your business objectives and product margins to ensure sustainable profitability.

Step 2: Gather Sufficient Data

Timing and Data Collection Insights

A critical challenge in bid optimization is understanding the right frequency of adjustments. You usually need 30 days of data to make decisions, so optimizing daily will not help performance for most keywords. However, there’s an important caveat: if some keywords have enough data, you could optimize those more frequently.

Data Considerations:

You need to expect at least 1 sale to have enough data to make any decision.

– Calculate minimum sample size based on conversion rate
– Formula: Required Clicks = 1/Conversion Rate
– Example: 5% conversion rate requires minimum 20 clicks
– Consider longer time ranges for low-traffic keywords

If your number of clicks is below 20, you don’t have enough data to make any decision. You should either choose a longer time range or aggregate keyword data.

Data Confidence Levels:

– Less than 20 clicks: Insufficient data
– 20-50 clicks: Moderate confidence
– 50+ clicks: High confidence

Step 3: Calculate Base Bid Adjustments

The key to manual bidding is carefully analyzing your average Cost Per Click (CPC) and Advertising Cost of Sale (ACOS) simultaneously.

Bid Adjustment Strategy:

– If ACOS is high (e.g., 90%) and average CPC is $0.70, with a target ACOS of 45%, you should lower bids to around $0.35
– If ACOS is low (e.g., 15%), consider gradually increasing bids

In any case, you should always adjust your max CPC based on your historical average CPC.

‍
‍Optimizing Bid adjustments

Top of search bid adjustments usually convert better than other placements. When optimizing your Amazon PPC campaigns, securing the top of search position is crucial for maximizing visibility and conversions. This placement, appearing in the first row of sponsored product ads above organic search results, typically generates the highest click-through rates and conversion rates due to its premium visibility. As a rule of thumb if your conversion rate are 30% better on top of search, you can increase your bid adjustments by 30%. Do that gradually and analyze how CPC increases.

For sponsored brand campaigns, you can not increase top of search placements. The strategy here is to lower other placements as those don’t perform as well as top of search. You can start with lowering by 30 to 45% other placements bid adjustments.

Conclusion

Manual bid optimization is both an art and a science. By following this structured approach and consistently monitoring performance, advertisers can achieve optimal results while maintaining control over their advertising spend. Remember, successful bid optimization is an ongoing process that requires patience, attention to detail, and a commitment to data-driven decision-making.

Next Steps

Ready to optimize your advertising campaigns? Our team of PPC experts can help you implement these strategies and achieve your performance targets. Contact us for a detailed analysis of your current campaigns and a customized optimization plan.

Manual Bid Optimization

Thu Nov 28 2024 19:37:58 GMT+0000 (Coordinated Universal Time)

Master PPC advertising through strategic manual bid optimization. This guide reveals how data-driven bid adjustments can transform campaign performance, giving advertisers precise control over their digital marketing spend and results.

How to get ready for Canton fair?

Disclaimer:  This article contains affiliate links. When you purchase a VPN subscription through our NordVPN link, we may earn a small commission at no additional cost to you. While we genuinely use and test all recommended products, we want to be transparent about our affiliate relationships.

The Canton Fair is the oldest and largest trade fair in China. If you want to meet with new suppliers or 3rd party service providers like logistics or warehouse companies, the Canton Fair is a great way to connect in a really short time.

When’s It Happening? Save the date!


The Canton Fair happens twice a year, split into three phases each time:‍

Spring Session (typically mid-April to early May)

  • Phase 1: Electronics, household electrical appliances, machinery, lighting equipment, hardware and tools, vehicles and spare parts, building materials, chemical products.

  • Phase 2: Consumer products, decorations goods, gifts.

  • Phase 3: Textiles & garments, shoes, office supplies, cases & bags, recreation products, medicines, medical devices and health products


Autumn Session (typically mid-October to early November)

Same phase structure as the Spring session

Pro tip: Each phase lasts about 5 days, so plan your visit based on the products you’re interested in. If you’re sourcing products from different phases, you might want to stay longer or make multiple trips. Check the official Canton Fair website for the exact dates of the upcoming session – they usually announce them a few months in advance.

Why Canton Fair?

Let’s be real – if you’re in the eCommerce or retail game, China is pretty much the manufacturing powerhouse you can’t ignore. Not only are they crushing it with competitive prices, but they’re also innovating like crazy. These days, you’ll find products in Canton Fair that you literally can’t source anywhere else in the world.

Canton: Location, Hotels, and Local Cuisine

Where is Canton?

‍‍Canton or Guangzhou (广州市) in Chinese is located in the Guangdong province (广东) in southeast China. People in Canton speak Cantonese but everybody can speak Mandarin. The city is close to Shenzhen (深圳市) which is the Tech hub of China, similar to Silicon Valley in the US. If you go further to the South, you will find Hong Kong.‍

Famous Cantonese people you might know (if you include Hong Kong) are Jackie Chan, Bruce Lee, John Woo.

During the Canton Fair, airfare to Foshan’s nearest airport (FUO) can be quite expensive. For a more budget-friendly alternative, consider flying to Hong Kong and taking the train to Foshan.

What to eat in Canton?

Cantonese food is famous worldwide for its fresh ingredients, delicate flavors, and cooking techniques that bring out the natural taste of ingredients. If you are not familiar with it, it might be difficult to know what is Cantonese vs what is Chinese. Here is your safe choice when you want something local:

  • Dim Sum (点心): large range of steamed options like steamed buns, dumplings, siumai… Those are generally paired with tea.

  • Rice noodle roll

  • Sui mei: Roasted duck, goose, pig, pigeon

  • Steamed chicken (白切鸡): Free-range chicken steamed with ginger and scallion

  • Soup: spare ribs or winter melon soup

  • Seafood: Lobster, crab, shrimp, scallops,  abalone, fish

In most of the restaurants in Canton, you will get either some hot tea or an insulated water bottle with boiled water and a salad bowl. This is not meant for you to drink but rather to sanitize your bowl, spoon and chopsticks.

Preparing Your Trip‍

Where to stay in Canton?

Here’s a pro tip that will save you some headaches: book a hotel, not an Airbnb. Why? Hotels handle that mandatory police registration for you.

When it comes to accommodation in Canton during the fair, location is everything. Ideally, you want to book a hotel along Metro Line 8, which directly connects to Xingangdong (新港东) metro station – the main entrance of the Canton Fair complex. The further you stay, the lower the hotel rate but the longer the commute. You might want not to stay too far away, especially because you might be tired after walking the whole day. Metro is inexpensive and come every couple of minutes so don’t worry about that and it is faster than getting a cab.

Checklist before your trip

Make sure you’ve taken care of the essentials—these often-overlooked details can make or break your trip.

  • Secure your visa well in advance because last-minute processing can be a nightmare.

  • Book your flight tickets early, especially during Canton Fair season when demand soars.

  • Don’t forget your Buyer Badge—if you don’t, you will still be able to enter the Canton fair but you will need to do it on your phone in the queue and probably waste a few hours before it is approved.

  • Bring your Business Cards. People in China still use that. Also I recommend to take a pen and write on the back of each business card the topic of the conversation you had with this person. This will help you to sort out your contact faster and follow up by email/on weChat after the fair.

  • Get a VPN (more on that later)

  • Take a backpack or a small suitcase? A briefcase might not be enough to carry all suppliers’ catalogs.

  • Get a power bank: don’t forget that in China, you do everything with your phone. If you need it to add business contact, pay anything or take the metro. One thing you don’t want is to run out of battery.

  • Buy a converter: Most hotels have double kind of sockets: A  (similar to the US), I (most common in Australia and New Zealand…) and C (optional, similar to the plug in Europe) but this is not granted. You might want to buy an adapter before your trip.


Download those App BEFORE your trip

China’s internet operates behind what’s known as the Great Firewall, blocking access to many familiar websites and apps. You won’t be able to access:

  • Social media platforms (Facebook, Instagram, Twitter)

  • Communication tools (WhatsApp, Skype)

  • Google services (Gmail, Google Maps, Google Drive)

  • Professional networks (LinkedIn)

  • Video platforms (YouTube)

  • News websites (many international news sites)

You can either go for a Western option like NordVPN or use a Chinese alternative like Pandafan.

A VPN (Virtual Private Network) is essential to access these services during your stay.

The most famous Western VPN for China is NordVPN. It is quite simple to use but not as stable as Chinese alternatives. Here is our affiliate link if you want to download it.  NordVPN Affiliate Link.

Full disclosure: If you sign up for NordVPN using our link, we earn a small commission – doesn’t cost you anything extra, but helps keep our blog running!

The other option is to download a Chinese alternative like Pandafan but you might be worried about who can access your data so just get NordVPN so that we can get some affiliate commission :).

Don’t forget to install and test your VPN BEFORE arriving in China – you won’t be able to download VPN apps once you’re there.

Making the Most of Your Canton Fair Visit: From Dress Code to Finding the Right Supplier

Dressing for Success (and Comfort!)

Let’s talk about what to wear. Forget the formal suit – business casual is what you are looking for. In other words, just dress as you would if you go to the office. No need to suit up. In terms of shoes, you want to go with something really really really comfy. The fair is 12 million sq ft or 1 million m². Expect to walk 30,000 steps a day. Just take your running shoes.

Your Fair Day Game Plan

Want to make the most of your time? Here’s what you need:

  1. Take your passport: you will need it to register on the first day and get your badge. Once you have your badge, you won’t need your passport anymore.

  2. A current floor plan: the fair is HUGE and the map changes every week. You have 4 sections: A, B, C, D. Get a floor plan on the first day and mark each section you want to visit. You won’t have time to visit everything so make sure you prioritize what you are interested the most.

  3. Go to talk to people and start networking (more on this next)

The Art of Supplier Conversations

Now, let’s talk about the fun part – meeting suppliers! Here are some conversation starters that’ll help you spot to break the ice and start engaging like a pro:

  • “Do you work with both B2B and B2C customers?”

  • “Which markets are you currently selling to?”

  • “What’s your experience with private labeling?”

  • “Can you tell me about some of your main clients?”

  • “What’s your typical MOQ and price range?” (but save the negotiation for later)

‍
Surviving (and Thriving!) in China

Ok now that we went through making the most out of the Canton fair, let’s talk about the basics you need to know to survive and enjoy your time in China.

WeChat: Your All-in-One Communication Tool

WeChat isn’t just a messaging app – it’s your lifeline in China. Beyond staying connected with friends, family, and colleagues, it’s essential when your VPN fails. One of its handiest features is the built-in image translator. Just go to Discover > Scan > Translate and point your camera at any Chinese text, including restaurant menus!

Setting up payments is straightforward:

  1. Go to Me > Pay and Services > Wallet > Bank Cards

  2. Add your foreign credit card

  3. To pay, either scan a merchant’s QR code (via Discover > Scan) or have them scan yours (find it under Me > Pay & Services > Money)

Alipay: Your Digital Wallet

Getting started with Alipay:

  1. Navigate to Account > Bank Cards

  2. Click “Add more bank” to link your credit card


    Once set up, you can:

  • Pay merchants by scanning their QR code or letting them scan yours (Pay/Receive)

  • Use public transport by generating a QR code in the Transport section (make sure you’ve selected the right city!)

  • Book rides through Didi (China’s Uber)

‍You can pay anything up to 200 RMB without any fees other than your credit card.

Pro tip: Alipay’s translation feature works across all Chinese apps, making it invaluable for navigating local services.

Need more specific advice about preparing for the Canton Fair? Drop us a line at Growth Scalers – we’ve helped businesses navigate their sourcing journey, and we’d love to help you too!

How to get ready for Canton fair?

Tue Feb 25 2025 20:20:27 GMT+0000 (Coordinated Universal Time)

Planning a visit to the Canton Fair? Discover how it connects you with suppliers, offers unique products, and why it’s an eCommerce’s dream.

How to buy UPC code for Amazon

Why do I need a barcode although you sell online?

It seems at first a bit contradictory to sell products online and to buy a barcode. At the end of the day, your product will not be scan at the cashier when the end customer checks out. However, you will still need a number to identify your product and to register it on Marketplaces like Amazon, Ebay, Walmart… This number will be the same, no matter in which country or which marketplace you sell so even though the price seems high, it is an investment that is worth doing to avoid further problems down the line. Also if you would like to sell your product and use FBA fulfillment, you will need to identify your product with a barcode so that it doesn’t get mixed up at Amazon warehouse.

UPC? EAN? ASIN? SKU? What do I actually need?

What is the structure of the barcode?

barcode

Where to buy a barcode?

Barcodes are not cheap, especially when you get started with your E-commerce. However, buying some barcodes from unreliable sources can cost you more along the line than just buying them for GS1 (none profit organization standardizing barcode worldwide).

We have heard of many horror stories about sellers who tried to save a few $ on barcode and ended up not being able to sell for months.

  • UPC code issues

  • UPC codes were used by other seller

  • I JUST bought 25 new barcodes from BarcodesTalk and I’m getting this error when I try to add a new product.

So be very careful before buying your barcode from any unreliable source and don’t forget, this is just some fixed cost, see it as an investment to launch your product.

One barcode vendor that worth being mentioned is legalbarcode.com. Their price is slightly cheaper than on GS1 but if you want to be sure that your barcode will be always accepted by any marketplace, just buy them from Gs1

How many barcodes do I need?

You need to buy one barcode for each variation of your product. For instance, let say you sell white and black tee-shirt in 3 different size: S, M, L. You will have in total 6 variations of your product: white S, M, L and black S, M, L. Therefore you should buy at least 6 units.

How much does it cost?

If you only need one barcode, you can buy it for $30 here.

You can check the latest pricing of GS1 here

GS1-pricing1

So to take our previous example, if you need to sell 6 units you can purchase 10 barcodes for $250. If you plan to 30 products or more, it becomes more interesting to buy 100 GTIN as the price for 100 is the same a buying 3 times 10 GTIN.

If you want to sell on Amazon FBA and you don’t have UPC barcode, you will need to pay $0.50 per unit so for 10 products, you will be better off with GS1 after selling 500 units, for 100 products after 1500 units…

Also, keep in mind, you need on barcode to register your company location. So if you plan to buy 10 barcodes, you will have only 9 available for your products.

How to buy barcodes on GS1 ?

If you are ready to purchase more than 1 barcode, you need to purchase a company prefix which will be the same for all your product. Select on the right the number of barcodes you need, usually, you will need only one prefix.

Once you are done, you can access GA1 Data Hub and register your location:‍

location-scaled-1

Once this is done, you can register your product. You can either register each product individually or use a bulk upload.

To create one product, go to Product > Create and input the mandatory fields:‍

Create-your-product-description-scaled-1

The GTIN will be automatically assigned. Don’t worry, if you do any mistake, you can still change and manage your product description later.

If you want to create barcode as bulk for several products, you can do this by uploading and excel spreadsheet.

First, you need to download the right number of GTIN you need:

  • Go to Import and click on Download Import Template

import-scaled-1

Once this is done, you need to click on Download All Available GTINs and select how many GTIN you want to register.

Finally, you need to fill out the template:

  • Action: Create

  • GS1CompanyPrefix: is the prefix you got previously, you can find it under location

  • GTIN is from the second sheet you downloaded

  • Packaging level depends on how units are sold

  • IsVariable: depends on whether the size change for each product. For instance, if you sell S, M and L t-shirts, IsVariable should be No because each S t-shirt has the same size. If you sell some cheese that needs to be cut and therefore don’t have always the same weight then IsVariable should be Yes.

  • IsPurchasable: should be Yes unless you don’t sell a product anymore.

Once this is done, you can upload the file. You just registered the GTIN for your product, you can now use this GTIN to list your product on any marketplace like Amazon, Walmart or Ebay…

How to print your barcode from GS1 ?

If you want to print your barcode to identify your product, you can do this in Gs1.

Go to Product > Manage and click on the product your want to print the barcode for. Then go to the last tab and select the type (UPC-A or Gs1 Databar Stacked Omnidirectional) and the size of your barcode (depending on the size of the product. Large barcode are easier to scan)

How to print your barcode for Amazon?

If you want to sell your product through FBA, you can print the barcode directly in Amazon Seller Central after listing your product and choosing Fulfillment by Amazon.

Go to your Amazon Seller Central Account > Inventory > Manage Inventory and select in the drop-down menu of the product you want to label: “print item labels”. If you don’t see this option make sure that you choose FBA for your fulfillment. You can again choose the best-looking size of your barcode.‍

‍

How to buy UPC code for Amazon

Tue Mar 12 2024 12:34:42 GMT+0000 (Coordinated Universal Time)

Learn everything about barcodes for e-commerce: UPC, EAN, and GTIN codes explained. Discover how to purchase legitimate barcodes from GS1, understand pricing structures, and properly label products for Amazon FBA and other marketplaces. Essential guide for online sellers starting their e-commerce journey.

How to Create Your Amazon Seller Account?

Unlike other channels like Google, Social Media or Display advertising, Amazon is a platform where consumers intend to buy a product that they are looking for. As a result, the conversion rate on Amazon is on average 3 times higher than on any other platforms.

Amazon has opened it’s marketplace to international sellers and we will see in this article how to get started selling your product on Amazon and what you need to know.

Create your Amazon account

Amazon can be quite diligent regarding any document you submit. Therefore, to avoid any frustration, before you start creating your Amazon seller account, make sure that you have the following information.

  1. Bank statement: the bank account will be used by Amazon to pay your sales. Professional sellers get paid by Amazon every two weeks

  2. Credit Card: This will be used to pay for the monthly subscription fee and the referral fees

  3. A valid address: Amazon will send you a postcard to confirm it

  4. A valid ID document: Passport or Id card depending on the country you are from

N.B: Only a legal representative of the company can create the account.

Are you ready to create your account? Go to Amazon Seller Central and follow the next steps:

Business Information

First of all, you will be asked to enter your personal information.

Note that you need to be a legal representative of the company.‍

step-0-account-creation-1-amazon-seller-account-registration

You can also add other contact people even though this is not mandatory.‍

Step-1-business-info

You will be asked to input your company’s address as well as your mobile phone number for verification.‍

Marketplaces

Amazon Global Selling allows sellers to sell on the following marketplaces:

  • North America (United States, Canada, Mexico and Brazil)

  • Europe (Germany, United Kingdom, France, Italy, Spain, Netherlands)

  • Asia-Pacific (Japan, Australia, Singapore, India)

  • Middle East and North Africa (Middle East and Turkey)

If you are not sure which Marketplace to start with, just select where you operate, you will be able to change this selection later.‍

After choosing the marketplace where you want to sell your product, you need to input your credit card to pay for Amazon fees. Usually, if you create an account and for any reason you could not sell your product, your credit card will not be charged.‍

step-4-billing-amazon-seller-account-registration

To be able to communicate your brand better you can create a store. Amazon protects sellers with brands and trademark. Therefore, if you have one, you should add it to enforce your right and avoid other sellers using your brand.‍

step-5-store-amazon-seller-account-registration-1280x914-1

Finally, after submitting your information it can take up to 2 business days before your account is approved.‍

step-6-verification-amazon-seller-account-registration-1280x1009-1

How much does it cost to sell on Amazon?

Amazon offer different services for sellers in order to scale their E-commerce business. Here is the breakdown of the cost that you should expect.

Subscription fee

You can decide between two selling plans:

  • Individual for $ 0.99 / item sold until 40 units a month

  • Professional for $ 39.99 / month

Because the individual plan is very limited, we advise you to choose the professional plan. In addition, usually, Amazon doesn’t charge the selling plan fees if you did not make any sales. Therefore, it is more beneficial to start directly with the Professional Plan.

Selling fee a.k.a. Referral fees

Amazon lets you sell your products on its platform but it comes at a cost. Like every affiliate marketing plan, Amazon charges a referral fee around 15% of your sales depending on your product category.‍

amazon-selling-table

‍If you sell for instance a mobile phone for $500, Amazon will charge you 8% * $500= $40 per sales.

If you sell a luggage for $300, Amazon will charge you 15% * $300 = $45 per sales…

Note that this is higher than the referral fee minimum.

Check here if you want to know the referral fee for each category.

FBA or FBM?

Building an e-commerce business can be quite demanding. It requires warehouse, logistics and great operations. Thankfully, Amazon allows you to use its logistic network and benefit from its infrastructure. This is called FBA: Fulfillment By Amazon. This service from Amazon comes with an additional fulfillment fee but allows you to focus on your business and on your products. In addition, it reduces the initial investment that you would need for warehousing and manpower to expand your business.

If you want to find out what would be the cost of selling on Amazon for a given product, you can check Amazon Revenue Calculator

Finally, selling internationally can be quite a headache with regard to taxes. To facilitate this, Amazon offers one-year free VAT Service to help you get started with your e-commerce business

Where can you sell?

Amazon marketplaces are currently open for sellers in the following countries:

This means that by selling on Amazon, you can reach 2.65 billion customers.‍

If you are still unsure about selling your product on Amazon or if you are struggling to implement your online strategy, we offer a free consultation. Feel free to contact us to learn more about it.

Also, check out our last post to boost sales for your ecommerce shop: Ultimate Guide to advertise online‍

How to Create Your Amazon Seller Account?

Tue Mar 12 2024 12:34:41 GMT+0000 (Coordinated Universal Time)

Discover how to start selling on Amazon with this comprehensive setup guide. Learn about account creation requirements, marketplace selection, fee structures, and choosing between FBA vs FBM fulfillment options. Essential reading for new sellers looking to launch their Amazon business and reach 2.65 billion potential customers globally.

Google Announces Retirement of Enhanced CPC Bid Strategy

In a recent announcement dated September 5, 2024, Google has revealed significant changes to its advertising platform. The Enhanced CPC (ECPC) bid strategy, a long-standing option for Search and Display campaigns, is set to be phased out. This blog post will cover the key details of this transition and provide guidance for advertisers on how to adapt their strategies.

Timeline of Changes

October 2024

New campaigns: The ECPC bid strategy will no longer be available as an option for new Search or Display campaigns.
Existing campaigns: If you’ve already switched away from ECPC, the option to return to this strategy will be removed.
Current ECPC users: Campaigns currently using ECPC can continue to do so until March 2025.

March 15, 2025

Final transition: Any Search and Display campaigns still using ECPC will be automatically migrated to Manual Cost-Per-Click (CPC).

Managing the Transition

As you prepare to move away from ECPC, keep these important points in mind:

Monitor Performance Closely: When switching to a new bid strategy, it’s crucial to keep a close eye on your campaign performance. Expect some fluctuations as the new bidding system adjusts.

Adjust Budgets and Targets: To maintain control over your spend and performance during this transition, be prepared to make adjustments to your budgets and targets as needed.

Alternative Bidding Strategies to Consider

Google recommends several alternative bidding strategies based on your advertising goals:

Maximize Conversions or Target CPA: Ideal if your goal is to maximize conversions within your budget and target CPA constraints.

Maximize Conversion Value or Target ROAS: Best for advertisers aiming to maximize return on ad spend within budget and target ROAS constraints. Note: This strategy requires at least two or more differentiated conversion values to be enabled.

Maximize Clicks or Target Impressions/CPM: Suitable if your primary objective is to increase site visits or impressions.

Pay per Conversion (Display campaigns only): If eligible, this option allows you to increase conversion volume while only paying for actual conversions.

Now with eCPC going away, the best way to keep control on bids is either to use manual CPC or to use smart bidding with a Portfolio strategy and set a min and/or max CPC.

Next Steps for Advertisers

Review your current campaigns and identify those using ECPC.

Plan your transition strategy, considering which alternative bidding strategy aligns best with your goals.

Begin testing new strategies on a portion of your campaigns to understand performance differences.

Stay informed about any further updates or guidance from Google regarding this transition.

Google Announces Retirement of Enhanced CPC Bid Strategy

Mon Sep 09 2024 06:52:32 GMT+0000 (Coordinated Universal Time)

In a recent announcement dated September 5, 2024, Google has revealed significant changes to its advertising platform.

From Bland to Brand: 10 Killer Design Strategies to Make Your Amazon Store Irresistible

Ever noticed how some stores just catch your eye while others… well, not so much? Let’s talk about turning your Amazon store from “meh” to “amazing” with some killer design strategies that’ll have customers clicking that “Buy Now” button faster than you can say “Prime shipping”!

Why Should You Care About Design? (It’s Not Just About Looking Pretty!)

Picture this: you’re scrolling through Amazon, and you see two similar products. One looks like it was photographed in someone’s garage, while the other? It’s like scrolling through a premium magazine! Which one would you trust with your hard-earned money? Exactly!

Your Secret Weapon: 10 Design Styles That’ll Make You Stand Out

1. Minimalist Design

You know that clean, crisp look that makes you feel instantly fancy? That’s minimalist design! Think Apple-style simplicity – lots of white space, clean lines, and text that doesn’t make your eyes hurt. Perfect if you want your products to scream “sophisticated” without actually screaming!‍

‍

2. Bold and Vibrant Design

Want to grab attention like a puppy in a tutu? Bold and vibrant designs are your best friend! This style is perfect if your target audience is young, fun, or just loves a good pop of color. Warning: may cause spontaneous smiling!

3. Storytelling Design

Everyone loves a good story, right? This design style doesn’t just show your product – it tells its journey! Think of it as Netflix for your product listings. Get those customers emotionally invested!

‍
4. Comparison-Centric Design

Side-by-side visuals that transparently highlight your product’s features and benefits. Build credibility by showing exactly what makes your offering unique.

5. Infographic-Driven Design

Got a complex product? Turn those technical details into eye candy with infographic-style designs. Because nobody wants to read a manual, but everyone loves pretty pictures!

6. Lifestyle Focused Design

Show your product living its best life! Real-world photos that help customers imagine your product in their world. It’s like Instagram, but for selling!

7. Luxurious and Premium Design

Going premium? Dark themes, metallic touches, and sophisticated vibes make customers feel like royalty. Perfect for those “treat yourself” products!

8. Playful and Fun Design

Who says shopping can’t be fun? Playful, charming designs that bring a smile to your customers’ faces. Great for kids’ products or adding some joy to everyday items!

9. Educational/Instructional Design

Show and tell! Educational designs that help customers understand exactly how your product makes their lives better. Because sometimes, we all need a little guidance!

10. Natural and Earthy Design

Natural, organic vibes that make customers feel good about their purchase. Perfect for eco-friendly products or anything that promotes wellness!

Ready to Give Your Store a Makeover?

Here’s the thing – picking the right design style isn’t just about what looks good (though that’s important too!). It’s about telling your brand’s story in a way that connects with your customers and makes them think, “Yep, this is exactly what I need!”

And hey, remember – you don’t have to copy these styles exactly. Think of them as inspiration to create something uniquely YOU. Because in the world of Amazon selling, authenticity is your superpower!

Need Some Help Making Your Store Shine?

That’s exactly why we’re here at Growth Scalers! We love helping sellers like you transform their stores from hidden gems to customer magnets. Ready to make your Amazon store absolutely irresistible?

Let’s chat about giving your store that “wow” factor that’ll have customers coming back for more!

Remember: Your store design is like your digital handshake – make it count! Want to learn more about making your Amazon store stand out? Contact us – we’re always excited to help sellers shine!

From Bland to Brand: 10 Killer Design Strategies to Make Your Amazon Store Irresistible

Sat Feb 08 2025 14:44:35 GMT+0000 (Coordinated Universal Time)

Transform your Amazon store from “meh” to “amazing” with 10 killer design strategies that captivate customers and boost your brand’s appeal today!

Fititude: Amazon product launched done the right way

Fititude came to Growth Scalers with a new concept in mind that they wanted to sell through different channels. The product was specially designed gloves that used a unique infused copper material to help people to recover from injuries like tendonitis or carpal tunnel syndrome.

Growth Scalers started with the journey by understanding the market and how to position the products. They discovered that most of the companies selling similar products stress the fact that the gloves cure arthritis. However, a niche in the younger and active population remained untapped. Many people indeed get injured due to repetitive movement, work out, or by working long hours on computers. Growth Scalers decided to position the product and target active and younger audiences.

Branding

To market the product for active users, Growth Scalers crafted the branding material in line with what the brand stands for:

  • Healthy lifestyle

  • Effort and rewards

  • Self-improvement

  • Success

  • Be True to Yourself

  • Community engagement‍

By choosing dynamic colors, designing a modern brand identity, Fititude is more identifiable than competitors without being overly flashy.

Products Pictures

Most of the buyers on Amazon only scan the products’ pictures and only skim the product description. That’s why choosing the right pictures, showcasing the right lifestyle was so important. Growth Scalers used lifestyle pictures to illustrate the benefits of the product.

By also being more inclusive towards women, Fititude could target a larger audience.‍

From feature to benefits

Growth Scalers’ motto is that features tell and benefits sell. Instead of listing the features of the product Growth Scalers emphasizes the benefit that it would bring to the user like pain release and the ability to find some sleep at night.‍

From product launch to profit:

Every launch is challenging because you are competing with other companies with more history, more reviews and ratings.

Fititude wanted to get some market share and decided to break-even at first for the time being. Growth Scalers helped them to get more reviews, thanks to the vine program and by promoting the product through PPC and discounts in Rebatekey. After getting some traction, the gloves ranked first in the top 100 of its category and made it to the top 30. At the same time, Fititude could raise the pricing, and thanks to Growth Scalers’s profit analysis, they could reach a 30% profit margin and sell 30 units per day after only 2 months.‍

Next steps

Fititude and Growth Scalers are currently working on diversifying the sales channels and have identified new markets like Canada, UK, Europe to get started. Also, eBay and Walmart are marketplaces where the demand is promising.

Case Study outcome:
Conversion rate (Order Item Session Percentage): 22.27%
Unit sold per day: 24
Profitability reach after 2 months: 30% net profit‍

Fititude: Amazon product launched done the right way

Tue Mar 12 2024 12:34:42 GMT+0000 (Coordinated Universal Time)

Fititude came to Growth Scalers with a new concept in mind that they wanted to sell through different channels.

Ecommerce Email Automation

Performance marketing is changing rapidly. Cookies are going away and it is becoming harder and harder to bring back visitors to your website once they leave. Unless we capture their emails and nudge them to become loyal customers. That’s what we are going to cover today.

What Can This Email Marketing Do For You?

Your email automation system becomes your 24/7 marketing powerhouse, handling everything from welcoming new customers like old friends to gently nudging those “I’ll buy it later” cart abandoners. It checks in after purchases (because who doesn’t love a little attention?), suggests products your customers will actually want, and even works its magic to win back those customers who’ve gone “Missing In Action.”

Your Step-by-Step Guide to Shopify Email Automation

Getting Started with Shopify Flow

  1. Install the App

    • Head to the Shopify App Store

    • Search for “Flow”

    • Click “Add App” to install

  2. Create Your Email Template

    • Navigate to Email > Templates

    • Click “Create New Template”

    • Save your template


3. Build Your Automation Workflow

  • Go to Marketing > Automation

  • Add your newly created email to the workflow

  • Set specific triggers (like product tags or customer actions)

In the example above, we send an email if someone ordered a product with the tag #retraite.

Create Your Email Masterpiece‍

Here’s a little insider tip – use AI tools like ChatGPT or Claude.ai to help you write emails that sound like they’re coming from a real human (because they are!). Just remember to add your personal touch – nobody knows your brand voice better than you do!‍

The Secret Sauce to Email Success

Let’s get real for a minute. You know those emails that make you feel like the brand really gets you? That’s what we’re aiming for here. It’s not about blasting your entire list with the same message – it’s about making each customer feel like you’re writing just for them.

Think about your own inbox. What makes you click on some emails and delete others without even opening them? Use that insight! Break down your audience into groups that make sense – maybe based on what they’ve bought before, or what they’ve been eyeing on your site.

Avoiding Common Pitfalls

Let me save you from some face-palm moments I’ve learned the hard way. Avoid bombarding your customers with multiple emails per day – we all know how annoying that can be. Skip the robotic language and write like you’re chatting with a friend. And remember, your email strategy isn’t a “set it and forget it” deal – it needs regular attention and refinement to stay effective.

The Bottom Line (Because We’re All Here to Grow Our Stores)

Here’s the deal – email automation isn’t just another tech tool to add to your stack. It’s your ticket to building real relationships with your customers while growing your store. It’s like having a conversation with thousands of customers at once, but making each one feel special.

Ready to see some magic happen in your store? Start small, test things out, and watch your customer relationships (and sales!) grow. Trust me, six months from now, you’ll wonder how you ever ran your store without it!

Ecommerce Email Automation

Sat Feb 08 2025 11:18:34 GMT+0000 (Coordinated Universal Time)

Transform your email system into a 24/7 marketing powerhouse. Build strong customer relationships and boost sales with effective automation techniques.

Ecommerce Case study Cristina Zandomenogo

From Handcraft to Digital

Born and raised in Caracas, Venezuela. Cristina has lived a life of nature and beauty surrounded by the mountains and the Atlantic Ocean. Throughout her life, this has inspired her and the idea behind her designs that every piece of jewelry must have movement.

She left her native land and family to obtain a BA in Fine Arts from Rollins College in Orlando, Florida. Cristina continued her education in jewelry design and fabrication by attending intensive workshops in various renowned jewelry schools throughout the United States.

The Complexity of Digital Sales

Christina started selling online her handcraft jewelry in 2016. In addition to creating new products and make sure that her customers were satisfied, she had to deal with a variety of new realities. From creating awareness on Facebook or Instagram to selling on her own website or on marketplaces like Amazon, eBay or Etsy, this was a new full-time job that she had to learn.

Selling products online can be overwhelming and distract from business purposes. Therefore, she looked for a partner who could take over the complexity for her and let her focus on what she likes.

ECommerce-Case-study

Growth Scalers: Your Partner to grow your business

Christina came across Growth Scalers through word of mouth

Growth Scalers have been helping eCommerce businesses and start-ups to scale up sales online through marketplace product listing and advertising.

“What I especially liked about Growth Scalers is that they took the time to understand my customers, my audience and my market. They not only increased my sales above expectations but also took away the complexity of running an online business for me.” – Cristina Zandomenogo

Jewelry-ecommerce

Implementation and Impact

After defining the winning strategy, Growth Scalers took care of everything. They started by making sure that my ecommerce website was set up correctly to ensure that I wouldn’t waste money in advertisement.

They listed my product on Amazon and Etsy and drove sales from Instagram, Facebook and Google.

If you want to know how Growth Scalers could create a revenue pipeline, check our last article: Ultimate Guide to advertise online

case-study-outcome

Ecommerce Case study Cristina Zandomenogo

Tue Mar 12 2024 12:34:41 GMT+0000 (Coordinated Universal Time)

Born and raised in Caracas, Venezuela. Cristina has lived a life of nature and beauty surrounded by the mountains and the Atlantic Ocean.

Create a Google Data Studio Dashboard in 6 steps

With Google Data Studio, anyone can create custom dashboards that integrate data from multiple sources, such as Google Analytics, Google Ads, Google Search Console, and other Google products. These are referred to as connectors, or data sources, plugins, integrations, etc.

Furthermore, third-party connectors will pull from other platforms such as Microsoft Ads, Facebook Ads, Linkedin, Twitter, and more.

Six easy steps to create a Google Data Studio dashboard

In this guide, we will explain step by step how to create a dashboard to have an overview of website traffic. We will be using two Data Studio connectors, Google Analytics and Google Ads for this dashboard.

Example of our dashboard:

Step 1. Log in and create a new report

To start, go to datastudio.google.com and sign in with the account which should be the same account as the Google Analytics & Google Search Console you want to create the dashboard for.‍

Google Data Studio Login

Log in to Google Data Studio with your Google Analytics account.

Now that you have signed in and accepted any Terms of Service notices, we are ready to create our blank report. Choose “Blank Report” for the report template and click “+.”. You can choose from other pre-built templates, but we will create a blank report for this example.‍

Reports

Set up a blank dashboard.

You can name your dashboard so you can find it easily, and Google will automatically save your dashboard as you use it.‍

Untitled Reports

Step 2: Connect Data Sources

For this dashboard, we will use two data sources, Google Analytics & Google Ads.‍

Demo Dashboard

First, click on the “Add data” button.

Find the Google Analytics connector and select it. As you will see, there are many other connectors available. All these data sources can be used in a report. But for now, we will stick with our current dashboard.‍

Add data to report

Select Google Analytics and authorize the connection.‍

Authorize

After selecting Google Analytics, we must select the property and then the view. This should be the main view that you use when viewing your data in Google Analytics.

To finish this step, click the “Add” button to connect to this data source.‍

Google Analytics to ReportAbout to add data

Click on “ADD TO REPORT” button.

Congratulations, you have added your first data source.

Now we can edit fields and add calculated fields if needed. Currently, all the fields for our dashboard are set up correctly.

Now, let’s add another data source – Google Ads.

Again, we click on the “Add Data” button, select Google Ads, and authorize the connection. Next, we choose our account and click the “Add” and “ADD TO REPORT” button.

To see our data sources we just click on “Resource”, and then “Manage added data sources”.‍

Resource Manage

We can see that both of our data sources have been added.‍

Embedded Data

Notice that data sources can be added from this window as well.

We can rename our Google Analytics source from “1 Master View” to something like “Demo Google Analytics”, by clicking on “EDIT” and changing the data source name in the upper left corner.‍

Data Source Editor

Step 3: Inserting Elements

Now that all our data sources have been set up, it’s time to build out our dashboard. The Google Data Studio package includes several types of elements that can be inserted into your report, such as line graphs, pie charts, tables, geographies, scorecards, scatter charts, and more.

You can add your elements to a dashboard by clicking on the “Insert” button and selecting the type of chart or table you wish to add.‍

Insert charts

Or by clicking on the “Add a Chart” button, and selecting the desired chart.‍

Choose charts

Line Graphs / Time Series

The first element we want to include in our dashboard is a time series line graph. Time series shows the performance of a metric over time. As such, we should add a time dimension (e.g. date, month, day of the week), along with a metric. We can do this by clicking on the time series element and dragging a graph into the top left half of the dashboard.

The next step is to select the data source, dimensions, and metrics.

We’ll start by selecting a data source. You may find that your graph defaults to Google Ads because that was the last data source we added. We can change this by clicking on the data source in the panel on the right of the dashboard and choosing Google Analytics to be our data source.

To represent our time dimension, we will have to segment this data by date. You may browse other options if you wish. We will use “Date” in this example dashboard.

This type of graph allows you to use multiple metrics, which will show up as different colored lines on the line graph. Let’s choose “Users” and “Unique New Users” for our example.‍

Graphics dashboard

Take note of the line graph in your dashboard as you choose these dimensions. You will see your changes immediately reflected on the graph.

Let’s add another time series chart to show the “Goal Conversion Rate”. Set dimensions and metrics.‍

Blend data

And there we have it.‍

Dashboard graphics

Pie Charts

A pie chart may be used to visualize the acquisition channels. In the blank space below the graph charts we created earlier we will add our pie chart.‍

Pie graphics

‍

The pie chart will be automatically populated with default dimensions and metrics. In order to reflect our top acquisition channels, we must update these. Just set your metric to “Users” and change your dimension to “Default Channel Grouping”.‍

Blend data 3

Adding elements to your dashboard also allows you to play with their styles. So, we go to the “Style” section from the “Data” section.‍

Ring graphic

You can style your elements in any way you like. Edit the colors, the text, the labels, and more. As an example, we created a pie chart with a “hole” in the middle.

Let’s change the layout of our dashboard and put all these charts in one row to have a better overview. Also, let’s move by dragging a pie chart on the left side.‍

Overview demo dash

Scorecards

Scorecards allow us to present raw metrics in an attractive manner. As an example, let’s insert a scorecard element above our line graphs.‍

Scorecards

For this scorecard, we want to measure “Users”, Sessions” “Pageviews”, “Bounce Rate” and “Avg Time on Page”. So we will add all of these and select the metrics for each one.

If you want to speed up the process, you can create your first scorecard, style it, and then copy/paste the additional scorecards. By doing so, you are able to change the metric on these scorecards and have a more uniform appearance.‍

Scorecard Uniform View

Most often you or your stakeholders will want to compare this metric to previous times. By selecting the previous period from the scorecard, we can easily compare the current period with the previous one. It shows what percent increase/decrease you had from the previous period.‍

Average time on page

Tables

Tables are the most effective way to embed lists of data. Tables can be scrolled and paginated. We will make a table to display acquisition, behavior, and conversions.

First, we will click on the “Insert” button and choose a table.‍

Tables and charts

The next step is to set dimensions and metrics.‍

Dimensions and Metrics

Here we can also add scorecards above the table so we can have a better overview of the acquisition and conversions that we are presenting in the table.‍

Conversions in table

Column chart

Column charts are typically used to compare several items within a specified range of values. They can be vertical or horizontal. You can use column charts to compare one category of data with one or more sub-items. We will use a column chart to present engagement by age and gender.

Following the process described above, we will insert the bar and set the dimension to “Age”, the breakdown dimension to “Gender” and the metric to “Pageviews”.‍

Metric Page Views

Geo chart

Geographic charts allow you to see how a measurement differs across a particular area. In our dashboard, we will use a geo chart to display what are the top countries by session.

So let’s insert the geo chart and set the dimension to “Country” and metric to “Session”.‍

CountryMetricSession

Here’s a table of top-ranking countries so that we can see where the countries are at. We will set the metrics to “Sessions” and “Pageviews”, We can style our table and set the “Pageviews” column to be displayed as a bar chart.‍

Page views as bar chart

Scatter chart

A scatter chart shows how data points are affected by each other along a horizontal and vertical axis. We will use it to show the relationship between the “Bounce Rate” and “Sessions”, by the “Affinity Category”.‍

Scatter Chart

Let’s also add the table below this chart.‍

ScatterChart2

Step 4: Apply a date range filter

At this point, all the elements added to our dashboard use “Auto” as the date. When this is initially pulled, it shows the data from the last 28 days, but we can adjust it to show us data from a different period of time.

Data Studio offers a feature known as the “Date Range” filter. The same method is used to add this element. From the menu bar, select the date range filter and drag it to the desired place.‍

Date Range

You can now switch to view mode and see the filter in action. A date range can be selected for your dashboard here.

Any comparison elements you select to compare to the previous period, including scorecards, will compare whatever date range you select to that period. As an example, if your date range has 60 days, the comparison will include 60 days before that date range.‍

Graphics with range

There is also an option to set a default date range in the “Data” tab. The default setting is usually the last 30 days. The date selector popup can also be customized via the “Style” tab.

Step 5: Adding Text Headers and Images

Having added elements, you probably noticed that there were no headings. This can be a bit confusing for users. We may also wish to incorporate some branding or images to help users understand our newly created dashboard.

Text Headers

Text headers can be added very easily with Google Data Studio’s “Text” element. You can insert text by selecting “Text” from the dropdown menu. To create the desired look, we can change the size, color, and font weight in the text properties.‍

Text properties

Inserting Images

Adding an image to a dashboard might be useful for several reasons. Business owners usually include their company logo.

On the “Data” tab, select the “Select a file” button. Then drag a box to your dashboard. Select the image you wish to upload from your computer.‍

Data select a file

Our company logo has been added to this report, for example. Images on your dashboard can be resized or moved around.‍

Resize or move around

Step 6: Formatting

We have all the data we need to see, but our dashboard does not look very appealing. Google Data Studio allows you to make very simple style edits.

Global Styles

Normally, the Layout and Theme sidebar appears if no elements are selected. Our dashboard and all elements of it can be customized in this sidebar.‍

Theme layout

Under the theme tab, we can click on Customize and edit the theme,and after that we can edit:

Primary styles where we can change the background of the whole dashboard and primary text styles, as well as borders.

In Accent styles we can change the background color and text style of each component.

Textbox styles allows us to change the background of your text components, and also you can customize link color and visited link color.

Data styles include a chart palette, which represents the order of colors used across all charts. Every theme has its own default colors. The theme we are using for our dashboard has blue, red, yellow, green, etc. Our dashboard pie chart uses these same colors but in descending order. If you have brand colors, you might want to change them to your brands. Just ensure the colors are different enough to let you know which colors represent which data.‍

Edit theme

Last but not least, canvas size is under layout. Depending on your needs, your dashboard can be scaled to any size you require. The dimensions can be changed to fit all elements on one page or you can select 16:9 to use it on a widescreen TV.‍

Theme layout size

Element Styles

With Google Data Studio, you can customize each element’s style. Each element will be styled based on the global styles, but you can even override them.

A large number of elements also contain additional elements that can be styled. You can change the color of the alternating rows and the header of a table, for instance. Using pie charts, you can change the alignment and position of the legend. Styles vary from element to element. Take your time to explore each element.

Time for redesign

OK, so we’ve built our dashboard, we’ve added the data, we’ve learned a bit about styling, and now it’s time to make our dashboard look good. Your dashboard is yours, so make it unique to you. Here is what our before and after looked like when we applied our branding.‍
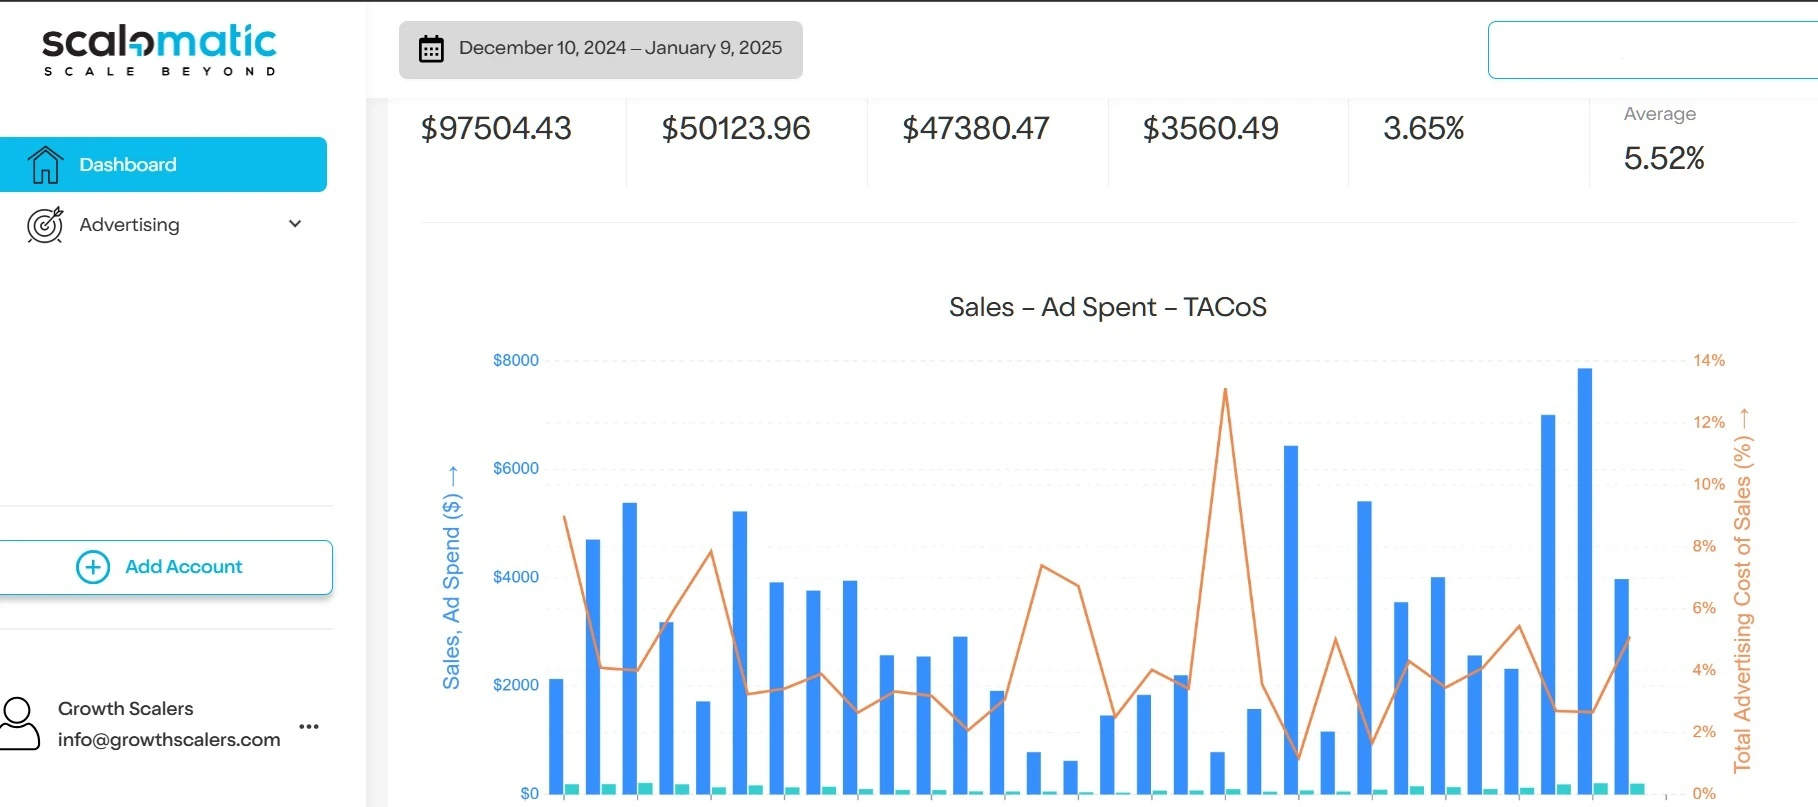
Branding1

‍

Branding2

‍

Create a Google Data Studio Dashboard in 6 steps

Tue Mar 12 2024 12:34:42 GMT+0000 (Coordinated Universal Time)

Millions of people around the world already use this free, powerful, and easy-to-learn Business Intelligence tool.

Amazon’s Climate Pledge Friendly program

If you’ve been wondering whether sustainability really matters in the eCommerce world, spoiler alert: it totally does! Let’s dive into Amazon’s Climate Pledge Friendly program and why it’s becoming such a big deal in the marketplace.
Crushing Numbers

Here’s something that’ll make you sit up straight – brands that joined the Climate Pledge Friendly program saw their sales shoot up by at least 12% in their first year. Not too shabby, right? As eCommerce experts who keep our eyes on marketplace trends, we’re pretty excited about what this means for sellers like you!
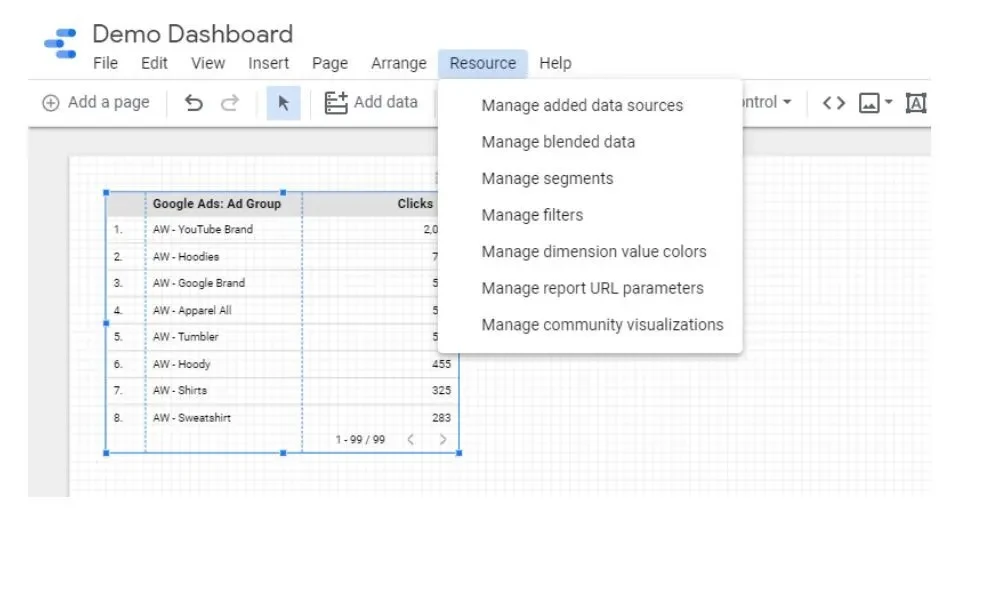
What’s Is Climate Pledge Friendly Program?

Think of it as Amazon’s way of giving eco-friendly products their time to shine. To get that sweet Climate Pledge Friendly badge, products need to score at least one certification from some pretty serious environmental organizations (we’re talking big names like Fairtrade, Rainforest Alliance, and Forest Stewardship Council).

The cool part? It works for practically everything – electronics, beauty products, household items, apparel – you name it! Over 1.4 million products are already rocking this badge on Amazon.

Here’s Where It Gets Really Interesting…

Ready for a mind-blowing stat? In 2023, over 37.6 million customers ditched traditional products for Climate Pledge Friendly alternatives. That’s a whopping 42% more than the year before! Talk about a trend catching fire, right?

Why This Matters For Your Business

If you’re selling on Amazon or considering it, this program is worth your attention. Customers are increasingly seeking sustainable products, and having the badge can make your eco-friendly items stand out. With sustainability becoming a major trend that isn’t slowing down, this could give you a competitive edge in your category.

Making the Most of This Opportunity

If you’re interested in getting your products certified for the Climate Pledge Friendly program, here’s what you should know:

  • Check out Amazon’s official Climate Pledge Friendly program page

  • Research which of the 50+ certifications might be right for your products

  • Consider this as part of your long-term Amazon selling strategy

‍The Bigger Picture

This isn’t just about a badge on Amazon – it’s about being part of a bigger movement in eCommerce. Consumers are becoming more environmentally conscious, and their shopping habits are reflecting that change. Whether you’re selling on Amazon, other marketplaces, or your own website, sustainability is becoming a key factor in purchase decisions.

Wrapping It Up

The Climate Pledge Friendly program is more than just another Amazon initiative – it’s a reflection of where consumer preferences are heading. With a 12% sales boost potential and millions of customers actively choosing sustainable products, it might be worth exploring for your business.

Stay tuned for more insights about the ever-evolving world of eCommerce! We love keeping our finger on the pulse of what’s happening across all major marketplaces, and we’ll keep sharing what we learn with our awesome community of sellers.

P.S. Have you noticed any changes in how customers respond to eco-friendly products in your business? We’d love to hear about your experiences!

Reference: Amazon Seller Central News

Amazon’s Climate Pledge Friendly program

Sat Feb 08 2025 22:32:49 GMT+0000 (Coordinated Universal Time)

Discover Amazon’s Climate Pledge Friendly program and how it boosts sales by spotlighting eco-friendly products. Embrace sustainability for success!

Amazon Virtual Bundles

In the competitive Amazon marketplace, sellers are constantly seeking innovative ways to increase sales and average order value. Enter Virtual Bundles – a game-changing feature that allows sellers to combine complementary products without the hassle of physical bundling or additional inventory management.

What Are Amazon Virtual Bundles?

Virtual bundles are digital combinations of two to five complementary products that are sold together on Amazon while being stored and shipped separately. This innovative approach offers sellers the flexibility to create attractive product combinations without the traditional constraints of physical bundling.

Why Virtual Bundles Matter for Your Amazon Business

1. Cross-Selling Mastery

Cross-selling is an art of strategic product pairing that transforms casual browsing into intentional purchasing. Virtual Bundles allow sellers to:

  • Create logical product combinations

  • Introduce customers to complimentary items

  • Increase product discovery

  • Leverage natural buying behaviors

  • Connect products across different categories


By strategically bundling items that solve customer problems or enhance product functionality, sellers can guide customers toward more comprehensive solutions, ultimately increasing total purchase value.

2. Increase Average Order Value

Virtual Bundles are a powerful mechanism to boost revenue without increasing customer acquisition costs:

  • Encourage larger single purchases

  • Provide built-in volume discounts

  • Create perceived value through the combination

  • Reduce individual product price sensitivity

  • Maximize revenue per customer interaction

The psychology of bundling makes customers feel they’re getting a better deal, motivating them to spend more than they initially intended.

3. Conquering Real Estate on Your Listing

Amazon’s competitive marketplace is a battlefield for visibility. Virtual Bundles offer a strategic advantage in occupying more digital shelf space:

  • Push down competitor advertisements

  • Increase cross-sell opportunities and average order value

  • Improve inventory turnover as you don’t need physical bundle

By creating sophisticated bundles, you’re not just selling products – you’re strategically positioning your offerings to dominate search results and minimize competitor exposure.

Creating Compelling Virtual Bundles: A Step-by-Step Guide

1. Image Preparation

Technical Requirements:

  • Resolution: 2000 x 2000 pixels

  • Background: Pure white

  • Format: High-quality digital render

  • Tool Recommendation: GIMP/Photoshop for image composition

‍

‍

Best Practices:

  • Ensure clear product visibility

  • Maintain professional appearance

  • Show scale relationships

  • Highlight bundle value

  • Use consistent lighting


2. Bundle Creation Process

  1. Navigate to Seller Central

  2. Access Brands → Virtual Bundles

  3. Select complementary products

  4. Upload optimized images

  5. Create compelling titles

  6. Craft engaging descriptions

  7. Set competitive pricing

  8. Add detailed bullet points

  9. Review and publish

‍

‍‍

3. Optimization Strategies

  • Use keyword-rich titles

  • Highlight savings

  • Feature unique benefits of each product

‍

4. Save and Publish

Advertising Limitations and Opportunities

One critical aspect of Virtual Bundles that sellers must understand is their unique advertising constraint. Unlike individual product listings, Virtual Bundles can only be advertised through Sponsored Brands campaigns. This limitation means:

  • Exclusive use of Sponsored Brands advertising

  • Requires brand registry enrollment

While this might seem restrictive, Sponsored Brands campaigns offer a great strategy to advertise, especially on competitors listing or on your own listing as an upsell/to protect your listing.

Conclusion

Virtual Bundles represent a powerful opportunity for Amazon sellers to increase sales without the traditional complexities of physical bundling. By following this comprehensive guide and maintaining focus on customer value, sellers can create successful bundle strategies that drive growth and enhance profitability.

Next Steps

Ready to revolutionize your Amazon selling strategy with Virtual Bundles? Growth Scalers’ team of Amazon experts can help you create, optimize, and manage winning virtual bundle campaigns. Contact us to unlock your products’ full potential on Amazon.

Product Bundle Inspiration: Real-World Examples

Beauty and Personal Care

Skincare Starter Kit:

  • Cleanser

  • Moisturizer

  • Facial serum

  • Travel-size makeup remover

Electronics and Accessories

Home Office Productivity Bundle:

  • Wireless mouse

  • Laptop stand

  • Ergonomic keyboard wristrest

  • Screen cleaning kit

Kitchen and Cooking

Baking Enthusiast Bundle:

  • Silicone baking mats

  • Measuring cups and spoons set

  • Decorative piping bags

  • Baking temperature conversion magnet

Fitness and Wellness

Home Workout Starter Pack:

  • Resistance bands

  • Yoga mat

  • Water bottle

  • Workout tracking journal

Pet Care

New Pet Owner Bundle:

  • Adjustable collar

  • ID tag

  • Training treats

  • Waste bag dispenser

  • Basic training guide

Home Organization

Closet Management Bundle:

  • Space-saving hangers

  • Closet dividers

  • Clothing storage boxes

  • Moth repellent sachets

Travel Accessories

Frequent Traveler Kit:

  • Portable phone charger

  • Universal travel adapter

  • Compact travel pillow

  • Noise-canceling earplugs

  • Passport wallet

Gardening

Urban Gardening Starter Set:

  • Herb seed collection

  • Small indoor planter

  • Soil nutrients

  • Gardening gloves

  • Plant care guide

Remember: Success in virtual bundling comes from understanding your customers’ needs and creating convenient, value-driven combinations that solve their problems. The perfect bundle anticipates customer challenges before they arise, offering comprehensive solutions that feel less like a purchase and more like a personalized problem-solving kit.

Amazon Virtual Bundles

Thu Nov 28 2024 19:47:49 GMT+0000 (Coordinated Universal Time)

Unlock the Power of Amazon Virtual Bundles: Boost Sales Without Inventory Hassles Discover how Amazon Virtual Bundles can transform your selling strategy by strategically combining products, increasing order value, and solving customer needs—all without complex inventory management.

Amazon Vine Program

In the competitive world of e-commerce, gaining traction for a new product can be challenging. The Amazon Vine program is a powerful tool that can potentially jumpstart your product’s success on the platform. We are going to cover in this article the Amazon Vine program, exploring the importance for product launches, when to use it, when to avoid it, and the associated costs.

What is the Amazon Vine Program?

The Amazon Vine program is an invitation-only service that allows brands to receive reviews for their products from a select group of Amazon customers known as “Vine Voices.” These reviewers are chosen based on their history of providing insightful and helpful reviews on Amazon. They receive free products from participating sellers and are required to submit honest, unbiased reviews within a specific timeframe.

The Importance of Amazon Vine for Product Launches

1. Boosting Conversion Rates

Getting initial reviews through the Vine program can significantly improve your product’s conversion rate. Customers are more likely to purchase a product when they see that other customers have had positive experiences with it. These early reviews provide social proof that can encourage potential buyers to make a purchase.

2. Enhancing Product Discovery

Having reviews helps your product stand out in Amazon’s search results. Products with reviews tend to catch the eye more readily, potentially leading to higher click-through rates. This increased visibility can be crucial in the competitive Amazon marketplace, especially for new products trying to gain traction.

3. Gathering Early Feedback and Assessing Product-Market Fit

The Vine program provides an excellent opportunity to receive early feedback on your product. This feedback can be invaluable in evaluating whether there’s a strong product-market fit or if the product needs adjustments. Vine reviewers often provide detailed insights that can help you identify potential improvements or confirm that your product meets market needs.

When to Use the Amazon Vine Program

1. New Product Launches

The Vine program is particularly beneficial when launching a new product. It can help you gain those crucial initial reviews that can make or break a product’s success on Amazon.

2. Entering Competitive Markets

If you’re introducing a product into a highly competitive category, Vine reviews can help your item stand out and compete with established brands.

3. Unique or Innovative Products

For products that are unique or require some explanation, Vine reviewers can provide detailed insights that help potential customers understand the product’s value.

When Not to Use the Amazon Vine Program

1. Products with Known Issues

If you’re aware of quality issues or potential problems with your product, it’s best to address these before entering the Vine program. Negative reviews from Vine Voices can be particularly damaging.

2. Very Low-Margin Products

Given the costs associated with the program (which we’ll discuss later), it may not be economically viable for products with very low profit margins.

3. When You’re Still Iterating on the Product

If you’re still in the process of refining your product based on feedback, it might be too early for the Vine program. It’s best to have a finalized version of your product before seeking reviews.

Pricing and Costs Associated with the Amazon Vine Program

1. Enrollment Fee

As of the latest update, Amazon has introduced a tiered fee structure for the Vine program:
$0 (new tier) – Enroll 1 to 2 units per parent ASIN and get up to 2 Vine reviews for free.
$75 (new tier) – Enroll 3 to 10 units per parent ASIN and get up to 10 Vine reviews.
$200 (existing tier) – Enroll 11 to 30 units per parent ASIN and get up to 30 Vine reviews.
These fees are non-refundable and are charged whether or not your product receives any reviews.

Important Warning: One-Time Enrollment

It’s crucial to note that once a product has been enrolled in the Vine program, it cannot be resubmitted. This means you have only one opportunity to gather Vine reviews for each product. Given this limitation, it’s generally advisable to aim for either 10 or 30 reviews from the start.

The rationale behind this recommendation is twofold:

Ten reviews represent a psychological threshold for many customers. Products with 10 or more reviews often appear more established and trustworthy.

If you opt for the free tier and receive only 1 or 2 reviews, you won’t have the option to enroll the same product again to reach that 10-review threshold.

Therefore, while the free tier might seem attractive, it may be more beneficial in the long run to invest in either the $75 tier (for up to 10 reviews) or the $200 tier (for up to 30 reviews). This strategy ensures you have a substantial number of reviews to boost your product’s credibility and visibility.

2. Product Cost

In addition to the enrollment fee, you’ll need to provide your products to Vine reviewers free of charge. You’re responsible for the cost of the products and any shipping fees to send them to Amazon’s fulfillment centers.

3. Fulfillment Cost

An often overlooked expense is the fulfillment cost. This includes the fees Amazon charges for picking, packing, and shipping your products to Vine reviewers. These costs can vary depending on the size and weight of your product, so it’s important to factor them into your overall budget for the Vine program.

4. Inventory Requirements

Amazon requires you to have sufficient inventory available for Vine reviewers. This usually means having at least 30 units available for each enrolled ASIN. Also, if you start getting some traction, you don’t want to run out of stock as it would impact your seller ranking.

Cost-Benefit Analysis

To determine if the Vine program is worth the investment for your product, consider the following:

Product Price Point: Higher-priced items may see a better return on investment from the program, as the cost of enrolling and providing free products is offset by potentially higher profit margins.

Competitive Landscape: In highly competitive niches, the cost of the Vine program might be justified by the potential boost in visibility and credibility.

Product Lifecycle: Consider how long you expect your product to be on the market. Longer-lived products may benefit more from early reviews.

Marketing Budget: Evaluate how the cost of the Vine program compares to other marketing initiatives you might undertake to promote your product.

Profit Margins: Ensure that your product’s profit margins can absorb the costs associated with the program while still remaining profitable.

Maximizing Your Success with the Amazon Vine Program

To get the most out of your investment in the Vine program, consider these strategies:

Choose Your Products Wisely: Select products that are likely to receive positive reviews and have a good profit margin to offset the program costs.

Ensure Product Quality: Before enrolling, thoroughly test your product to ensure it meets or exceeds expectations.

Provide Detailed Product Information: Give Vine reviewers comprehensive information about your product to help them write informed reviews.

Monitor and Respond to Reviews: While you can’t influence the content of Vine reviews, you can respond to them professionally, addressing any concerns raised.

Learn from Feedback: Use the insights from Vine reviews to improve your product or develop new ones.

Conclusion

The Amazon Vine program can be a powerful tool for launching new products on the platform, providing valuable early reviews that can boost visibility and credibility. However, it’s not without its costs and risks. By carefully considering your product, market position, and budget, you can determine whether the Vine program is the right choice for your Amazon selling strategy.

Remember, while the Vine program can provide a strong start, long-term success on Amazon depends on consistently delivering high-quality products and excellent customer service. Use the Vine program as part of a comprehensive strategy to establish and grow your presence on the world’s largest e-commerce platform.

Amazon Vine Program

Fri Aug 30 2024 08:24:31 GMT+0000 (Coordinated Universal Time)

How to launch new product with Amazon Vine Program

Amazon Seller Case Study Sonoma Linen

From Bricks and Mortar to Amazon

After decades of experience in the bricks-and-mortar business in the US, Sonoma Linen decided that it was time to diversify into new sales channels and start selling online.

Sonoma spent years traveling the world to get the best possible product. Their bed sheets are as soft as hotel bed sheets but for an affordable price. After growing their traditional business, they decided to leverage their experience, to take it online and start selling on Amazon.

‍The Complexity of Digital Sales

Sonoma started selling online in May 2020 and quickly realized how competitive the bedding and pillowcase category on Amazon was. Furthermore, to be profitable, they needed to ramp up their sales to reach an economy of scale and decrease inventory and logistic costs.

As an experienced businessman, Sonoma realized that e-commerce required a variety of skills such as SEO, product title optimization, sponsored product advertising, all of which he was not familiar with and so decided to get some help. He tried many different SaaS solutions and services of freelancers but each time they failed to provide the results required. After a while his sales started declining and he found that nobody cared about his business as much as he did.

‍Growth Scaler: Your Partner to grow your business

Sonoma was looking for a proactive partner that he could rely on and trust to take over the operation, meanwhile he could concentrate on the business strategy. Growth Scalers brought to the table the pallet of skillsets he was looking for. With both Sonoma’s understanding of customers and Growth Scalers’ Amazon know-how, they could quickly ramp up sales, improve seller ranking and get the Amazon Choice badge for most of the products, which in turn improved sales again.

“You guys are like a Mercedes, the best that someone can expect! Great job, good results, nice progress, well done.” – Sonoma Linen

Implementation and Impact

Growth Scalers first outlined the strategy and the middle and long-term action plan to scale up sales and reach an economy of scale.

Growth Scalers helped Sonoma Linen with:

  • Product Title Optimization to increase visibility

  • Improved product description, added video and pictures to improve conversion

  • SEO Keyword research to boost organic sales

  • Fix issues with Amazon Listing and inventory

  • Scaled up Sponsor Product keywords to reach more customers and double spends with the same ACOS

  • Forecasted inventory and took action before products went out of stock.

If you want to find out what is our secret to boost sales and conversions, check out our Ultimate Guide

‍‍‍‍‍‍‍‍

case-study-result-amazon-ppc-organic-sales

‍

‍

Amazon Seller Case Study Sonoma Linen

Tue Mar 12 2024 12:34:42 GMT+0000 (Coordinated Universal Time)

From Bricks and Mortar to Amazon.After decades of experience in the bricks-and-mortar business in the US, Sonoma Linen decided that it was time to diversify

Amazon SEO

Ranking organically helps you getting free sales on Amazon. You don’t need to pay any dollar in advertising. This can highly improve your bottom line.

Why Keywords Matter More Than You Think

Amazon’s search algorithm is based on product title and organic keywords. Keywords help you to be indexed for additional keywords that you don’t want to include in your title. Amazon will index your product for any combination of keywords in your title and in your organic keywords.

So for instance, if you are selling a product in different size and color but don’t want to have this in your title, you can add those keywords into the backend of your listing. Also, you should add any keywords that people could use if they search for your product in another language (for instance Spanish in the US, French in CA…)

Step-by-Step Keyword Research Procedure

Step 1: Competitor Analysis with Helium 10 Cerebro

  1. Identify Top Competitors

    • Select 9 top-performing competitor ASINs

    • Include 1 of your own product ASIN

  2. Run Cerebro with Precise Filters

    • Set Search Volume filter to 300+ searches

    • Choose “Organic” Match Type

    • Download results as CSV file

Step 2: Keyword Relevance Assessment

  1. Import CSV to Google Sheets

    • Use File > Import/Upload

    • Drag and drop the downloaded file

  1. Evaluate Keyword Relevancy

    • Use COUNTIF formula (=countif(G7:P7,”<30″))

    • Relevancy Scale:

      • 5-9 competitors ranking = High Relevance

      • Indicates high traffic and potential competition

  2. Keyword Selection

    • Filter keywords with relevancy ≥7

    • Copy Keyword Phrase column

Step 3: Keyword Optimization

  1. Keyword Refinement

    • Split keywords by words

    • Extract unique keywords using =UNIQUE() formula

  • Copy keywords to notepad to remove formatting

  1. Keyword Cleaning

    • Remove plural forms

    • Eliminate keywords already in product title

    • Ensure total byte count is under 251 bytes

Step 4: Implementing Keywords

  1. Amazon Seller Central

    • Go to Inventory > Manage All Inventory

    • Click ‘Edit’ for specific listing

    • Navigate to Product Details > Generic Keyword

    • Paste optimized keywords

    • Save changes

Pro Tips for Keyword Success

  • Regularly update your keyword strategy

  • Balance between high-volume and specific long-tail keywords

  • Monitor competitor keyword changes

Ready to Scale Your Amazon Business?

Keyword research is just the beginning. At Growth Scalers, we transform complex eCommerce challenges into growth opportunities. Our dedicated platform experts are ready to take your Amazon strategy to the next level.

Don’t let your products get lost in the Amazon marketplace. Let’s optimize your visibility together!

Amazon SEO

Tue Dec 03 2024 13:31:53 GMT+0000 (Coordinated Universal Time)

Unlock free Amazon sales with organic SEO strategies using Helium 10. Optimize without breaking the bank and watch your bottom line soar.